The Linux Users’ Guide
Copyright c 1993, 1994, 1996 Larry Greenfield
All you need to know to start using Linux, a free Unix clone. This manual covers the basic Unix commands,
as well as the more specific Linux ones. This manual is intended for the beginning Unix user, although
it may be useful for more experienced users for reference purposes.
i
UNIX is a trademark of X/Open
MS-DOS and Microsoft Windows are trademarks of Microsoft Corporation
OS/2 and Operating System/2 are trademarks of IBM
X Window System is a trademark of X Consortium, Inc.
Motif is a trademark of the Open Software Foundation
Linux is not a trademark, and has no connection to UNIX, Unix System Labratories, or to X/Open.
Please bring all unacknowledged trademarks to the attention of the author.
Copyright c Larry Greenfield
427 Harrison Avenue
Highland Park, NJ
08904
leg+@andrew.cmu.edu
Permission is granted to make and distribute verbatim copes of this manual provided the copyright
notice and this permission notice are preserved on all copies.
Permission is granted to copy and distribute modified versions of this manual under the conditions for
verbatim copying, provided also that the sections that reprint “The GNU General Public License”,
“The GNU Library General Public License”, and other clearly marked sections held under seperate
copyright are reproduced under the conditions given within them, and provided that the entire
resulting derived work is distributed under the terms of a permission notice identical to this one.
Permission is granted to copy and distribute translations of this manual into another language under
the conditions for modified versions. “The GNU General Public License” and “The GNU Library
General Public License” may be included in a translation approved by the Free Software Foundation
instead of in the original English.
At your option, you may distribute verbatim and modified versions of this document under the
terms of the GNU General Public License, excepting the clearly marked sections held under seperate
copyright.
Exceptions to these rules may be granted for various purposes: Write to Larry Greenfield at
the above address or email leg+@andrew.cmu.edu, and ask. It is requested (but not required) that
you notify the author whenever commercially or large-scale printing this document. Royalties and
donations are accepted and will encourage further editions.
ii
These are some of the typographical conventions used in this book.
Bold Used to mark new concepts, WARNINGS, and keywords in a language.
italics Used for emphasis in text.
slanted Used to mark meta-variables in the text, especially in representations of the
command line. For example, “ls -l foo” where foo would “stand for” a filename,
such as /bin/cp.
Typewriter Used to represent screen interaction.
Also used for code examples, whether it is “C” code, a shell script, or something
else, and to display general files, such as configuration files. When necessary for
clarity’s sake, these examples or figures will be enclosed in thin boxes.
Key Represents a key to press. You will often see it in this form: “Press return to
continue.”
3 A diamond in the margin, like a black diamond on a ski hill, marks “danger” or
“caution.” Read paragraphs marked this way carefully.
This X in the margin indicates special instructions for users of the X Window
System.
SLOW
This indicates a paragraph that contains special information that should be read
carefully.
Acknowledgments
The author would like to thank the following people for their invaluable help either with Linux itself,
or in writing The Linux Users’ Guide:
Linus Torvalds for providing something to write this manual about.
Karl Fogel has given me much help with writing my Linux documentation and wrote most of
Chapter 8 and Chapter 9. I cannot give him enough credit.
Maurizio Codogno wrote much of Chapter 11.
David Channon wrote the appendix on vi. (Appendix A)
Yggdrasil Computing, Inc. for their generous (and voluntary) support of this manual.
Red Hat Software for their (more recent and still voluntary!) support.
The fortune program for supplying me with many of the wonderful quotes that start each chap-
ter. They cheer me up, if no one else.
iii
iv
Contents
1 Introduction 3
1.1 Who Should Read This Book . . . . . . . . . . . . . . . . . . . . . . . . . . . . . . . 3
1.1.1 What You Should Have Done Before Reading This Book . . . . . . . . . . . . 3
1.2 How to Avoid Reading This Book . . . . . . . . . . . . . . . . . . . . . . . . . . . . 4
1.3 How to Read This Book . . . . . . . . . . . . . . . . . . . . . . . . . . . . . . . . . . 4
1.4 Linux Documentation . . . . . . . . . . . . . . . . . . . . . . . . . . . . . . . . . . . 5
1.4.1 Other Linux Books . . . . . . . . . . . . . . . . . . . . . . . . . . . . . . . . . 5
1.4.2 HOWTOs . . . . . . . . . . . . . . . . . . . . . . . . . . . . . . . . . . . . . . 5
1.4.3 What’s the Linux Documentation Project? . . . . . . . . . . . . . . . . . . . 6
1.5 Operating Systems . . . . . . . . . . . . . . . . . . . . . . . . . . . . . . . . . . . . . 6
2 What’s Unix, anyway? 9
2.1 Unix History . . . . . . . . . . . . . . . . . . . . . . . . . . . . . . . . . . . . . . . . 9
2.2 Linux History . . . . . . . . . . . . . . . . . . . . . . . . . . . . . . . . . . . . . . . . 10
2.2.1 Linux Now . . . . . . . . . . . . . . . . . . . . . . . . . . . . . . . . . . . . . 11
2.2.2 A Few Questions and Answers . . . . . . . . . . . . . . . . . . . . . . . . . . 11
2.2.3 Commercial Software in Linux . . . . . . . . . . . . . . . . . . . . . . . . . . 12
3 Getting Started 13
3.1 Power to the Computer . . . . . . . . . . . . . . . . . . . . . . . . . . . . . . . . . . 13
3.2 Linux Takes Over . . . . . . . . . . . . . . . . . . . . . . . . . . . . . . . . . . . . . . 14
3.3 The User Acts . . . . . . . . . . . . . . . . . . . . . . . . . . . . . . . . . . . . . . . 16
3.3.1 Logging In . . . . . . . . . . . . . . . . . . . . . . . . . . . . . . . . . . . . . 16
3.3.2 Leaving the Computer . . . . . . . . . . . . . . . . . . . . . . . . . . . . . . . 17
3.3.3 Turning the Computer Off . . . . . . . . . . . . . . . . . . . . . . . . . . . . . 17
v
vi CONTENTS
3.4 Kernel Messages . . . . . . . . . . . . . . . . . . . . . . . . . . . . . . . . . . . . . . 18
4 The Unix Shell 23
4.1 Unix Commands . . . . . . . . . . . . . . . . . . . . . . . . . . . . . . . . . . . . . . 23
4.1.1 A Typical Unix Command . . . . . . . . . . . . . . . . . . . . . . . . . . . . . 24
4.2 Helping Yourself . . . . . . . . . . . . . . . . . . . . . . . . . . . . . . . . . . . . . . 25
4.3 Storing Information . . . . . . . . . . . . . . . . . . . . . . . . . . . . . . . . . . . . 26
4.3.1 Looking at Directories with ls . . . . . . . . . . . . . . . . . . . . . . . . . . 27
4.3.2 The Current Directory and cd . . . . . . . . . . . . . . . . . . . . . . . . . . 29
4.3.3 Creating and Removing Directories . . . . . . . . . . . . . . . . . . . . . . . . 30
4.4 Moving Information . . . . . . . . . . . . . . . . . . . . . . . . . . . . . . . . . . . . 31
4.4.1 cp Like a Monk . . . . . . . . . . . . . . . . . . . . . . . . . . . . . . . . . . . 32
4.4.2 Pruning Back with rm . . . . . . . . . . . . . . . . . . . . . . . . . . . . . . . 33
4.4.3 A Forklift Can Be Very Handy . . . . . . . . . . . . . . . . . . . . . . . . . . 34
5 The X Window System 37
5.1 Starting and Stopping the X Window System . . . . . . . . . . . . . . . . . . . . . . 37
5.1.1 Starting X . . . . . . . . . . . . . . . . . . . . . . . . . . . . . . . . . . . . . . 37
5.1.2 Exiting X . . . . . . . . . . . . . . . . . . . . . . . . . . . . . . . . . . . . . . 37
5.2 What is The X Window System? . . . . . . . . . . . . . . . . . . . . . . . . . . . . . 38
5.3 What’s This on my Screen? . . . . . . . . . . . . . . . . . . . . . . . . . . . . . . . . 38
5.3.1 XClock . . . . . . . . . . . . . . . . . . . . . . . . . . . . . . . . . . . . . . . 39
5.3.2 XTerm . . . . . . . . . . . . . . . . . . . . . . . . . . . . . . . . . . . . . . . . 40
5.4 Window Managers . . . . . . . . . . . . . . . . . . . . . . . . . . . . . . . . . . . . . 40
5.4.1 When New Windows are Created . . . . . . . . . . . . . . . . . . . . . . . . . 40
5.4.2 Focus . . . . . . . . . . . . . . . . . . . . . . . . . . . . . . . . . . . . . . . . 41
5.4.3 Moving Windows . . . . . . . . . . . . . . . . . . . . . . . . . . . . . . . . . . 41
5.4.4 Depth . . . . . . . . . . . . . . . . . . . . . . . . . . . . . . . . . . . . . . . . 41
5.4.5 Iconization . . . . . . . . . . . . . . . . . . . . . . . . . . . . . . . . . . . . . 42
5.4.6 Resizing . . . . . . . . . . . . . . . . . . . . . . . . . . . . . . . . . . . . . . . 42
5.4.7 Maximization . . . . . . . . . . . . . . . . . . . . . . . . . . . . . . . . . . . . 43
5.4.8 Menus . . . . . . . . . . . . . . . . . . . . . . . . . . . . . . . . . . . . . . . . 43
5.5 X Attributes . . . . . . . . . . . . . . . . . . . . . . . . . . . . . . . . . . . . . . . . 43
CONTENTS vii
5.5.1 Geometry . . . . . . . . . . . . . . . . . . . . . . . . . . . . . . . . . . . . . . 43
5.5.2 Display . . . . . . . . . . . . . . . . . . . . . . . . . . . . . . . . . . . . . . . 44
5.6 Common Features . . . . . . . . . . . . . . . . . . . . . . . . . . . . . . . . . . . . . 44
5.6.1 Buttons . . . . . . . . . . . . . . . . . . . . . . . . . . . . . . . . . . . . . . . 45
5.6.2 Menu Bars . . . . . . . . . . . . . . . . . . . . . . . . . . . . . . . . . . . . . 45
5.6.3 Scroll Bars . . . . . . . . . . . . . . . . . . . . . . . . . . . . . . . . . . . . . 46
6 Working with Unix 49
6.1 Wildcards . . . . . . . . . . . . . . . . . . . . . . . . . . . . . . . . . . . . . . . . . . 49
6.1.1 What Really Happens? . . . . . . . . . . . . . . . . . . . . . . . . . . . . . . 50
6.1.2 The Question Mark . . . . . . . . . . . . . . . . . . . . . . . . . . . . . . . . 50
6.2 Time Saving with bash . . . . . . . . . . . . . . . . . . . . . . . . . . . . . . . . . . 51
6.2.1 Command-Line Editing . . . . . . . . . . . . . . . . . . . . . . . . . . . . . . 51
6.2.2 Command and File Completion . . . . . . . . . . . . . . . . . . . . . . . . . . 51
6.3 The Standard Input and The Standard Output . . . . . . . . . . . . . . . . . . . . . 52
6.3.1 Unix Concepts . . . . . . . . . . . . . . . . . . . . . . . . . . . . . . . . . . . 52
6.3.2 Output Redirection . . . . . . . . . . . . . . . . . . . . . . . . . . . . . . . . 52
6.3.3 Input Redirection . . . . . . . . . . . . . . . . . . . . . . . . . . . . . . . . . . 53
6.3.4 The Pipe . . . . . . . . . . . . . . . . . . . . . . . . . . . . . . . . . . . . . . 53
6.4 Multitasking . . . . . . . . . . . . . . . . . . . . . . . . . . . . . . . . . . . . . . . . 54
6.4.1 Using Job Control . . . . . . . . . . . . . . . . . . . . . . . . . . . . . . . . . 54
6.4.2 The Theory of Job Control . . . . . . . . . . . . . . . . . . . . . . . . . . . . 58
6.5 Virtual Consoles: Being in Many Places at Once . . . . . . . . . . . . . . . . . . . . 60
7 Powerful Little Programs 61
7.1 The Power of Unix . . . . . . . . . . . . . . . . . . . . . . . . . . . . . . . . . . . . . 61
7.2 Operating on Files . . . . . . . . . . . . . . . . . . . . . . . . . . . . . . . . . . . . . 62
7.3 System Statistics . . . . . . . . . . . . . . . . . . . . . . . . . . . . . . . . . . . . . . 63
7.4 What’s in the File? . . . . . . . . . . . . . . . . . . . . . . . . . . . . . . . . . . . . . 65
7.5 Information Commands . . . . . . . . . . . . . . . . . . . . . . . . . . . . . . . . . . 66
8 Editing files with Emacs 71
8.1 What’s Emacs? . . . . . . . . . . . . . . . . . . . . . . . . . . . . . . . . . . . . . . . 71
8.2 Getting Started Quickly in X . . . . . . . . . . . . . . . . . . . . . . . . . . . . . . . 73
viii CONTENTS
8.3 Editing Many Files at Once . . . . . . . . . . . . . . . . . . . . . . . . . . . . . . . . 74
8.4 Ending an Editing Session . . . . . . . . . . . . . . . . . . . . . . . . . . . . . . . . . 75
8.5 The Meta Key . . . . . . . . . . . . . . . . . . . . . . . . . . . . . . . . . . . . . . . 75
8.6 Cutting, Pasting, Killing and Yanking . . . . . . . . . . . . . . . . . . . . . . . . . . 76
8.7 Searching and Replacing . . . . . . . . . . . . . . . . . . . . . . . . . . . . . . . . . . 77
8.8 What’s Really Going On Here? . . . . . . . . . . . . . . . . . . . . . . . . . . . . . . 78
8.9 Asking Emacs for Help . . . . . . . . . . . . . . . . . . . . . . . . . . . . . . . . . . . 79
8.10 Specializing Buffers: Modes . . . . . . . . . . . . . . . . . . . . . . . . . . . . . . . . 79
8.11 Programming Modes . . . . . . . . . . . . . . . . . . . . . . . . . . . . . . . . . . . . 80
8.11.1 C Mode . . . . . . . . . . . . . . . . . . . . . . . . . . . . . . . . . . . . . . . 80
8.11.2 Scheme Mode . . . . . . . . . . . . . . . . . . . . . . . . . . . . . . . . . . . . 81
8.11.3 Mail Mode . . . . . . . . . . . . . . . . . . . . . . . . . . . . . . . . . . . . . 82
8.12 Being Even More Efficient . . . . . . . . . . . . . . . . . . . . . . . . . . . . . . . . . 82
8.13 Customizing Emacs . . . . . . . . . . . . . . . . . . . . . . . . . . . . . . . . . . . . . 83
8.14 Finding Out More . . . . . . . . . . . . . . . . . . . . . . . . . . . . . . . . . . . . . 87
9 I Gotta Be Me! 89
9.1 bash Customization . . . . . . . . . . . . . . . . . . . . . . . . . . . . . . . . . . . . 89
9.1.1 Shell Startup . . . . . . . . . . . . . . . . . . . . . . . . . . . . . . . . . . . . 89
9.1.2 Startup Files . . . . . . . . . . . . . . . . . . . . . . . . . . . . . . . . . . . . 90
9.1.3 Aliasing . . . . . . . . . . . . . . . . . . . . . . . . . . . . . . . . . . . . . . . 90
9.1.4 Environment Variables . . . . . . . . . . . . . . . . . . . . . . . . . . . . . . . 91
9.2 The X Window System Init Files . . . . . . . . . . . . . . . . . . . . . . . . . . . . . 97
9.2.1 Twm Configuration . . . . . . . . . . . . . . . . . . . . . . . . . . . . . . . . 99
9.2.2 Fvwm Configuration . . . . . . . . . . . . . . . . . . . . . . . . . . . . . . . . 104
9.3 Other Init Files . . . . . . . . . . . . . . . . . . . . . . . . . . . . . . . . . . . . . . . 105
9.3.1 The Emacs Init File . . . . . . . . . . . . . . . . . . . . . . . . . . . . . . . . 105
9.3.2 FTP Defaults . . . . . . . . . . . . . . . . . . . . . . . . . . . . . . . . . . . . 105
9.3.3 Allowing Easy Remote Access to Your Account . . . . . . . . . . . . . . . . . 106
9.3.4 Mail Forwarding . . . . . . . . . . . . . . . . . . . . . . . . . . . . . . . . . . 107
9.4 Seeing Some Examples . . . . . . . . . . . . . . . . . . . . . . . . . . . . . . . . . . . 107
CONTENTS ix
10 Talking to Others 109
10.1 Electronic Mail . . . . . . . . . . . . . . . . . . . . . . . . . . . . . . . . . . . . . . . 109
10.1.1 Sending Mail . . . . . . . . . . . . . . . . . . . . . . . . . . . . . . . . . . . . 109
10.1.2 Reading Mail . . . . . . . . . . . . . . . . . . . . . . . . . . . . . . . . . . . . 110
10.2 More than Enough News . . . . . . . . . . . . . . . . . . . . . . . . . . . . . . . . . . 111
10.3 Searching for People . . . . . . . . . . . . . . . . . . . . . . . . . . . . . . . . . . . . 111
10.3.1 The finger command . . . . . . . . . . . . . . . . . . . . . . . . . . . . . . . 111
10.3.2 Plans and Projects . . . . . . . . . . . . . . . . . . . . . . . . . . . . . . . . . 112
10.4 Using Systems by Remote . . . . . . . . . . . . . . . . . . . . . . . . . . . . . . . . . 112
10.5 Exchanging Files . . . . . . . . . . . . . . . . . . . . . . . . . . . . . . . . . . . . . . 113
10.6 Travelling the Web . . . . . . . . . . . . . . . . . . . . . . . . . . . . . . . . . . . . . 113
11 Funny Commands 115
11.1 find, the file searcher . . . . . . . . . . . . . . . . . . . . . . . . . . . . . . . . . . . 115
11.1.1 Generalities . . . . . . . . . . . . . . . . . . . . . . . . . . . . . . . . . . . . . 115
11.1.2 Expressions . . . . . . . . . . . . . . . . . . . . . . . . . . . . . . . . . . . . . 116
11.1.3 Options . . . . . . . . . . . . . . . . . . . . . . . . . . . . . . . . . . . . . . . 116
11.1.4 Tests . . . . . . . . . . . . . . . . . . . . . . . . . . . . . . . . . . . . . . . . . 117
11.1.5 Actions . . . . . . . . . . . . . . . . . . . . . . . . . . . . . . . . . . . . . . . 119
11.1.6 Operators . . . . . . . . . . . . . . . . . . . . . . . . . . . . . . . . . . . . . . 119
11.1.7 Examples . . . . . . . . . . . . . . . . . . . . . . . . . . . . . . . . . . . . . . 120
11.1.8 A last word . . . . . . . . . . . . . . . . . . . . . . . . . . . . . . . . . . . . . 121
11.2 tar, the tape archiver . . . . . . . . . . . . . . . . . . . . . . . . . . . . . . . . . . . 122
11.2.1 Introduction . . . . . . . . . . . . . . . . . . . . . . . . . . . . . . . . . . . . 122
11.2.2 Main options . . . . . . . . . . . . . . . . . . . . . . . . . . . . . . . . . . . . 122
11.2.3 Modifiers . . . . . . . . . . . . . . . . . . . . . . . . . . . . . . . . . . . . . . 122
11.2.4 Examples . . . . . . . . . . . . . . . . . . . . . . . . . . . . . . . . . . . . . . 122
11.3 dd, the data duplicator . . . . . . . . . . . . . . . . . . . . . . . . . . . . . . . . . . . 122
11.3.1 Options . . . . . . . . . . . . . . . . . . . . . . . . . . . . . . . . . . . . . . . 122
11.3.2 Examples . . . . . . . . . . . . . . . . . . . . . . . . . . . . . . . . . . . . . . 123
11.4 sort, the data sorter . . . . . . . . . . . . . . . . . . . . . . . . . . . . . . . . . . . . 124
11.4.1 Introduction . . . . . . . . . . . . . . . . . . . . . . . . . . . . . . . . . . . . 124
11.4.2 Options . . . . . . . . . . . . . . . . . . . . . . . . . . . . . . . . . . . . . . . 124
CONTENTS 1
11.4.3 Examples . . . . . . . . . . . . . . . . . . . . . . . . . . . . . . . . . . . . . . 124
12 Errors, Mistakes, Bugs, and Other Unpleasantries 125
12.1 Avoiding Errors . . . . . . . . . . . . . . . . . . . . . . . . . . . . . . . . . . . . . . . 125
12.2 What to do When Something Goes Wrong . . . . . . . . . . . . . . . . . . . . . . . . 126
12.3 Not Your Fault . . . . . . . . . . . . . . . . . . . . . . . . . . . . . . . . . . . . . . . 126
12.3.1 When Is There a Bug . . . . . . . . . . . . . . . . . . . . . . . . . . . . . . . 126
12.3.2 Reporting a Bug . . . . . . . . . . . . . . . . . . . . . . . . . . . . . . . . . . 127
A Introduction to Vi 129
A.1 A Quick History of Vi . . . . . . . . . . . . . . . . . . . . . . . . . . . . . . . . . . . 129
A.2 Quick Ed Tutorial . . . . . . . . . . . . . . . . . . . . . . . . . . . . . . . . . . . . . 130
A.2.1 Creating a file . . . . . . . . . . . . . . . . . . . . . . . . . . . . . . . . . . . 130
A.2.2 editing a existing file . . . . . . . . . . . . . . . . . . . . . . . . . . . . . . . . 131
A.2.3 Line numbers in detail . . . . . . . . . . . . . . . . . . . . . . . . . . . . . . . 131
A.3 Quick Vi Tutorial . . . . . . . . . . . . . . . . . . . . . . . . . . . . . . . . . . . . . . 133
A.3.1 Invoking vi . . . . . . . . . . . . . . . . . . . . . . . . . . . . . . . . . . . . . 133
A.3.2 Cursor movement commands . . . . . . . . . . . . . . . . . . . . . . . . . . . 133
A.3.3 Deleting text . . . . . . . . . . . . . . . . . . . . . . . . . . . . . . . . . . . . 134
A.3.4 File saving . . . . . . . . . . . . . . . . . . . . . . . . . . . . . . . . . . . . . 134
A.3.5 What’s next . . . . . . . . . . . . . . . . . . . . . . . . . . . . . . . . . . . . . 134
A.4 Advanced Vi Tutorial . . . . . . . . . . . . . . . . . . . . . . . . . . . . . . . . . . . 134
A.4.1 Moving around . . . . . . . . . . . . . . . . . . . . . . . . . . . . . . . . . . . 135
A.4.2 Modifing Text . . . . . . . . . . . . . . . . . . . . . . . . . . . . . . . . . . . 136
A.4.3 Copying and Moving sections of text . . . . . . . . . . . . . . . . . . . . . . . 138
A.4.4 Searching and replacing text . . . . . . . . . . . . . . . . . . . . . . . . . . . 140
B The GNU General Public License 143
C The GNU Library General Public License 151
2 CONTENTS
Chapter 1
Introduction
How much does it cost to entice a dope-smoking Unix system guru to Dayton?
Brian Boyle, Unix World’s First Annual Salary Survey
1.1 Who Should Read This Book
Are you someone who should read this book? Let’s answer by asking some other questions: Have
you just gotten Linux from somewhere, installed it, and want to know what to do next? Or are you
a non-Unix computer user who is considering Linux but wants to find out what it can do for you?
If you have this book, the answer to these questions is probably “yes.” Anyone who has Linux,
the free Unix clone written by Linus Torvalds, on their PC but doesn’t know what to do next should
read this book. In this book, we’ll cover most of the basic Unix commands, as well as some of the
more advanced ones. We’ll also talk about GNU Emacs, a powerful editor, and several other large
Unix applications.
1.1.1 What You Should Have Done Before Reading This Book
This book assumes that you have access to a Unix system. (It’s a bit hard to learn without getting
wet!) This Unix system is assumed to be an Intel PC running Linux. This requirement isn’t
necessary, but when versions of Unix differ, I’ll be talking about how Linux acts—nothing else.
Linux is available in many forms, called distributions. It is hoped that you’ve found a complete
distribution such as the Slackware, Redhat, or the MCC-Interim versions and have installed it.
There are differences between the various distributions of Linux, but for the most part they’re small
and unimportant. You may find differneces in the examples in this book. For the most part, these
should be fairly minor differences and are nothing to worry about. If there is a severe difference
between this book and your actual experience, please inform me, the author.
If you’re the superuser (the maintainer, the installer) of the system, you also should have created
a normal user account for yourself. Please consult the installation manual(s) for this information.
3
4 Chapter 1. Introduction
If you aren’t the superuser, you should have obtained an account from the superuser.
You should have time and patience. Learning Linux isn’t easy—most people find learning the
Macintosh Operating System is easier. Once you learn Linux things get a lot easier. Unix is a very
powerful system and it is very easy to do some complex tasks.
In addition, this book assumes that you are moderately familiar with some computer terms.
Although this requirement isn’t necessary, it makes reading the book easier. You should know about
computer terms such as ‘program’ and ‘execution’. If you don’t, you might want to get someone’s
help with learning Unix.
1.2 How to Avoid Reading This Book
The best way to learn about almost any computer program is at your computer. Most people find
that reading a book without using the program isn’t beneficial. The best way to learn Unix and
Linux is by using them. Use Linux for everything you can. Experiment. Don’t be afraid—it’s
possible to mess things up, but you can always reinstall. Keep backups and have fun!
Unix isn’t as intuitively obvious as some other operating systems. Thus, you will probably end
up reading at least Chapters 4, 5, and 6.
The number one way to avoid using this book is to use the on-line documentation that’s available.
Learn how to use the man command—it’s described in Section 4.2.
1.3 How to Read This Book
The suggested way of learning Unix is to read a little, then to play a little. Keep playing until you’re
comfortable with the concepts, and then start skipping around in the book. You’ll find a variety of
topics are covered, some of which you might find interesting and some of which you’ll find boring.
After a while, you should feel confident enough to start using commands without knowing exactly
what they should do. This is a good thing.
What most people regard as Unix is the Unix shell, a special program that interprets commands.
It is the program that controls the obvious “look and feel” of Unix. In practice, this is a fine way of
looking at things, but you should be aware that Unix really consists of many more things, or much
less. This book tells you about how to use the shell as well as some programs that Unix usually
comes with and some programs Unix doesn’t always come with (but Linux usually does).
The current chapter is a meta-chapter—it discusses this book and how to apply this book to
getting work done. The other chapters contain:
Chapter 2 discusses where Unix and Linux came from, and where they might be going. It also
talks about the Free Software Foundation and the GNU Project.
Chapter 3 talks about how to start and stop using your computer, and what happens at these
times. Much of it deals with topics not needed for using Linux, but still quite useful and
interesting.
1.4. Linux Documentation 5
Chapter 4 introduces the Unix shell. This is where people actually do work, and run programs.
It talks about the basic programs and commands you must know to use Unix.
Chapter 5 covers the X Window System. X is the primary graphical front-end to Unix, and some
distributions set it up by default.
Chapter 6 covers some of the more advanced parts of the Unix shell. Learning techniques described
in this chapter will help make you more efficent.
Chapter 7 has short descriptions of many different Unix commands. The more tools a user knows
how to use, the quicker he will get his work done.
Chapter 8 describes the Emacs text editor. Emacs is a very large program that integrates many
of Unix’s tools into one interface.
Chapter 9 talks about ways of customizing the Unix system to your personal tastes.
Chapter 10 investigates the ways a Unix user can talk to other machines around the world, in-
cluding electronic mail and the World Wide Web.
Chapter 11 describes some of the larger, harder to use commands.
Chapter 12 talks about easy ways to avoid errors in Unix and Linux.
1.4 Linux Documentation
This book, The Linux Users’ Guide, is intended for the Unix beginner. Luckily, the Linux Docu-
mentation Project is also writing books for the more experienced users.
1.4.1 Other Linux Books
The other books include Installation and Getting Started, a guide on how to aquire and install
Linux, The Linux System Adminstrator’s Guide, how to organize and maintain a Linux system,
and The Linux Kernel Hackers’ Guide, a book about how to modify Linux. The Linux Network
Administration Guide talks about how to install, configure, and use a network connection.
1.4.2 HOWTOs
In additon to the books, the Linux Documentation Project has made a series of short documents
describing how to setup a particular aspect of Linux. For instance, the SCSI-HOWTO describes some
of the complications of using SCSI—a standard way of talking to devices—with Linux.
These HOWTOs are available in several forms: in a bound book such as The Linux Bible or
Dr. Linux; in the newsgroup comp.os.linux.answers; or on various sites on the World Wide
Web. A central site for Linux information is http://www.linux.org.
6 Chapter 1. Introduction
1.4.3 What’s the Linux Documentation Project?
Like almost everything associated with Linux, the Linux Documentation Project is a collection
of people working across the globe. Originally organized by Lars Wirzenius, the Project is now
coordinated by Matt Welsh with help from Michael K. Johnson.
It is hoped that the Linux Documentation Project will supply books that will meet all the
needs of documenting Linux at some point in time. Please tell us if we’ve suceeded or what we
should improve on. You can contact the author at leg+@andrew.cmu.edu and/or Matt Welsh at
mdw@cs.cornell.edu.
1.5 Operating Systems
An operating system’s primary purpose is to support programs that actually do the work you’re
interested in. For instance, you may be using an editor so you can create a document. This editor
could not do its work without help from the operating system—it needs this help for interacting
with your terminal, your files, and the rest of the computer.
If all the operating system does is support your applications, why do you need a whole book
just to talk about the operating system? There are lots of routine maintenance activities (apart
from your major programs) that you also need to do. In the case of Linux, the operating system
also contains a lot of “mini-applications” to help you do your work more efficently. Knowing the
operating system can be helpful when you’re not working in one huge application.
Operating systems (frequently abbreviated as “OS”) can be simple and minimalist, like DOS,
or big and complex, like OS/2 or VMS. Unix tries to be a middle ground. While it supplies more
resources and does more than early operating systems, it doesn’t try to do everything. Unix was
originally designed as a simplification of an operating system named Multics.
The original design philosophy for Unix was to distribute functionality into small parts, the
programs.1
That way, you can easily achieve new functionality and new features by combining the
small parts (programs) in new ways. And if new utilities appear (and they do), you can integrate
them into your old toolbox. When I write this document, for example, I’m using these programs
actively; fvwm to manage my “windows”, emacs to edit the text, L
A
TEX to format it, xdvi to preview
it, dvips to prepare it for printing and then lpr to print it. If there was a different dvi previewer
available, I could use that instead of xdvi without changing my other programs. At the current time,
my system is running thirty eight programs simultaneously. (Most of these are system programs
that “sleep” until they have some specific work to do.)
When you’re using an operating system, you want to minimize the amount of work you put into
getting your job done. Unix supplies many tools that can help you, but only if you know what these
tools do. Spending an hour trying to get something to work and then finally giving up isn’t very
productive. This book will teach you what tools to use in what situations, and how to tie these
1This was actually determined by the hardware Unix original ran on. For some strange reason, the resulting
operating system was very useful on other hardware. The basic design is good enough to still be used twenty five
years later.
1.5. Operating Systems 7
various tools together.
The key part of an operating system is called the kernel. In many operating systems, like Unix,
OS/2, or VMS, the kernel supplies functions for running programs to use, and schedules them to be
run. It basically says program A can get so much time, program B can get this much time, and so
on. A kernel is always running: it is the first program to start when the system is turned on, and
the last program to do anything when the system is halted.
8 Chapter 1. Introduction
Chapter 2
What’s Unix, anyway?
Ken Thompson has an automobile which he helped design. Unlike most automobiles, it has
neither speedometer, nor gas gage, nor any of the numerous idiot lights which plague the
modern driver. Rather, if the driver makes any mistake, a giant “?” lights up in the center
of the dashboard. “The experienced driver,” he says, “will usually know what’s wrong.”
2.1 Unix History
In 1965, Bell Telephone Laboratories (Bell Labs, a division of AT&T) was working with General
Electric and Project MAC of MIT to write an operating system called Multics. To make a long
story slightly shorter, Bell Labs decided the project wasn’t going anywhere and broke out of the
group. This left Bell Labs without a good operating system.
Ken Thompson and Dennis Ritchie decided to sketch out an operating system that would meet
Bell Labs’ needs. When Thompson needed a development environment (1970) to run on a PDP-7,
he implemented their ideas. As a pun on Multics, Brian Kernighan, another Bell Labs researcher,
gave the system the name Unix.
Later, Dennis Ritchie invented the “C” programming language. In 1973, Unix was rewritten in
C instead of the original assembly language.1
In 1977, Unix was moved to a new machine through
a process called porting away from the PDP machines it had run on previously. This was aided by
the fact Unix was written in C since much of the code could simply be recompiled and didn’t have
to be rewritten.
In the late 1970’s, AT&T was forbidden from competing in the computing industry, so it licensed
Unix to various colleges and universities very cheaply. It was slow to catch on outside of academic
institutions but was eventually popular with businesses as well. The Unix of today is different
from the Unix of 1970. It has two major variations: System V, from Unix System Laboratories
1“Assembly language” is a very basic computer language that is tied to a particular type of computer. It is usually
considered a challenge to program in.
9
10 Chapter 2. What’s Unix, anyway?
(USL), a subsiderary of Novell2
, and the Berkeley Software Distribution (BSD). The USL version
is now up to its forth release, or SVR43
, while BSD’s latest version is 4.4. However, there are many
different versions of Unix besides these two. Most commercial versions of Unix derive from one of
the two groupings. The versions of Unix that are actually used usually incorporate features from
both variations.
Current commercial versions of Unix for Intel PCs cost between $500 and $2000.
2.2 Linux History
The primary author of Linux is Linus Torvalds. Since his original versions, it has been improved by
countless numbers of people around the world. It is a clone, written entirely from scratch, of the Unix
operating system. Neither USL, nor the University of California, Berkeley, were involved in writing
Linux. One of the more interesting facts about Linux is that development occurs simulataneously
around the world. People from Austrialia to Finland contributed to Linuxand will hopefully continue
to do so.
Linux began with a project to explore the 386 chip. One of Linus’s earlier projects was a program
that would switch between printing AAAA and BBBB. This later evolved to Linux.
Linux has been copyrighted under the terms of the GNU General Public License (GPL). This
is a license written by the Free Software Foundation (FSF) that is designed to prevent people from
restricting the distribution of software. In brief, it says that although you can charge as much as
you’d like for a copy, you can’t prevent the person you sold it to from giving it away for free. It also
means that the source code4
must also be available. This is useful for programmers. Anybody can
modify Linux and even distributed his/her modifications, provided that they keep the code under
the same copyright.
Linux supports most of popular Unix software, including the X Window System. The X Window
System was created at the Massachusetts Institute of Technology. It was written to allow Unix
systems to create graphical windows and easily interact with each other. Today, the X Window
System is used on every version of Unix available.
In addition to the two variations of Unix, System V and BSD, there is also a set of standardization
documents published by the IEEE entitled POSIX. Linux is first and foremost compliant with the
POSIX-1 and POSIX-2 documents. Its look and feel is much like BSD in some places, and somewhat
like System V in others. It is a blend (and to most people, a good one) of all three standards.
Many of the utilities included with Linux distributions are from the Free Software Foundation
and are part of GNU Project. The GNU Project is an effort to write a portable, advanced operating
system that will look a lot like Unix. “Portable” means that it will run on a variety of machines,
not just Intel PCs, Macintoshes, or whatever. The GNU Project’s operating system is called the
Hurd. The main difference between Linux and GNU Hurd is not in the user interface but in the
2It was recently sold to Novell. Previously, USL was owned by AT&T.
3A cryptic way of saying “system five, release four”.
4The source code of a program is what the programmer reads and writes. It is later translated into unreadable
machine code that the computer interprets.
2.2. Linux History 11
programmer’s interface—the Hurd is a modern operating system while Linux borrows more from
the original Unix design.
The above history of Linux is deficient in mentioning anybody besides Linux Torvalds. For
instance, H. J. Lu has maintained gcc and the Linux C Library (two items needed for all the
programs on Linux) since very early in Linux’s life. You can find a list of people who deserve to be
recognized on every Linux system in the file /usr/src/linux/CREDITS.
2.2.1 Linux Now
The first number in Linux’s version number indicates truly huge revisions. These change very slowly
and as of this writing (February, 1996) only version “1” is available. The second number indicates
less major revisions. Even second numbers signify more stable, dependable versions of Linuxwhile
odd numbers are developing versions that are more prone to bugs. The final version number is the
minor release number—every time a new version is released that may just fix small problems or add
minor features, that number is increased by one. As of February, 1996, the latest stable version is
1.2.11 and the latest development version is 1.3.61.
Linux is a large system and unfortunately contains bugs which are found and then fixed. Although
some people still experience bugs regularly, it is normally because of non-standard or faulty hardware;
bugs that effect everyone are now few and far between.
Of course, those are just the kernel bugs. Bugs can be present in almost every facet of the system,
and inexperienced users have trouble seperating different programs from each other. For instance,
a problem might arise that all the characters are some type of gibberish—is it a bug or a “feature”?
Surprisingly, this is a feature—the gibberish is caused by certain control sequences that somehow
appeared. Hopefully, this book will help you to tell the different situations apart.
2.2.2 A Few Questions and Answers
Before we embark on our long voyage, let’s get the ultra-important out of the way.
Question: Just how do you pronounce Linux?
Answer: According to Linus, it should be pronounced with a short ih sound, like prInt, mInImal,
etc. Linux should rhyme with Minix, another Unix clone. It should not be pronounced like (American
pronounciation of) the “Peanuts” character, Linus, but rather LIH-nucks. And the u is sharp as in
rule, not soft as in ducks. Linux should almost rhyme with “cynics”.
Question: Why work on Linux?
Answer: Why not? Linux is generally cheaper (or at least no more expensive) than other
operating systems and is frequently less problematic than many commercial systems. It might not
be the best system for your particular applications, but for someone who is interested in using Unix
applications available on Linux, it is a high-performance system.
12 Chapter 2. What’s Unix, anyway?
2.2.3 Commercial Software in Linux
There is a lot of commercial software available for Linux. Starting with Motif, a user interface for
the X Window System that vaguely resembles Microsoft Windows, Linux has been gaining more and
more commercial software. These days you can buy anything from Word Perfect (a popular word
processor) to Maple, a complex symbolic manipulation package, for Linux.
For any readers interested in the legalities of Linux, this is allowed by the Linux license. While
the GNU General Public License (reproduced in Appendix B) covers the Linux kernel and would
seemingly bar commercial software, the GNU Library General Public License (reproduced in Ap-
pendix C) covers most of the computer code applications depend on. This allows commercial software
providers to sell their applications and withhold the source code.
Please note that those two documents are copyright notices, and not licenses to use. They do not
regulate how you may use the software, merely under what circumstances you can copy it and any
derivative works. To the Free Software Foundation, this is an important distinction: Linux doesn’t
involve any “shrink-wrap” licenses but is merely protected by the same law that keeps you from
photocopying a book.
Chapter 3
Getting Started
This login session: $13.99, but for you $11.88.
You may have previous experience with MS-DOS or other single user operating systems, such
as OS/2 or the Macintosh. In these operating systems, you didn’t have to identify yourself to the
computer before using it; it was assumed that you were the only user of the system and could access
everything. Well, Unix is a multi-user operating system—not only can more than one person use it
at a time, different people are treated differently.
To tell people apart, Unix needs a user to identify him or herself1
by a process called logging in.
When you first turn on the computer a complex process takes place before the computer is ready
for someone to use it. Since this guide is geared towards Linux, I’ll tell you what happens during
the Linux boot-up sequence.
If you’re using Linux on some type of computer besides an Intel PC, some things in this chapter
won’t apply to you. Mostly, they’ll be in Section 3.1.
If you’re just interested in using your computer, you can skip all the information in the chapter
except for Section 3.3.
3.1 Power to the Computer
The first thing that happens when you turn an Intel PC on is that the BIOS executes. BIOS stands
for Basic Input/Output System. It’s a program permenantly stored in the computer on read-only
chips. It performs some minimal tests, and then looks for a floppy disk in the first disk drive. If it
finds one, it looks for a “boot sector” on that disk, and starts executing code from it, if any. If there
is a disk, but no boot sector, the BIOS will print a message like:
Non-system disk or disk error
1From here on in this book, I shall be using the masculine pronouns to identify all people. This is the standard
English convention, and people shouldn’t take it as a statement that only men can use computers.
13
14 Chapter 3. Getting Started
Figure 3.1 The path an Intel PC takes to get to a shell prompt. init may or may not start the X
Window System. If it does, xdm runs. Otherwise, getty runs.
BIOS
Linux
LILO
the kernel
the X Window System
the shell
init
bash
xdm
getty
login
Removing the disk and pressing a key will cause the boot process to continue.
If there isn’t a floppy disk in the drive, the BIOS looks for a master boot record (MBR) on
the hard disk. It will start executing the code found there, which loads the operating system. On
Linux systems, LILO, the LInux LOader, can occupy the MBR position, and will load Linux. For
now, we’ll assume that happens and that Linux starts to load. (Your particular distribution may
handle booting from the hard disk differently. Check with the documentation included with the
distribution. Another good reference is the LILO documentation, [1].)
3.2 Linux Takes Over
After the BIOS passes control to LILO, LILO passes control to the Linux kernel. A kernel is the
central program of the operating system, in control of all other programs. The first thing that Linux
does once it starts executing is to change to protected mode. The 803862
CPU that controls your
computer has two modes called “real mode” and “protected mode”. DOS runs in real mode, as does
the BIOS. However, for more advanced operating systems, it is necessary to run in protected mode.
Therefore, when Linux boots, it discardes the BIOS.
Other CPUs will get to this stage differently. No other CPU needs to switch into protected mode
and few have to have such a heavy framework around the loading procedure as LILO and the BIOS.
Once the kernel starts up, Linux works much the same.
Linux then looks at the type of hardware it’s running on. It wants to know what type of hard
disks you have, whether or not you have a bus mouse, whether or not you’re on a network, and other
bits of trivia like that. Linux can’t remember things between boots, so it has to ask these questions
each time it starts up. Luckily, it isn’t asking you these questions—it is asking the hardware! During
2When I refer to the 80386, I am also talking about the 80486, Pentium, and Pentium Pro computers unless I
specifically say so. Also, I’ll be abbreviating 80386 as 386.
3.2. Linux Takes Over 15
boot-up, the Linux kernel will print variations on several messages. You can read about the messages
in Section 3.4. This query process can some cause problems with your system but if it was going
to, it probably would have when you first installed Linux. If you’re having problems, consult your
distribution’s documentation.
The kernel merely manages other programs, so once it is satisfied everything is okay, it must
start another program to do anything useful. The program the kernel starts is called init . (Notice
the difference in font. Things in this font are usually the names of programs, files, directories, or
other computer related items.) After the kernel starts init, it never starts another program. The
kernel becomes a manager and a provider, not an active program.
So to see what the computer is doing after the kernel boots up, we’ll have to examine init. init
goes through a complicated startup sequence that isn’t the same for all computers. Linux has many
different versions of init, and each does things its own way. It also matters whether your computer
is on a network and what distribution you used to install Linux. Some things that might happen
once init is started:
• The file systems might be checked. What is a file system? A file system is the layout of files on
the hard disk. It let’s Linux know which parts of the disk are already used, and which aren’t.
(It’s like an index to a rather large filing system or a card catalog to a library.) Unfortunately,
due to various factors such as power losses, what the file system information thinks is going
on in the rest of the disk and the actually layout of the rest of the disk are occasionally in
conflict. A special program, called fsck, can find these situations and hopefully correct them.
• Special routing programs for networks are run. These programs tell your computer how it’s
suppose to contact other computers.
• Temporary files left by some programs may be deleted.
• The system clock can be correctly updated. This is trickier then one might think, since Unix,
by default, wants the time in UCT (Universal Coordinated Time, also known as Greenwich
Mean Time) and your CMOS clock, a battery powered clock in your computer, is probably set
on local time. This means that some program must read the time from your hardware clock
and correct it to UCT.
After init is finished with its duties at boot-up, it goes on to its regularly scheduled activities.
init can be called the parent of all processes on a Unix system. A process is simply a running
program. Since one program can be running two or more times, there can be two or more processes
for any particular program.
In Unix, a process, an instance of a program, is created by a system call—a service provided by
the kernel—called fork. (It’s called “fork” since one process splits off into two seperate ones.) init
forks a couple of processes, which in turn fork some of their own. On your Linux system, what init
runs are several instances of a program called getty. getty is the program that will allow a user to
login and eventually calls a program called login.
16 Chapter 3. Getting Started
3.3 The User Acts
3.3.1 Logging In
The first thing you have to do to use a Unix machine is to identify yourself. The login is Unix’s way
of knowing that users are authorized to use the system. It asks for an account name and password.
An account name is normally similar to your regular name; you should have already received one
from your system administrator, or created your own if you are the system administrator. (Infor-
mation on doing this should be available in Installation and Getting Started or The Linux System
Adminstrator’s Guide.)
You should see, after all the boot-up procedures are done, something like the following (the first
line is merely a greeting message—it might be a disclaimer or anything else):
Welcome to the mousehouse. Please, have some cheese.
mousehouse login:
However, it’s possible that what the system presents you with does not look like this. Instead of
a boring text mode screen, it is graphical. However, it will still ask you to login, and will function
mostly the same way. If this is the case on your system, you are going to be using The X Window
System. This means that you will be presented with a windowing system. Chapter 5 will discuss
some of the differences that you’ll be facing. Logging in will be similar as will the basics to much of
Unix. If you are using X, look for a giant X is the margin.
This is, of course, your invitation to login. Throughout this manual, we’ll be using the fictional
(or not so fictional, depending on your machine) user larry. Whenever you see larry, you should
be substituting your own account name. Account names are usually based on real names; bigger,
more serious Unix systems will have accounts using the user’s last name, or some combination of
first and last name, or even some numbers. Possible accounts for Larry Greenfield might be: larry,
greenfie, lgreenfi, lg19.
mousehouse is, by the way, the “name” of the machine I’m working on. It is possible that when
you installed Linux, you were prompted for some very witty name. It isn’t very important, but
whenever it comes up, I’ll be using mousehouse or, rarely, lionsden when I need to use a second
system for clarity or contrast.
After entering larry and pressing return , I’m faced with the following:
mousehouse login: larry
Password:
What Linux is asking for is your password. When you type in your password, you won’t be able
to see what you type. Type carefully: it is possible to delete, but you won’t be able to see what you
are editing. Don’t type too slowly if people are watching—they’ll be able to learn your password. If
you mistype, you’ll be presented with another chance to login.
If you’ve typed your login name and password correctly, a short message will appear, called
the message of the day. This could say anything—the system adminstrator decides what it should
3.3. The User Acts 17
be. After that, a prompt appears. A prompt is just that, something prompting you for the next
command to give the system. It should look something like this:
/home/larry#
If you’ve already determined you’re using X, you’ll probably see a prompt like the one above
in a “window” somewhere on the screen. (A “window” is a rectangular box.) To type into the
prompt, move the mouse cursor (it probably looks like a big “x” or an arrow) using the mouse into
the window.
3.3.2 Leaving the Computer
Do not just turn off the computer! You risk losing valuable data!
SLOW Unlike most versions of DOS, it’s a bad thing to just hit the power switch when you’re done
using the computer. It is also bad to reboot the machine (with the reset button) without first taking
proper precautions. Linux, in order to improve performance, has a disk cache. This means it
temporarily stores part of the computer’s permanent storage in RAM.3
The idea of what Linux
thinks the disk should be and what the disk actually contains is syncronized every 30 seconds. In
order to turn off or reboot the computer, you’ll have to go through a procedure telling it to stop
caching disk information.
If you’re done with the computer, but are logged in (you’ve entered a username and password),
first you must logout. To do so, enter the command logout. All commands are sent by pressing
return . Until you hit return nothing will happen and you can delete what you’ve done and start
over.
/home/larry# logout
Welcome to the mousehouse. Please, have some cheese.
mousehouse login:
Now another user can login.
3.3.3 Turning the Computer Off
If this is a single user system, you might want to turn the computer off when you’re done with it.4
To do so, you’ll have to log into a special account called root. The root account is the system
adminstrator’s account and can access any file on the system. If you’re going to turn the computer
3The difference between “RAM” and a hard disk is like the difference between short term memory and long term
memory. Shutting off the power is like giving the computer a knock on the head—it’ll forget everything in short term
memory. But things saved in long term memory, the hard disk, will be okay. The disk is thousands of times slower
than RAM.
4To avoid possibly weakening some hardware components, only turn off the computer when you’re done for the
day. Turning the computer on and off once a day is probably the best compromise between energy and wear & tear
on the system.
18 Chapter 3. Getting Started
off, get the password from the system adminstrator. (In a single user system, that’s you! Make sure
you know the root password.) Login as root:
mousehouse login: root
Password:
Linux version 1.3.55 (root@mousehouse) #1 Sun Jan 7 14:56:26 EST 1996
/# shutdown now
Why? end of the day
URGENT: message from the sysadmin:
System going down NOW
... end of the day ...
Now you can turn off the power...
The command shutdown now prepares the system to be reset or turned off. Wait for a message
saying it is safe to and then reset or turn off the system. (When the system asks you “Why?”, it
is merely asking for a reason to tell other users. Since no one is using the system when you shut it
down, you can tell it anything you want or nothing at all.)
A quick message to the lazy: an alternative to the logout/login approach is to use the command
su. As a normal user, from your prompt, type su and press return . It should prompt you for
the root password, and then give you root privileges. Now you can shutdown the system with the
shutdown now command.
3.4 Kernel Messages
When you first start your computer, a series of messages flash across the screen describing the
hardware that is attached to your computer. These messages are printed by the Linux kernel. In
this section, I’ll attempt to describe and explain those messages.
Naturally, these messages differ from machine to machine. I’ll describe the messages I get for
my machine. The following example contains all of the standard messages and some specific ones.
(In general, the machine I’m taking this from is a minimally configured one: you won’t see a lot of
device specific configuration.) This was made with Linux version 1.3.55—one of the most recent as
of this writing.
1. The first thing Linux does is decides what type of video card and screen you have, so it can
pick a good font size. (The smaller the font, the more that can fit on the screen on any one
time.) Linux may ask you if you want a special font, or it might have had a choice compiled
in.5
Console: 16 point font, 400 scans
Console: colour VGA+ 80x25, 1 virtual console (max 63)
5“Compiled” is the process by which a computer program that a human writes gets translated into something the
computer understands. A feature that has been “compiled in” has been included in the program.
3.4. Kernel Messages 19
In this example, the machine owner decided he wanted the standard, large font at compile time.
Also, note the misspelling of the word “color.” Linus evidently learned the wrong version of
English.
2. The next thing the kernel will report is how fast your system is, as measured by “BogoMIPS”.
A “MIP” stands for a million instructions per second, and a “BogoMIP” is a “bogus MIP”: how
many times the computer can do absolutely nothing in one second. (Since this loop doesn’t
actually do anything, the number is not actually a measure of how fast the system is.) Linux
uses this number when it needs to wait for a hardware device.
Calibrating delay loop.. ok - 33.28 BogoMIPS
3. The Linux kernel also tells you a little about memory usage:
Memory: 23180k/24576k available (544k kernel code, 384k reserved, 468k data)
This said that the machine had 24 megabytes of memory. Some of this memory was reserved
for the kernel. The rest of it can be used by programs. This is the temporary RAM that is
used only for short term storage. Your computer also has a permanent memory called a hard
disk. The hard disk’s contents stay around even when power is turned off.
4. Throughout the bootup procedure, Linux tests different parts of the hardware and prints
messages about these tests.
This processor honours the WP bit even when in supervisor mode. Good.
5. Now Linux moves onto the network configuration. The following should be described in The
Linux Networking Guide, and is beyond the scope of this document.
Swansea University Computer Society NET3.033 for Linux 1.3.50
IP Protocols: ICMP, UDP, TCP
6. Linux supports a FPU, a floating point unit. This is a special chip (or part of a chip, in the
case of a 80486DX CPU) that performs arithmetic dealing with non-whole numbers. Some of
these chips are bad, and when Linux tries to identify these chips, the machine “crashes”. The
machine stops functioning. If this happens, you’ll see:
Checking 386/387 coupling...
Otherwise, you’ll see:
Checking 386/387 coupling... Ok, fpu using exception 16 error reporting.
if you’re using a 486DX. If you are using a 386 with a 387, you’ll see:
Checking 386/387 coupling... Ok, fpu using irq13 error reporting.
7. It now runs another test on the “halt” instruction.
Checking ’hlt’ instruction... Ok.
8. After that initial configuration, Linux prints a line identifying itself. It says what version it is,
what version of the GNU C Compiler compiled it, and when it was compiled.
Linux version 1.3.55 (root@mousehouse) (gcc version 2.7.0) #1 Sun Jan 7 14:56:26 EST 1996
20 Chapter 3. Getting Started
9. The serial driver has started to ask questions about the hardware. A driver is a part of the
kernel that controls a device, usually a peripheral. It is responsible for the details of how
the CPU communicates with the device. This allows people who write user applications to
concentrate on the application: they don’t have to worry about exactly how the computer
works.
Serial driver version 4.11 with no serial options enabled
tty00 at 0x03f8 (irq = 4) is a 16450
tty01 at 0x02f8 (irq = 3) is a 16450
tty02 at 0x03e8 (irq = 4) is a 16450
Here, it found 3 serial ports. A serial port is the equivalent of a DOS COM port, and is a device
normally used to communicate with modems and mice.
What it is trying to say is that serial port 0 (COM1) has an address of 0x03f8. When it
interrupts the kernel, usually to say that it has data, it uses IRQ 4. An IRQ is another means
of a peripheral talking to the software. Each serial port also has a controller chip. The usual
one for a port to have is a 16450; other values possible are 8250 and 16550.
10. Next comes the parallel port driver. A parallel port is normally connected to a printer, and
the names for the parallel ports (in Linux) start with lp. lp stands for Line Printer, although
in modern times it makes more sense for it to stand for Laser Printer. (However, Linux will
happily communicate with any sort of parallel printer: dot matrix, ink jet, or laser.)
lp0 at 0x03bc, (polling)
That message says it has found one parallel port, and is using the standard driver for it.
11. Linux next identifies your hard disk drives. In the example system I’m showing you, mousehouse,
I’ve installed two IDE hard disk drives.
hda: WDC AC2340, 325MB w/127KB Cache, CHS=1010/12/55
hdb: WDC AC2850F, 814MB w/64KB Cache, LBA, CHS=827/32/63
12. The kernel now moves onto looking at your floppy drives. In this example, the machine has
two drives: drive “A” is a 5 1/4 inch drive, and drive “B” is a 3 1/2 inch drive. Linux calls
drive “A” fd0 and drive “B” fd1.
Floppy drive(s): fd0 is 1.44M, fd1 is 1.2M
floppy: FDC 0 is a National Semiconductor PC87306
13. The next driver to start on my example system is the SLIP driver. It prints out a message
about its configuration.
SLIP: version 0.8.3-NET3.019-NEWTTY (dynamic channels, max=256) (6 bit encapsulation enabled)
CSLIP: code copyright 1989 Regents of the University of California
14. The kernel also scans the hard disks it found. It will look for the different partitions on each
of them. A partition is a logical separation on a drive that is used to keep operating systems
from interfering with each other. In this example, the computer had two hard disks (hda, hdb)
with four partitions and one partition, respectively.
3.4. Kernel Messages 21
Partition check:
hda: hda1 hda2 hda3 hda4
hdb: hdb1
15. Finally, Linux mounts the root partition. The root partition is the disk partition where
the Linux operating system resides. When Linux “mounts” this partition, it is making the
partition available for use by the user.
VFS: Mounted root (ext2 filesystem) readonly.
22 Chapter 3. Getting Started
Chapter 4
The Unix Shell
Making files is easy under the UNIX operating system. Therefore, users tend to create
numerous files using large amounts of file space. It has been said that the only standard
thing about all UNIX systems is the message-of-the-day telling users to clean up their files.
System V.2 administrator’s guide
4.1 Unix Commands
When you first log into a Unix system, you are presented with something that looks like the following:
/home/larry#
That “something” is called a prompt. As its name would suggest, it is prompting you to enter
a command. Every Unix command is a sequence of letters, numbers, and characters. There are no
spaces, however. Some valid Unix commands are mail, cat, and CMU is Number-5. Some characters
aren’t allowed—we’ll go into that later. Unix is also case-sensitive. This means that cat and Cat
are different commands.1
The prompt is displayed by a special program called the shell. Shells accept commands, and
run those commands. They can also be programmed in their own language, and programs written
in that language are called “shell scripts”.
There are two major types of shells in Unix: Bourne shells and C shells. Bourne shells are named
after their inventor, Steven Bourne. Steven Bourne wrote the original Unix shell sh, and most shells
since then end in the letters sh to indicate they are extentions on the original idea. There are many
implementations of his shell, and all those specific shell programs are called Bourne shells. Another
class of shells, C shells (originally implemented by Bill Joy), are also common. Traditionally, Bourne
shells have been used for shell scripts and compatibility with the original sh while C shells have been
1Case sensitivity is a very personal thing. Some operating systems, such as OS/2 or Windows NT are case
preserving, but not case sensitive. In practice, Unix rarely uses the different cases. It is unusual to have a situation
where cat and Cat are different commands.
23
24 Chapter 4. The Unix Shell
used for interactive use. (C shells have had the advantages of having better interactive features but
somewhat harder programming features.)
Linux comes with a Bourne shell called bash, written by the Free Software Foundation. bash
stands for Bourne Again Shell, one of the many bad puns in Unix. It is an “advanced” Bourne
shell: it contains the standard programming features found in all Bourne shells with many interactive
features commonly found in C shells. bash is the default shell to use running Linux.
When you first login, the prompt is displayed by bash, and you are running your first Unix
program, the bash shell. As long as you are logged in, the bash shell will constantly be running.
4.1.1 A Typical Unix Command
The first command to know is cat. To use it, type cat, and then return :
/home/larry# cat
If you now have a cursor on a line by itself, you’ve done the correct thing. There are several
variances you could have typed—some would work, some wouldn’t.
• If you misspelled cat, you would have seen
/home/larry# ct
ct: command not found
/home/larry#
Thus, the shell informs you that it couldn’t find a program named “ct” and gives you another
prompt to work with. Remember, Unix is case sensitive: CAT is a misspelling.
• You could have also placed whitespace before the command, like this:2
/home/larry# cat
This produces the correct result and runs the cat program.
• You might also press return on a line by itself. Go right ahead—it does absolutely nothing.
I assume you are now in cat. Hopefully, you’re wondering what it is doing. No, it is not a game.
cat is a useful utility that won’t seem useful at first. Type anything and hit return. What you
should have seen is:
/home/larry# cat
Help! I’m stuck in a Linux program!
2The ‘ ’ indicates that the user typed a space.
4.2. Helping Yourself 25
(The slanted text indicates what I typed to cat.) What cat seems to do is echo the text right
back at yourself. This is useful at times, but isn’t right now. So let’s get out of this program and
move onto commands that have more obvious benefits.
To end many Unix commands, type Ctrl-d 3
. Ctrl-d is the end-of-file character, or EOF for
short. Alternatively, it stands for end-of-text, depending on what book you read. I’ll refer to it as
an end-of-file. It is a control character that tells Unix programs that you (or another program) is
done entering data. When cat sees you aren’t typing anything else, it terminates.
For a similar idea, try the program sort. As its name indicates, it is a sorting program. If
you type a couple of lines, then press Ctrl-d , it will output those lines in a sorted order. These
types of programs are called filters, because they take in text, filter it, and output the text slightly
differently. Both cat and sort are unusual filters. cat is unusual because it reads in text and
performs no changes on it. sort is unusual because it reads in lines and doesn’t output anything
until after it’s seen the EOF character. Many filters run on a line-by-line basis: they will read in a
line, perform some computations, and output a different line.
4.2 Helping Yourself
The man command displays reference pages for the command4
you specify. For example:
/home/larry# man cat
cat(1) cat(1)
NAME
cat - Concatenates or displays files
SYNOPSIS
cat [-benstuvAET] [--number] [--number-nonblank] [--squeeze-blank]
[--show-nonprinting] [--show-ends] [--show-tabs] [--show-all]
[--help] [--version] [file...]
DESCRIPTION
This manual page documents the GNU version of cat ...
There’s about one full page of information about cat. Try running man now. Don’t expect to
understand the manpage given. Manpages usually assume quite a bit of Unix knowledge—knowledge
that you might not have yet. When you’ve read the page, there’s probably a little black block at the
bottom of your screen similar to “--more--” or “Line 1”. This is the more-prompt, and you’ll
learn to love it.
3Hold down the key labeled “Ctrl” and press “d”, then let go of both.
4man will also display information on a system call, a subroutine, a file format, and more. In the original version
of Unix it showed the exact same information the printed documentation would. For now, you’re probably only
interested in getting help on commands.
26 Chapter 4. The Unix Shell
Instead of just letting the text scroll away, man stops at the end of each page, waiting for you
to decide what to do now. If you just want to go on, press Space and you’ll advance a page. If
you want to exit (quit) the manual page you are reading, just press q . You’ll be back at the shell
prompt, and it’ll be waiting for you to enter a new command.
There’s also a keyword function in man. For example, say you’re interested in any commands
that deal with Postscript, the printer control language from Adobe. Type man -k ps or man -k
Postscript, you’ll get a listing of all commands, system calls, and other documented parts of Unix
that have the word “ps” (or “Postscript”) in their name or short description. This can be very useful
when you’re looking for a tool to do something, but you don’t know it’s name—or if it even exists!
4.3 Storing Information
Filters are very useful once you are an experienced user, but they have one small problem. How do
you store the information? Surely you aren’t expected to type everything in each time you are going
to use the program! Of course not. Unix provides files and directories.
A directory is like a folder: it contains pieces of paper, or files. A large folder can even hold
other folders—directories can be inside directories. In Unix, the collection of directories and files is
called the file system. Initially, the file system consists of one directory, called the “root” directory.
Inside this directory, there are more directories, and inside those directories are files and yet more
directories.5
Each file and each directory has a name. It has both a short name, which can be the same as
another file or directory somewhere else on the system, and a long name which is unique. A short
name for a file could be joe, while it’s “full name” would be /home/larry/joe. The full name is
usually called the path. The path can be decode into a sequence of directories. For example, here
is how /home/larry/joe is read:
/home/larry/joe
The initial slash indicates the root directory.
This signifies the directory called home. It is inside the root directory.
This is the directory larry, which is inside home.
joe is inside larry. A path could refer to either a directory or a filename,
so joe could be either. All the items before the short name must be directories.
An easy way of visualizing this is a tree diagram. To see a diagram of a typical Linux system,
look at Figure 4.1. Please note that this diagram isn’t complete—a full Linux system has over 8000
files!—and shows only some of the standard directories. Thus, there may be some directories in
that diagram that aren’t on your system, and your system almost certainly has directories not listed
there.
5There may or may not be a limit to how “deep” the file system can go. (I’ve never reached it—one can easily
have directories 10 levels deep.)
4.3. Storing Information 27
Figure 4.1 A typical (abridged) Unix directory tree.
/ bin
dev
etc
home larry
sam
lib
proc
tmp
usr X11R6
bin
emacs
etc
g++-include
include
lib
local bin
emacs
etc
lib
man
spool
src linux
tmp
4.3.1 Looking at Directories with ls
Now that you know that files and directories exist, there must be some way of manipulating them.
Indeed there is. The command ls is one of the more important ones. It lists files. If you try ls as
a command, you’ll see:
/home/larry# ls
/home/larry#
That’s right, you’ll see nothing. Unix is intensionally terse: it gives you nothing, not even “no
files” if there aren’t any files. Thus, the lack of output was ls’s way of saying it didn’t find any files.
But I just said there could be 8000 or more files lying around: where are they? You’ve run into
the concept of a “current” directory. You can see in your prompt that your current directory is
/home/larry, where you don’t have any files. If you want a list of files of a more active directory,
try the root directory:
28 Chapter 4. The Unix Shell
/home/larry# ls /
bin etc install mnt root user var
dev home lib proc tmp usr vmlinux
/home/larry#
In the above command, “ls /”, the directory (“/”) is a parameter. The first word of the
command is the command name, and anything after it is a parameter. Parameters generally modify
what the program is acting on—for ls, the parameters say what directory you want a list for. Some
commands have special parameters called options or switches. To see this try:
/home/larry# ls -F /
bin/ etc/ install/ mnt/ root/ user/ var@
dev/ home/ lib/ proc/ tmp/ usr/ vmlinux
/home/larry#
The -F is an option. An option is a special kind of parameter that starts with a dash and
modifies how the program runs, but not what the program runs on. For ls, -F is an option that
lets you see which ones are directories, which ones are special files, which are programs, and which
are normal files. Anything with a slash is a directory. We’ll talk more about ls’s features later. It’s
a surprisingly complex program!
Now, there are two lessons to be learned here. First, you should learn what ls does. Try a few
other directories that are shown in Figure 4.1, and see what they contain. Naturally, some will be
empty, and some will have many, many files in them. I suggest you try ls both with and without
the -F option. For example, ls /usr/local looks like:
/home/larry# ls /usr/local
archives bin emacs etc ka9q lib tcl
/home/larry#
The second lesson is more general. Many Unix commands are like ls. They have options, which
are generally one character after a dash, and they have parameters. Unlike ls, some commands
require certain parameters and/or options. To show what commands generally look like, we’ll use
the following form:
ls [-aRF] [directory]
I’ll generally use command templates like that before I introduce any command from now on.
The first word is the command (in this case ls). Following the command are all the parameters.
Optional parameters are contained in brackets (“[” and “]”). Meta-variables are slanted—they’re
words that take the place of actual parameters. (For example, above you see directory, which should
be replaced by the name of a real directory.)
Options are a special case. They’re enclosed by brackets, but you can take any one of them
without using all of them. For instance, with just the three options given for ls you have eight
different ways of running the command: with or without each of the options. (Contrast ls -R with
ls -F.)
4.3. Storing Information 29
4.3.2 The Current Directory and cd
pwd
Using directories would be cumbersome if you had to type the full path each time you wanted
to access a directory. Instead, Unix shells have a feature called the “current” or “present” or
“working” directory. Your setup most likely displays your directory in your prompt: /home/larry.
If it doesn’t, try the command pwd, for present working directory. (Sometimes the prompt will
display the machine name. This is only really useful in a networked environment with lots of
different machines.)
mousehouse>pwd
/home/larry
mousehouse>
cd [directory]
As you can see, pwd tells you your current directory6
—a very simple command. Most commands
act, by default, on the current directory. For instance, ls without any parameters displays the
contents of the current directory. We can change our current directory using cd. For instance, try:
/home/larry# cd /home
/home# ls -F
larry/ sam/ shutdown/ steve/ user1/
/home#
If you omit the optional parameter directory, you’re returned to your home, or original, directory.
Otherwise, cd will change you to the specified directory. For instance:
/home# cd
/home/larry# cd /
/# cd home
/home# cd /usr
/usr# cd local/bin
/usr/local/bin#
As you can see, cd allows you to give either absolute or relative pathnames. An absolute path
starts with / and specifies all the directories before the one you wanted. A relative path is in
relation to your current directory. In the above example, when I was in /usr, I made a relative
move to local/bin—local is a directory under usr, and bin is a directory under local! (cd home
was also a relative directory change.)
6You’ll see all the terms in this book: present working directory, current directory, or working directory. I prefer
“current directory”, although at times the other forms will be used for stylistic purposes.
30 Chapter 4. The Unix Shell
There are two directories used only for relative pathnames: “.” and “..”. . The directory “.”
refers to the current directory and “..” is the parent directory. These are “shortcut” directories.
They exist in every directory, but don’t really fit the “folder in a folder” concept. Even the root
directory has a parent directory—it’s its own parent!
The file ./chapter-1 would be the file called chapter-1 in the current directory. Occasion-
ally, you need to put the “./” for some commands to work, although this is rare. In most cases,
./chapter-1 and chapter-1 will be identical.
The directory “..” is most useful in “backing up”:
/usr/local/bin# cd ..
/usr/local# ls -F
archives/ bin/ emacs@ etc/ ka9q/ lib/ tcl@
/usr/local# ls -F ../src
cweb/ linux/ xmris/
/usr/local#
In this example, I changed to the parent directory using cd .., and I listed the directory
/usr/src from /usr/local using ../src. Note that if I was in /home/larry, typing ls -F ../src
wouldn’t do me any good!
The directory ~/ is an alias for your home directory:
/usr/local# ls -F ~/
/usr/local#
You can see at a glance that there isn’t anything in your home directory! ~/ will become more
useful as we learn more about how to manipulate files.
4.3.3 Creating and Removing Directories
mkdir directory1 [directory2 . . . directoryN]
Creating your own directories is extremely simple under Unix, and can be a useful organizational
tool. To create a new directory, use the command mkdir. Of course, mkdir stands for make
directory.
Let’s do a small example to see how this works:
/home/larry# ls -F
/home/larry# mkdir report-1993
/home/larry# ls -F
report-1993/
/home/larry# cd report-1993
/home/larry/report-1993#
4.4. Moving Information 31
mkdir can take more than one parameter, interpreting each parameter as another directory to
create. You can specify either the full pathname or a relative pathname; report-1993 in the above
example is a relative pathname.
/home/larry/report-1993# mkdir /home/larry/report-1993/chap1 ~/report-1993/chap2
/home/larry/report-1993# ls -F
chap1/ chap2/
/home/larry/report-1993#
rmdir directory1 [directory2 . . . directoryN]
The opposite of mkdir is rmdir (remove directory). rmdir works exactly like mkdir.
An example of rmdir is:
/home/larry/report-1993# rmdir chap1 chap3
rmdir: chap3: No such file or directory
/home/larry/report-1993# ls -F
chap2/
/home/larry/report-1993# cd ..
/home/larry# rmdir report-1993
rmdir: report-1993: Directory not empty
/home/larry#
As you can see, rmdir will refuse to remove a non-existant directory, as well as a directory that
has anything in it. (Remember, report-1993 has a subdirectory, chap2, in it!) There is one more
interesting thing to think about rmdir: what happens if you try to remove your current directory?
Let’s find out:
/home/larry# cd report-1993
/home/larry/report-1993# ls -F
chap2/
/home/larry/report-1993# rmdir chap2
/home/larry/report-1993# rmdir .
rmdir: .: Operation not permitted
/home/larry/report-1993#
Another situation you might want to consider is what happens if you try to remove the parent of
your current directory. This turns out not to be a problem since the parent of your current directory
isn’t empty, so it can’t be removed!
4.4 Moving Information
All of these fancy directories are very nice, but they really don’t help unless you have some place to
store you data. The Unix Gods saw this problem, and they fixed it by giving the users files.
32 Chapter 4. The Unix Shell
We will learn more about creating and editing files in the next few chapters.
The primary commands for manipulating files under Unix are cp, mv, and rm. They stand for
copy, move, and remove, respectively.
4.4.1 cp Like a Monk
cp [-i] source destination
cp [-i] file1 file2 . . . fileN destination-directory7
cp is a very useful utility under Unix, and extremely powerful. It enables one person to copy
more information in a second than a fourteenth century monk could do in a year.
Be careful with cp if you don’t have a lot of disk space. No one wants to see a “Disk full” message
SLOW when working on important files. cp can also overwrite existing files without warning—I’ll talk more
about that danger later.
We’ll first talk about the first line in the command template. The first parameter to cp is the file
to copy—the second is where to copy it. You can copy to either a different filename, or a different
directory. Let’s try some examples:
/home/larry# ls -F /etc/passwd
/etc/passwd
/home/larry# cp /etc/passwd .
/home/larry# ls -F
passwd
/home/larry# cp passwd frog
/home/larry# ls -F
frog passwd
/home/larry#
The first cp command I ran took the file /etc/passwd, which contains the names of all the
users on the Unix system and their (encrypted) passwords, and copied it to my home directory. cp
doesn’t delete the source file, so I didn’t do anything that could harm the system. So two copies of
/etc/passwd exist on my system now, both named passwd, but one is in the directory /etc and
one is in /home/larry.
Then I created a third copy of /etc/passwd when I typed cp passwd frog—the three copies
are now: /etc/passwd, /home/larry/passwd and /home/larry/frog. The contents of these three
files are the same, even if the names aren’t.
cp can copy files between directories if the first parameter is a file and the second parameter is
a directory. In this case, the short name of the file stays the same.
7cp has two lines in its template because the meaning of the second parameter can be different depending on the
number of parameters.
4.4. Moving Information 33
It can copy a file and change it’s name if both parameters are file names. Here is one danger of
cp. If I typed cp /etc/passwd /etc/group, cp would normally create a new file with the contents
identical to passwd and name it group. However, if /etc/group already existed, cp would destroy
the old file without giving you a chance to save it! (It won’t even print out a message reminding
you that you’re destroying a file by copying over it.)
Let’s look at another example of cp:
/home/larry# ls -F
frog passwd
/home/larry# mkdir passwd_version
/home/larry# cp frog passwd passwd_version
/home/larry# ls -F
frog passwd passwd_version/
/home/larry# ls -F passwd_version
frog passwd
/home/larry#
How did I just use cp? Evidentally, cp can take more than two parameters. (This is the second
line in the command template.) What the above command did is copied all the files listed (frog
and passwd) and placed them in the passwd version directory. In fact, cp can take any number of
parameters, and interprets the first n − 1 parameters to be files to copy, and the nth
parameter as
what directory to copy them too.
You cannot rename files when you copy more than one at a time—they always keep their short
SLOW name. This leads to an interesting question. What if I type cp frog passwd toad, where frog and
passwd exist and toad isn’t a directory? Try it and see.
4.4.2 Pruning Back with rm
rm [-i] file1 file2 . . . fileN
Now that we’ve learned how to create millions of files with cp (and believe me, you’ll find new
ways to create more files soon), it may be useful to learn how to delete them. Actually, it’s very
simple: the command you’re looking for is rm, and it works just like you’d expect: any file that’s a
parameter to rm gets deleted.
For example:
/home/larry# ls -F
frog passwd passwd_version/
/home/larry# rm frog toad passwd
rm: toad: No such file or directory
/home/larry# ls -F
passwd_version/
/home/larry#
34 Chapter 4. The Unix Shell
As you can see, rm is extremely unfriendly. Not only does it not ask you for confirmation, but
it will also delete things even if the whole command line wasn’t correct. This could actually be
dangerous. Consider the difference between these two commands:
/home/larry# ls -F
toad frog/
/home/larry# ls -F frog
toad
/home/larry# rm frog/toad
/home/larry#
and this
/home/larry# rm frog toad
rm: frog is a directory
/home/larry# ls -F
frog/
/home/larry#
As you can see, the difference of one character made a world of difference in the outcome of the
SLOW command. It is vital that you check your command lines before hitting return !
4.4.3 A Forklift Can Be Very Handy
mv [-i] old-name new-name
mv [-i] file1 file2 . . . fileN new-directory
Finally, the other file command you should be aware of is mv. mv looks a lot like cp, except that
it deletes the original file after copying it. It’s a lot like using cp and rm together. Let’s take a look
at what we can do:
/home/larry# cp /etc/passwd .
/home/larry# ls -F
passwd
/home/larry# mv passwd frog
/home/larry# ls -F
frog
/home/larry# mkdir report
/home/larry# mv frog report
/home/larry# ls -F
report/
/home/larry# ls -F report
frog
/home/larry#
As you can see, mv will rename a file if the second parameter is a file. If the second parameter is
a directory, mv will move the file to the new directory, keeping it’s shortname the same.
4.4. Moving Information 35
You should be very careful with mv—it doesn’t check to see if the file already exists, and will
SLOW remove any old file in its way. For instance, if I had a file named frog already in my directory
report, the command mv frog report would delete the file ~/report/frog and replace it with
~/frog.
In fact, there is one way to make rm, cp and mv ask you before deleting files. All three of these
commands accept the -i option, which makes them query the user before removing any file. If you
use an alias, you can make the shell do rm -i automatically when you type rm. You’ll learn more
about this later in Section 9.1.3 on page 90.
36 Chapter 4. The Unix Shell
Chapter 5
The X Window System
The nice thing about standards is that there are so many of them to choose from.
Andrew S. Tanenbaum
This chapter only applies to those using the X Window System. If you encounter a screen with
multiply windows, colors, or a cursor that is only movable with your mouse, you are using X. (If
your screen consists of white characters on a black background, you are not currently using X. If
you want to start it up, take a look at Section 5.1.)
5.1 Starting and Stopping the X Window System
5.1.1 Starting X
Even if X doesn’t start automatically when you login, it is possible to start it from the regular text-
mode shell prompt. There are two possible commands that will start X, either startx or xinit.
Try startx first. If the shell complains that no such command is found, try using xinit and see if
X starts. If neither command works, you may not have X installed on your system—consult local
documentation for your distribution.
If the command runs but you are eventually returned to the black screen with the shell prompt,
X is installed but not configured. Consult the documentation that came with your distribution on
how to setup X.
5.1.2 Exiting X
Depending on how X is configured, there are two possible ways you might have to exit X. The first
is if your window manager controls whether or not X is running. If it does, you’ll have to exit X
using a menu (see Section 5.4.8 on page 43). To display a menu, click a button on the background.
37
38 Chapter 5. The X Window System
The important menu entry should be “Exit Window Manager” or “Exit X” or some entry con-
taining the word “Exit”. Try to find that entry (there could be more than one menu—try different
mouse buttons!) and choose it.
The other method would be for a special xterm to control X. If this is the case, there is probably
a window labeled “login” or “system xterm”. To exit from X, move the mouse cursor into that
window and type “exit”.
If X was automatically started when you logged in, one of these methods should log you out.
Simply login again to return. If you started X manually, these methods should return you to the
text mode prompt. (If you wish to logout, type logout at this prompt.)
5.2 What is The X Window System?
The X Window System is a distributed, graphical method of working developed primarily at the
Massachusetts Institute of Technology. It has since been passed to a consortium of vendors (aptly
named “The X Consortium”) and is being maintained by them.
The X Window System (hereafter abbreviated as “X”1
) has new versions every few years, called
releases. As of this writing, the latest revision is X11R6, or release six. The eleven in X11 is officially
the version number but there hasn’t been a new version in many years, and one is not currently
planned.
There are two terms when dealing with X that you should be familiar. The client is a X program.
For instance, xterm is the client that displays your shell when you log on. The server is a program
that provides services to the client program. For instance, the server draws the window for xterm
and communicates with the user.
Since the client and the server are two separate programs, it is possible to run the client and the
server on two physically separate machines. In addition to supplying a standard method of doing
graphics, you can run a program on a remote machine (across the country, if you like!) and have it
display on the workstation right in front of you.
A third term you should be familiar with is the window manager. The window manager is a
special client that tells the server where to position various windows and provides a way for the user
to move these windows around. The server, by itself, does nothing for the user. It is merely there
to provide a buffer between the user and the client.
5.3 What’s This on my Screen?
When you first start X, several programs are started. First, the server is started. Then, several
clients are usually started. Unfortunately, this is not standardized across various distributions. It is
likely that among these clients are a window manager, either fvwm or twm, a prompt, xterm, and a
clock, xclock.
1There are several acceptable ways to refer to The X Window System. A common though incorrect way of referring
to X is “X Windows”.
5.3. What’s This on my Screen? 39
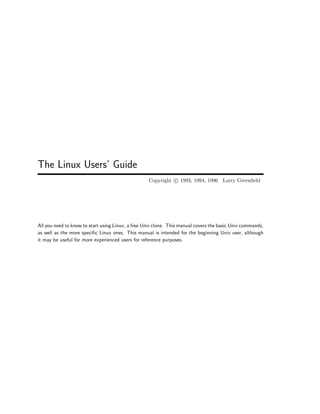
Figure 5.1 An annotated example of a standard X screen. In this example, the user is running twm.
The standard clock has been replaced by a transparent clock called oclock.
xterm
xeyes
icon manager
scrollbar
emacs
root menu
title bar
menu bar
oclock
5.3.1 XClock
xclock [-digital] [-analog] [-update seconds] [-hands color]
I’ll explain the simpliest one first: xclock functions exactly as you’d expect it would. It ticks off
the seconds, minutes and hours in a small window.
No amounts of clicking or typing in xclock’s window will affect it—that’s all it does. Or is it?
In fact, there are various different options you can give to the program to have it act in different
ways. For instance, xclock -digital will create a digital clock. xclock -update 1 will create a
second hand that moves every second, while -update 5 will create a second hand that moves every
5 seconds.
For more information on xclock’s options, consult its manpage—man xclock. If you’re going to
try running a few of your own xclocks, you should probably read Section 6.4 (Multitasking) to learn
40 Chapter 5. The X Window System
how to run them in addition to your current programs. (If you run an xclock in the foreground—the
usual way of running a program—and want to get out of it, type ctrl-c .)
5.3.2 XTerm
The window with a prompt in it (something that probably looks like /home/larry#) is being con-
trolled by a program called xterm. xterm is a deceptively complicated program. At first glance,
it doesn’t seem to do much, but it actually has to do a lot of work. xterm emulates a terminal so
that regular text-mode Unix applications work correctly. It also maintains a buffer of information
so that you can refer back to old commands. (To see how to use this, look at Section 5.6.3.)
For much of this book, we’re going to be learning about the Unix command-line, and you’ll find
that inside your xterm window. In order to type into xterm, you usually have to move your mouse
cursor (possibly shaped like an “X” or an arrow) into the xterm window. However, this behavior is
dependent on the window manager.
One way of starting more programs under X is through an xterm. Since X programs are standard
Unix programs, they can be run from normal command prompts such as xterms. Since running a
long term program from a xterm would tie up the xterm as long as the program was running, people
normally start X programs in the background. For more information about this, see Section 6.4.
5.4 Window Managers
On Linux, there are two different window managers that are commonly used. One of them, called
twm is short for “Tab Window Manager”. It is larger than the other window manager usually used,
fvwm. (fvwm stands for “F(?) Virtual Window Manager”—the author neglected to tie down exactly
what the f stood for.) Both twm and fvwm are highly configurable, which means I can’t tell you
exactly what keys do what in your particular setup.
To learn about twm’s configuration, look at Section 9.2.1. fvwm’s configuration is covered in
Section 9.2.2.
5.4.1 When New Windows are Created
There are three possible things a window manager will do when a new window is created. It is
possible to configure a window manager so that an outline of the new window is shown, and you are
allowed to position it on your screen. That is called manual placement. If you are presented with
the outline of a window, simply use the mouse to place it where you wish it to appear and click the
left mouse button.
It is also possible that the window manager will place the new window somewhere on the screen
by itself. This is known as random placement.
Finally, sometimes an application will ask for a specific spot on the screen, or the window manager
will be configured to display certain applications on the same place of the screen all the time. (For
5.4. Window Managers 41
instance, I specify that I want xclock to always appear in the upper right hand corner of the screen.)
5.4.2 Focus
The window manager controls some important things. The first thing you’ll be interested in is
focus. The focus of the server is which window will get what you type into the keyboard. Usually
in X the focus is determined by the position of the mouse cursor. If the mouse cursor is in one
xterm’s window2
, that xterm will get your keypresses. This is different from many other windowing
systems, such as Microsoft Windows, OS/2, or the Macintosh, where you must click the mouse in
a window before that window gets focus. Usually under X, if your mouse cursor wanders from a
window, focus will be lost and you’ll no longer be able to type there.
Note, however, that it is possible to configure both twm and fvwm so that you must click on or
in a window to gain focus, and click somewhere else to lose it, identical to the behavior of Microsoft
Windows. Either discover how your window manager is configured by trial and error, or consult
local documentation.
5.4.3 Moving Windows
Another very configurable thing in X is how to move windows around. In my personal configuration
of twm, there are three different ways of moving windows around. The most obvious method is to
move the mouse cursor onto the title bar and drag the window around the screen. Unfortunately,
this may be done with any of the left, right, or middle buttons3
. (To drag, move the cursor above
the title bar, and hold down on the button while moving the mouse.) Most likely, your configuration
is set to move windows using the left mouse buttons.
Another way of moving windows may be holding down a key while dragging the mouse. For
instance, in my configuration, if I hold down the Alt key, move the cursor above a window, I can
drag the window around using the left mouse button.
Again, you may be able to understand how the window manager is configured by trial and error,
or by seeing local documentation. Alternatively, if you want to try to interpret the window manager’s
configuration file, see Section 9.2.1 for twm or Section 9.2.2 for fvwm.
5.4.4 Depth
Since windows are allowed to overlap in X, there is a concept of depth. Even though the windows and
the screen are both two dimensional, one window can be in front of another, partially or completely
obscuring the rear window.
There are several operations that deal with depth:
2You can have more then one copy of xterm running at the same time!
3Many PCs have only two button mice. If this is the case for you, you should be able to emulate a middle button
by using the left and right buttons simultaneously.
42 Chapter 5. The X Window System
• Raising the window, or bringing a window to the front. This is usually accomplished by
clicking on a window’s title bar with one of the buttons. Depending on how the window
manager is configured, it could be any one of the buttons. (It is also possible that more then
one button will do the job.)
• Lowering the window, or pushing the window to the back. This can generally be accomplished
by a different click in the title bar. It is also possible to configure some window managers so
that one click will bring the window foward if there is anything over it, while that same click
will lower it when it is in the front.
• Cycling through windows is another operation many window managers allow. This brings
each window to the front in an orderly cycle.
5.4.5 Iconization
There are several other operations that can obscure windows or hide them completely. First is the
idea of “iconization”. Depending on the window manager, this can be done in many different ways.
In twm, many people configure an icon manager. This is a special window that contains a list of
all the other windows on the screen. If you click on a name (depending on the setup, it could be
with any of the buttons!) the window disappears—it is iconified. The window is still active, but you
can’t see it. Another click in the icon manager restores the window to the screen.
This is quite useful. For instance, you could have remote xterms to many different computers
that you occasionally use. However, since you rarely use all of them at a given time, you can keep
most of the xterm windows iconified while you work with a small subset. The only problem with
this is it becomes easy to “lose” windows. This causes you to create new windows that duplicate
the functionality of iconified windows.
Other window managers might create actual icons across the bottom of the screen, or might just
leave icons on the root window.
5.4.6 Resizing
There are several different methods to resize windows under X. Again, it is dependent on your
window manager and exactly how your window manager is configured. The method many Microsoft
Windows users are familiar with is to click on and drag the border of a window. If your window
manager creates large borders that change how the mouse cursor looks when it is moved over them,
that is probably the method used to resize windows.
Another method used is to create a “resizing” button on the titlebar. In Figure 5.3, a small
button is visible on the right of each titlebar. To resize windows, the mouse is moved onto the resize
button and the left mouse button is held down. You can then move the mouse outside the borders
of the window to resize it. The button is released when the desired size has been reached.
5.5. X Attributes 43
5.4.7 Maximization
Most window managers support maximization. In twm, for instance, you can maximize the height,
the width, or both dimensions of a window. This is called “zooming” in twm’s language although I
prefer the term maximization. Different applications respond differently to changes in their window
size. (For instance, xterm won’t make the font bigger but will give you a larger workspace.)
Unfortunately, it is extremely non-standard on how to maximize windows.
5.4.8 Menus
Another purpose for window managers is for them to provide menus for the user to quickly accomplish
tasks that are done over and over. For instance, I might make a menu choice that automatically
launches Emacs or an additional xterm for me. That way I don’t need to type in an xterm—an
especially good thing if there aren’t any running xterms that I need to type in to start a new
program!
In general, different menus can be accessed by clicking on the root window, which is an immovable
window behind all the other ones. By default, it is colored gray, but could look like anything.4
To
try to see a menu, click and hold down a button on the desktop. A menu should pop up. To make
a selection, move (without releasing the mouse button) the cursor over one of the items any then
release the mouse button.
5.5 X Attributes
There are many programs that take advantage of X. Some programs, like emacs, can be run either
as a text-mode program or as a program that creates its own X window. However, most X programs
can only be run under X.
5.5.1 Geometry
There are a few things common to all programs running under X. In X, the concept of geometry
is where and how large a window is. A window’s geometry has four components:
• The horizontal size, usually measured in pixels. (A pixel is the smallest unit that can be
colored. Many X setups on Intel PCs have 1024 pixels horizontally and 768 pixels vertically.)
Some applications, like xterm and emacs, measure their size in terms of number of characters
they can fit in the window. (For instance, eighty characters across.)
• The vertical size, also usually measured in pixels. It’s possible for it to be measured in char-
acters.
4One fun program to try is called xfishtank. It places a small aquarium in the background for you.
44 Chapter 5. The X Window System
• The horizontal distance from one of the sides of the screen. For instance, +35 would mean
make the left edge of the window thirty-five pixels from the left edge of the screen. On the
other hand, -50 would mean make the right edge of the window fifty pixels from the right edge
of the screen. It’s generally impossible to start the window off the screen, although a window
can be moved off the screen. (The main exception is when the window is very large.)
• The vertical distance from either the top or the bottom. A positive vertical distance is measured
from the top of the screen; a negative vertical distance is measured from the bottom of the
screen.
All four components get put together into a geometry string that looks like: 503x73-78+0. (That
translates into a window 503 pixels long, 73 pixels high, put near the top right hand corner of the
screen.) Another way of stating it is hsizexvsize±hplace±vplace.
5.5.2 Display
Every X application has a display that it is associated with. The display is the name of the screen
that the X server controls. A display consists of three components:
• The machine name that the server is running on. At stand-alone Linux installations the server
is always running on the same system as the clients. In such cases, the machine name can be
omitted.
• The number of the server running on that machine. Since any one machine could have multiple
X servers running on it (unlikely for most Linux machines, but possible) each must have a
unique number.
• The screen number. X supports a particular server controlling more than one screen at a
time. You can imagine that someone wants a lot of screen space, so they have two monitors
sitting next to each other. Since they don’t want two X servers running on one machine for
performance reasons, they let one X server control both screens.
These three things are put together like so: machine:server-number.screen-number.
For instance, on mousehouse, all my applications have the display set to :0.0, which means the
first screen of the first server on the local display. However, if I am using a remote computer, the
display might be set to mousehouse:0.0.
By default, the display is taken from the environment variable (see Section 9.1.4) named DISPLAY,
and can be overridden with a command-line option (see Figure 5.2). To see how DISPLAY is set, try
the command echo $DISPLAY.
5.6 Common Features
While X is a graphical user interface, it is a very uneven graphical user interface. It’s impossible
to say how any component of the system is going to work, because every component can easily be
5.6. Common Features 45
Figure 5.2 Standard options for X programs.
Name Followed by Example
-geometry geometry of the window xterm -geometry 80x24+0+90
-display display you want the program to appear xterm -display lionsden:0.0
-fg the primary foreground color xterm -fg yellow
-bg the primary background color xterm -bg blue
reconfigured, changed, and even replaced. This means it’s hard to say exactly how to use various
parts of the interface. We’ve already encountered one cause of this: the different window managers
and how configurable each window manager is.
Another cause of this uneven interface is the fact that X applications are built using things
called “widget sets”. Included with the standard X distribution are “Athena widgets” developed at
MIT. These are commonly used in free applications. They have the disadvantage that they are not
particularly good-looking and are somewhat harder to use than other widgets.
The other popular widget set is called “Motif”. Motif is a commercial widget set similar to the
user interface used in Microsoft Windows. Many commercial applications use Motif widgets, as well
as some free applications. The popular World Wide Web Browser netscape uses Motif.
Let’s try to go through some of the more usually things you’ll encounter.
5.6.1 Buttons
Buttons are generally the easiest thing to use. A button is invoked by positioning the mouse cursor
over it and clicking (pressing and immediately releasing the mouse button) the left button. Athena
and Motif buttons are functionally the same although they have cosmetic differences.
5.6.2 Menu Bars
A menu bar is a collection of commands accessible using the mouse. For instance, emacs’s menu bar
is shown in Figure 5.3. Each word is a category heading of commands. File deals with commands
that bring up new files and save files. By convention, this is also the category that contains the
command to exit the program.
To access a command, move the mouse cursor over a particular category (such as File) and press
and hold down the left mouse button. This will display a variety of commands. To select one of
the commands, move the mouse cursor over that command and release the left mouse button. Some
menu bars let you click on a category—if this is the case, clicking on the category will display the
menu until you click on either a command, another menu, or outside the menu bar (indicating that
you are not interested in running a particular command).
46 Chapter 5. The X Window System
Figure 5.3 emacs will change its menu bar depending on the type of file you’re working on. Here
is one possible menu bar.
Figure 5.4 An Athena-type scroll bar is visible on the left of this xterm window. Next to it, a
Motif-type scroll bar is visible on the netscape window.
5.6.3 Scroll Bars
A scroll bar is a method to allow people to display only part of a document, while the rest is off
the screen. For instance, the xterm window is currently displaying the bottom third of the text
available in Figure 5.4. It’s easy to see what part of the available text is current being displayed:
the darkened part of the scroll bar is relative to both the position and the amount of displayed text.
If the text displayed is all there is, the entire scroll bar is dark. If the middle half of the text is
displayed, the middle half of the scroll bar is darkened.
A vertical scroll bar may be to the left or right of the text and a horizontal one may be above or
below, depending the application.
Athena scroll bars
Athena scroll bars operate differently from scroll bars in other windowing systems. Each of the three
buttons of the mouse operate differently. To scroll upwards (that is, display material above what
is currently visible) you can click the rightmost mouse button anywhere in the scroll bar. To scroll
downwards, click the left mouse button anywhere in the scroll bar.
5.6. Common Features 47
You can also jump to a particular location in the displayed material by clicking the middle mouse
button anywhere in the scroll bar. This causes the window to display material starting at that point
in the document.
Motif scroll bars
A Motif scroll bar acts much more like a Microsoft Windows or Macintosh scroll bar. An example of
one is on the right in Figure 5.4. Notice that in addition to the bar, it has arrows above and below
it. These are used for fine-tuning: clicking either the left or middle buttons on them will scroll a
small amount such as one line; the right button does nothing.
The behavior of clicking inside the scroll bar is widely different for Motif scroll bars than Athena
scroll bars. The right button has no effect. Clicking the left button above the current position scrolls
upward. Similarly, clicking below the current position scrolls downward. Clicking and holding the
left button on the current position allows one to move the bar at will. Releasing the left button
positions the window.
Clicking the middle button anywhere on the bar will immediately jump to that location, similar
to the behavior of the Athena middle button. However, instead of starting to display the data at
the position clicked, that position is taken to be the midpoint of the data to be displayed.
48 Chapter 5. The X Window System
Chapter 6
Working with Unix
A UNIX saleslady, Lenore,
Enjoys work, but she likes the beach more.
She found a good way
To combine work and play:
She sells C shells by the seashore.
Unix is a powerful system for those who know how to harness its power. In this chapter, I’ll try
to describe various ways to use Unix’s shell, bash, more efficently.
6.1 Wildcards
In the previous chapter, you learned about the file maintence commands cp, mv, and rm. Occasionally,
you want to deal with more than one file at once—in fact, you might want to deal with many files at
once. For instance, you might want to copy all the files beginning with data into a directory called
~/backup. You could do this by either running many cp commands, or you could list every file on
one command line. Both of these methods would take a long time, however, and you have a large
chance of making an error.
A better way of doing that task is to type:
/home/larry/report# ls -F
1993-1 1994-1 data1 data5
1993-2 data-new data2
/home/larry/report# mkdir ~/backup
/home/larry/report# cp data* ~/backup
/home/larry/report# ls -F ~/backup
data-new data1 data2 data5
/home/larry/report#
As you can see, the asterix told cp to take all of the files beginning with data and copy them to
~/backup. Can you guess what cp d*w ~/backup would have done?
49
50 Chapter 6. Working with Unix
6.1.1 What Really Happens?
Good question. Actually, there are a couple of special characters intercepted by the shell, bash. The
character “*”, an asterix, says “replace this word with all the files that will fit this specification”. So,
the command cp data* ~/backup, like the one above, gets changed to cp data-new data1 data2
data5 ~/backup before it gets run.
To illustrate this, let me introduce a new command, echo. echo is an extremely simple command;
it echoes back, or prints out, any parameters. Thus:
/home/larry# echo Hello!
Hello!
/home/larry# echo How are you?
How are you?
/home/larry# cd report
/home/larry/report# ls -F
1993-1 1994-1 data1 data5
1993-2 data-new data2
/home/larry/report# echo 199*
1993-1 1993-2 1994-1
/home/larry/report# echo *4*
1994-1
/home/larry/report# echo *2*
1993-2 data2
/home/larry/report#
As you can see, the shell expands the wildcard and passes all of the files to the program you
tell it to run. This raises an interesting question: what happens if there are no files that meet the
wildcard specification? Try echo /rc/fr*og and bash passes the wildcard specification verbatim
to the program.
Other shells, like tcsh, will, instead of just passing the wildcard verbatim, will reply No match.
Here’s the same command run under tcsh:
mousehouse>echo /rc/fr*og
echo: No match.
mousehouse>
The last question you might want to know is what if I wanted to have data* echoed back at me,
instead of the list of file names? Well, under both bash and tcsh, just include the string in quotes:
/home/larry/report# echo "data*"
data*
/home/larry/report#
OR
mousehouse>echo "data*"
data*
mousehouse>
6.1.2 The Question Mark
In addition to the asterix, the shell also interprets a question mark as a special character. A question
mark will match one, and only one character. For instance, ls /etc/?? will display all two letter
files in the the /etc directory.
6.2. Time Saving with bash 51
6.2 Time Saving with bash
6.2.1 Command-Line Editing
Occasionally, you’ve typed a long command to bash and, before you hit return, notice that there
was a spelling mistake early in the line. You could just delete all the way back and retype everything
you need to, but that takes much too much effort! Instead, you can use the arrow keys to move back
there, delete the bad character or two, and type the correct information.
There are many special keys to help you edit your command line, most of them similar to the
commands used in GNU Emacs. For instance, C-t flips two adjacent characters.1
You’ll be able
to find most of the commands in the chapter on Emacs, Chapter 8.
6.2.2 Command and File Completion
Another feature of bash is automatic completion of your command lines. For instance, let’s look at
the following example of a typical cp command:
/home/larry# ls -F
this-is-a-long-file
/home/larry# cp this-is-a-long-file shorter
/home/larry# ls -F
shorter this-is-a-long-file
/home/larry#
It’s a big pain to have to type every letter of this-is-a-long-file whenever you try to access
it. So, create this-is-a-long-file by copying /etc/passwd to it2
. Now, we’re going to do the
above cp command very quickly and with a smaller chance of mistyping.
Instead of typing the whole filename, type cp th and press and release the Tab . Like magic,
the rest of the filename shows up on the command line, and you can type in shorter. Unfortunately,
bash cannot read your thoughts, and you’ll have to type all of shorter.
When you type Tab , bash looks at what you’ve typed and looks for a file that starts like that.
For instance, if I type /usr/bin/ema and then hit Tab , bash will find /usr/bin/emacs since that’s
the only file that begins /usr/bin/ema on my system. However, if I type /usr/bin/ld and hit Tab ,
bash beeps at me. That’s because three files, /usr/bin/ld, /usr/bin/ldd, and /usr/bin/ld86 all
start with /usr/bin/ld on my system.
If you try a completion and bash beeps, you can immediately hit Tab again to get a list of all
the files your start matches so far. That way, if you aren’t sure of the exact spelling of your file, you
can start it and scan a much smaller list of files.
1 C-t means hold down the key labeled “Ctrl”, then press the “t” key. Then release the “Ctrl” key.
2cp /etc/passwd this-is-a-long-file
52 Chapter 6. Working with Unix
6.3 The Standard Input and The Standard Output
Let’s try to tackle a simple problem: getting a listing of the /usr/bin directory. If all we do is ls
/usr/bin, some of the files scroll off the top of the screen. How can we see all of the files?
6.3.1 Unix Concepts
The Unix operating system makes it very easy for programs to use the terminal. When a program
writes something to your screen, it is using something called standard output. Standard output,
abbreviated as stdout, is how the program writes things to a user. The name for what you tell
a program is standard input (stdin). It’s possible for a program to communicate with the user
without using standard input or output, but most of the commands I cover in this book use stdin
and stdout.
For example, the ls command prints the list of the directories to standard output, which is
normally “connected” to your terminal. An interactive command, such as your shell, bash, reads
your commands from standard input.
It is also possible for a program to write to standard error, since it is very easy to make
standard output point somewhere besides your terminal. Standard error (stderr) is almost always
connected to a terminal so an actual human will read the message.
In this section, we’re going to examine three ways of fiddling with the standard input and output:
input redirection, output redirection, and pipes.
6.3.2 Output Redirection
A very important feature of Unix is the ability to redirect output. This allows you, instead of
viewing the results of a command, to save it in a file or send it directly to a printer. For instance,
to redirect the output of the command ls /usr/bin, we place a > sign at the end of the line, and
say what file we want the output to be put in:
/home/larry# ls
/home/larry# ls -F /usr/bin > listing
/home/larry# ls
listing
/home/larry#
As you can see, instead of writing the names of all the files, the command created a totally new
file in your home directory. Let’s try to take a look at this file using the command cat. If you think
back, you’ll remember cat was a fairly useless command that copied what you typed (the standard
input) to the terminal (the standard output). cat can also print a file to the standard output if you
list the file as a parameter to cat:
/home/larry# cat listing
...
/home/larry#
6.3. The Standard Input and The Standard Output 53
The exact output of the command ls /usr/bin appeared in the contents of listing. All well
and good, although it didn’t solve the original problem.3
However, cat does do some interesting things when it’s output is redirected. What does the
command cat listing > newfile do? Normally, the > newfile says “take all the output of the
command and put it in newfile.” The output of the command cat listing is the file listing.
So we’ve invented a new (and not so efficient) method of copying files.
How about the command cat > fox? cat by itself reads in each line typed at the terminal
(standard input) and prints it right back out (standard output) until it reads Ctrl-d . In this case,
standard output has been redirected into the file fox. Now cat is serving as a rudimentary editor:
/home/larry# cat > fox
The quick brown fox jumps over the lazy dog.
press Ctrl-d
We’ve now created the file fox that contains the sentence “The quick brown fox jumps over the
lazy dog.” One last use of the versitile cat command is to concatenate files together. cat will
print out every file it was given as a parameter, one after another. So the command cat listing
fox will print out the directory listing of /usr/bin, and then it will print out our silly sentence.
Thus, the command cat listing fox > listandfox will create a new file containing the contents
of both listing and fox.
6.3.3 Input Redirection
Like redirecting standard output, it is also possible to redirect standard input. Instead of a program
reading from your keyboard, it will read from a file. Since input redirection is related to output
redirection, it seems natural to make the special character for input redirection be <. It too, is used
after the command you wish to run.
This is generally useful if you have a data file and a command that expects input from standard
input. Most commands also let you specify a file to operate on, so < isn’t used as much in day-to-day
operations as other techniques.
6.3.4 The Pipe
Many Unix commands produce a large amount of information. For instance, it is not uncommon
for a command like ls /usr/bin to produce more output than you can see on your screen. In order
for you to be able to see all of the information that a command like ls /usr/bin, it’s necessary to
use another Unix command, called more.4
more will pause once every screenful of information. For
instance, more < /etc/rc will display the file /etc/rc just like cat /etc/rc would, except that
3For impatient readers, the command you might want to try is more. However, there’s still a bit more to talk about
before we get there.
4more is named because that’s the prompt it originally displayed: --more--. In many versions of Linux the more
command is identical to a more advanced command that does all that more can do and more. Proving that computer
programmers make bad comedians, they named this new program less.
54 Chapter 6. Working with Unix
more will let you read it. more also allows the command more /etc/rc, and that’s the normal way
of invoking it.
However, that doesn’t help the problem that ls /usr/bin displays more information than you
can see. more < ls /usr/bin won’t work—input redirection only works with files, not commands!
You could do this:
/home/larry# ls /usr/bin > temp-ls
/home/larry# more temp-ls
...
/home/larry# rm temp-ls
However, Unix supplies a much cleaner way of doing that. You can just use the command ls
/usr/bin | more. The character “|” indicates a pipe. Like a water pipe, a Unix pipe controls
flow. Instead of water, we’re controlling the flow of information!
A useful tool with pipes are programs called filters. A filter is a program that reads the standard
input, changes it in some way, and outputs to standard output. more is a filter—it reads the data
that it gets from standard input and displays it to standard output one screen at a time, letting
you read the file. more isn’t a great filter because its output isn’t suitable for sending to another
program.
Other filters include the programs cat, sort, head, and tail. For instance, if you wanted to
read only the first ten lines of the output from ls, you could use ls /usr/bin | head.
6.4 Multitasking
6.4.1 Using Job Control
Job control refers to the ability to put processes (another word for programs, essentially) in the
background and bring them to the foreground again. That is to say, you want to be able to make
something run while you go and do other things, but have it be there again when you want to tell
it something or stop it. In Unix, the main tool for job control is the shell—it will keep track of jobs
for you, if you learn how to speak its language.
The two most important words in that language are fg, for foreground, and bg, for background.
To find out how they work, use the command yes at a prompt.
/home/larry# yes
This will have the startling effect of running a long column of y’s down the left hand side of your
screen, faster than you can follow.5
To get them to stop, you’d normally type ctrl-c to kill it, but
instead you should type ctrl-z this time. It appears to have stopped, but there will be a message
before your prompt, looking more or less like this:
5There are good reasons for this strange command to exist. Occasional commands ask for confirmation—a “yes”
answer to a question. The yes command allows a programmer to automate the response to these questions.
6.4. Multitasking 55
[1]+ Stopped yes
It means that the process yes has been suspended in the background. You can get it running
again by typing fg at the prompt, which will put it into the foreground again. If you wish, you
can do other things first, while it’s suspended. Try a few ls’s or something before you put it back
in the foreground.
Once it’s returned to the foreground, the y’s will start coming again, as fast as before. You do
not need to worry that while you had it suspended it was “storing up” more y’s to send to the
screen: when a program is suspended the whole program doesn’t run until you bring it back to life.
(Now type ctrl-c to kill it for good, once you’ve seen enough).
Let’s pick apart that message we got from the shell:
[1]+ Stopped yes
The number in brackets is the job number of this job, and will be used when we need to refer
to it specifically. (Naturally, since job control is all about running multiple processes, we need some
way to tell one from another). The + following it tells us that this is the “current job” — that is,
the one most recently moved from the foreground to the background. If you were to type fg, you
would put the job with the + in the foreground again. (More on that later, when we discuss running
multiple jobs at once). The word Stopped means that the job is “stopped”. The job isn’t dead,
but it isn’t running right now. Linux has saved it in a special suspended state, ready to jump back
into the action should anyone request it. Finally, the yes is the name of the process that has been
stopped.
Before we go on, let’s kill this job and start it again in a different way. The command is named
kill and can be used in the following way:
/home/larry# kill %1
[1]+ Stopped yes
/home/larry#
That message about it being “stopped” again is misleading. To find out whether it’s still alive
(that is, either running or frozen in a suspended state), type jobs:
/home/larry# jobs
[1]+ Terminated yes
/home/larry#
There you have it—the job has been terminated! (It’s possible that the jobs command showed
nothing at all, which just means that there are no jobs running in the background. If you just killed
a job, and typing jobs shows nothing, then you know the kill was successful. Usually it will tell you
the job was “terminated”.)
Now, start yes running again, like this:
/home/larry# yes > /dev/null
56 Chapter 6. Working with Unix
If you read the section about input and output redirection, you know that this is sending the
output of yes into the special file /dev/null. /dev/null is a black hole that eats any output sent
to it (you can imagine that stream of y’s coming out the back of your computer and drilling a hole
in the wall, if that makes you happy).
After typing this, you will not get your prompt back, but you will not see that column of y’s
either. Although output is being sent into /dev/null, the job is still running in the foreground. As
usual, you can suspend it by hitting ctrl-z . Do that now to get the prompt back.
/home/larry# yes > /dev/null
["yes" is running, and we just typed ctrl-z]
[1]+ Stopped yes >/dev/null
/home/larry#
Hmm. . . is there any way to get it to actually run in the background, while still leaving us the
prompt for interactive work? The command to do that is bg:
/home/larry# bg
[1]+ yes >/dev/null &
/home/larry#
Now, you’ll have to trust me on this one: after you typed bg, yes > /dev/null began to run
again, but this time in the background. In fact, if you do things at the prompt, like ls and stuff,
you might notice that your machine has been slowed down a little bit (endlessly generating and
discarding a steady stream of y’s does take some work, after all!) Other than that, however, there
are no effects. You can do anything you want at the prompt, and yes will happily continue to
sending its output into the black hole.
There are now two different ways you can kill it: with the kill command you just learned, or
by putting the job in the foreground again and hitting it with an interrupt, ctrl-c . Let’s try the
second way, just to understand the relationship between fg and bg a little better;
/home/larry# fg
yes >/dev/null
[now it’s in the foreground again. Imagine that I hit ctrl-c to terminate it]
/home/larry#
There, it’s gone. Now, start up a few jobs running in simultaneously, like this:
/home/larry# yes > /dev/null &
[1] 1024
/home/larry# yes | sort > /dev/null &
[2] 1026
/home/larry# yes | uniq > /dev/null
[and here, type ctrl-z to suspend it, please]
6.4. Multitasking 57
[3]+ Stopped yes | uniq >/dev/null
/home/larry#
The first thing you might notice about those commands is the trailing & at the end of the first
two. Putting an & after a command tells the shell to start in running in the background right from
the very beginning. (It’s just a way to avoid having to start the program, type ctrl-z , and then
type bg.) So, we started those two commands running in the background. The third is suspended
and inactive at the moment. You may notice that the machine has become slower now, as the two
running ones require some amount of CPU time.
Each one told you it’s job number. The first two also showed you their process identification
numbers, or PID’s, immediately following the job number. The PID’s are normally not something
you need to know, but occasionally come in handy.
Let’s kill the second one, since I think it’s making your machine slow. You could just type kill
%2, but that would be too easy. Instead, do this:
/home/larry# fg %2
yes | sort >/dev/null
[type ctrl-c to kill it]
/home/larry#
As this demonstrates, fg takes parameters beginning with % as well. In fact, you could just have
typed this:
/home/larry# %2
yes | sort >/dev/null
[type ctrl-c to kill it]
/home/larry#
This works because the shell automatically interprets a job number as a request to put that job
in the foreground. It can tell job numbers from other numbers by the preceding %. Now type jobs
to see which jobs are left running:
/home/larry# jobs
[1]- Running yes >/dev/null &
[3]+ Stopped yes | uniq >/dev/null
/home/larry#
The “-” means that job number 1 is second in line to be put in the foreground, if you just type
fg without giving it any parameters. The “+” means the specified job is first in line—a fg without
parameters will bring job number 3 to the foreground. However, you can get to it by naming it, if
you wish:
/home/larry# fg %1
yes >/dev/null
[now type ctrl-z to suspend it]
58 Chapter 6. Working with Unix
[1]+ Stopped yes >/dev/null
/home/larry#
Having changed to job number 1 and then suspending it has also changed the priorities of all
your jobs. You can see this with the jobs command:
/home/larry# jobs
[1]+ Stopped yes >/dev/null
[3]- Stopped yes | uniq >/dev/null
/home/larry#
Now they are both stopped (because both were suspended with ctrl-z ), and number 1 is next
in line to come to the foreground by default. This is because you put it in the foreground manually,
and then suspended it. The “+” always refers to the most recent job that was suspended from the
foreground. You can start it running again:
/home/larry# bg
[1]+ yes >/dev/null &
/home/larry# jobs
[1]- Running yes >/dev/null
[3]+ Stopped yes | uniq >/dev/null
/home/larry#
Notice that now it is running, and the other job has moved back up in line and has the +. Now
let’s kill them all so your system isn’t permanently slowed by processes doing nothing.
/home/larry# kill %1 %3
[3] Terminated yes | uniq >/dev/null
/home/larry# jobs
[1]+ Terminated yes >/dev/null
/home/larry#
You should see various messages about termination of jobs—nothing dies quietly, it seems. Fig-
ure 6.1 on the facing page shows a quick summary of what you should know for job control.
6.4.2 The Theory of Job Control
It is important to understand that job control is done by the shell. There is no program on the
system called fg; rather, fg, bg, &, jobs, and kill are all shell-builtins (actually, sometimes kill is
an independent program, but the bash shell used by Linux has it built in). This is a logical way to
do it: since each user wants their own job control space, and each user already has their own shell, it
is easiest to just have the shell keep track of the user’s jobs. Therefore, each user’s job numbers are
meaningful only to that user: my job number [1] and your job number [1] are probably two totally
different processes. In fact, if you are logged in more than once, each of your shells will have unique
job control data, so you as a user might have two different jobs with the same number running in
two different shells.
6.4. Multitasking 59
Figure 6.1 A summary of commands and keys used in job control.
fg %job This is a shell command that returns a job to the foreground. To find out which
one this is by default, type jobs and look for the one with the +.
Parameters: Optional job number. The default is the process identified with +.
& When an & is added to the end of the command line, it tells the command to run in
the background automatically. This process is then subject to all the usual methods
of job control detailed here.
bg %job This is a shell command that causes a suspended job to run in the background. To
find out which one this is by default, type jobs and look for the one with the +.
Parameters: Optional job number. The default is the process identified with +.
kill %job PID This is a shell command that causes a background job, either suspended or running,
to terminate. You should always specify the job number or PID, and if you are using
job numbers, remember to precede them with a %.
Parameters: Either the job number (preceded by %) or PID (no % is necessary).
More than one process or job can be specified on one line.
jobs This shell command just lists information about the jobs currently running or sus-
pending. Sometimes it also tells you about ones that have just exited or been
terminated.
ctrl-c This is the generic interrupt character. Usually, if you type it while a program is
running in the foreground, it will kill the program (sometimes it takes a few tries).
However, not all programs will respond to this method of termination.
ctrl-z This key combination usually causes a program to suspend, although a few programs
ignore it. Once suspended, the job can be run in the background or killed.
The way to tell for sure is to use the Process ID numbers (PID’s). These are system-wide — each
process has its own unique PID number. Two different users can refer to a process by its PID and
know that they are talking about the same process (assuming that they are logged into the same
machine!)
Let’s take a look at one more command to understand what PIDs are. The ps command will list
all running processes, including your shell. Try it out. It also has a few options, the most important
of which (to many people) are a, u, and x. The a option will list processes belonging to any user, not
just your own. The x switch will list processes that don’t have a terminal associated with them.6
Finally, the u switch will give additionally information about the process that is frequently useful.
To really get an idea of what your system is doing, put them all together: ps -aux. You can
then see the process that uses the more memory by looking at the %MEM column, and the most CPU
by looking at the %CPU column. (The TIME column lists the total amount of CPU time used.)
6This only makes sense for certain system programs that don’t have to talk to users through a keyboard.
60 Chapter 6. Working with Unix
Another quick note about PIDs. kill, in addition to taking options of the form %job#, will
take options of raw PIDs. So, put a yes > /dev/null in the background, run ps, and look for yes.
Then type kill PID.7
If you start to program in C on your Linux system, you will soon learn that the shell’s job control
is just an interactive version of the function calls fork and execl. This is too complex to go into
here, but may be helpful to remember later on when you are programming and want to run multiple
processes from a single program.
6.5 Virtual Consoles: Being in Many Places at Once
Linux supports virtual consoles. These are a way of making your single machine seem like multiple
terminals, all connected to one Linux kernel. Thankfully, using virtual consoles is one of the simplest
things about Linux: there are “hot keys” for switching among the consoles quickly. To try it, log in
to your Linux system, hold down the left Alt key, and press F2 (that is, the function key number
2).8
You should find yourself at another login prompt. Don’t panic: you are now on virtual console
(VC) number 2! Log in here and do some things — a few ls’s or whatever — to confirm that this is
a real login shell. Now you can return to VC number 1, by holding down the left Alt and pressing
F1 . Or you can move on to a third VC, in the obvious way ( Alt - F3 ).
Linux systems generally come with four VC’s enabled by default. You can increase this all the
way to eight; this should be covered in The Linux System Adminstrator’s Guide. It involves editing
a file in /etc or two. However, four should be enough for most people.
Once you get used to them, VC’s will probably become an indispensable tool for getting many
things done at once. For example, I typically run Emacs on VC 1 (and do most of my work there),
while having a communications program up on VC 3 (so I can be downloading or uploading files by
modem while I work, or running jobs on remote machines), and keep a shell up on VC 2 just in case
I want to run something else without tying up VC 1.
7In general, it’s easier to just kill the job number instead of using PIDs.
8Make sure you are doing this from text consoles: if you are running X windows or some other graphical application,
it probably won’t work, although rumor has it that X Windows will soon allow virtual console switching under Linux.
Chapter 7
Powerful Little Programs
better !pout !cry
better watchout
lpr why
santa claus <north pole >town
cat /etc/passwd >list
ncheck list
ncheck list
cat list | grep naughty >nogiftlist
cat list | grep nice >giftlist
santa claus <north pole > town
who | grep sleeping
who | grep awake
who | egrep ’bad|good’
for (goodness sake) {
be good
}
7.1 The Power of Unix
The power of Unix is hidden in small commands that don’t seem too useful when used alone, but
when combined with other commands (either directly or indirectly) produce a system that’s much
more powerful and flexible than most other operating systems. The commands I’m going to talk
about in this chapter include sort, grep, more, cat, wc, spell, diff, head, and tail. Unfortunately,
it isn’t totally intuitive what these names mean right now.
Let’s cover what each of these utilities do seperately and then I’ll give some examples of how to
use them together.1
1Please note that the short summaries on commands in this chapter are not comprehensive. Please consult the
61
62 Chapter 7. Powerful Little Programs
7.2 Operating on Files
In addition to the commands like cd, mv, and rm you learned in Chapter 4, there are other commands
that just operate on files but not the data in them. These include touch, chmod, du, and df. All
of these files don’t care what is in the file—the merely change some of the things Unix remembers
about the file.
Some of the things these commands manipulate:
• The time stamp. Each file has three dates associated with it.2
The three dates are the creation
time (when the file was created), the last modification time (when the file was last changed),
and the last access time (when the file was last read).
• The owner. Every file in Unix is owned by one user or the other.
• The group. Every file also has a group of users it is associated with. The most common group
for user files is called users, which is usually shared by all the user account on the system.
• The permissions. Every file has permissions (sometimes called “privileges”) associated with it
which tell Unix who can access what file, or change it, or, in the case of programs, execute it.
Each of these permissions can be toggled seperately for the owner, the group, and all other
users.
touch file1 file2 . . . fileN
touch will update the time stamps of the files listed on the command line to the current time.
If a file doesn’t exist, touch will create it. It is also possible to specify the time that touch will set
files to—consult the the manpage for touch.
chmod [-Rfv] mode file1 file2 . . . fileN
The command used to change the permissions on a file is called chmod, short for change mode.
Before I go into how to use the command, let’s discuss what permissions are in Unix. Each file has a
group of permissions associated with it. These permissions tell Unix whether or not the file can be
read from, written to, or executed as a program. (In the next few paragraphs, I’ll talk about users
doing these things. Any programs a user runs are allowed to do the same things a user is. This can
be a security problem if you don’t know what a particular program does.)
Unix recognizes three different types of people: first, the owner of the file (and the person allowed
to use chmod on that file). Second, the “group”. The group of most of your files might be “users”,
meaning the normal users of the system. (To find out the group of a particular file, use ls -l file.)
command’s manpage if you want to know every option.
2Older filesystems in Linux only stored one date, since they were derived from Minix. If you have one of these
filesystems, some of the information will merely be unavailable—operation will be mostly unchanged.
7.3. System Statistics 63
Then, there’s everybody else who isn’t the owner and isn’t a member of the group, appropriately
called “other”.
So, a file could have read and write permissions for the owner, read permissions for the group,
and no permissions for all others. Or, for some reason, a file could have read/write permissions for
the group and others, but no permissions for the owner!
Let’s try using chmod to change a few permissions. First, create a new file using cat, emacs, or
any other program. By default, you’ll be able to read and write this file. (The permissions given
other people will vary depending on how the system and your account is setup.) Make sure you can
read the file using cat. Now, let’s take away your read privilege by using chmod u-r filename. (The
parameter u-r decodes to “user minus read”.) Now if you try to read the file, you get a Permission
denied error! Add read privileges back by using chmod u+r filename.
Directory permissions use the same three ideas: read, write, and execute, but act slightly differ-
ently. The read privilege allows the user (or group or others) to read the directory—list the names
of the files. The write permission allows the user (or group or others) to add or remove files. The
execute permission allows the user to access files in the directory or any subdirectories. (If a user
doesn’t have execute permissions for a directory, they can’t even cd to it!)
To use chmod, replace the mode with what to operate on, either user, group, other, or all, and
what to do with them. (That is, use a plus sign to indicate adding a privilege or a minus sign
to indicate taking one away. Or, an equals sign will specify the exact permissions.) The possible
permissions to add are read, write, and execute.
chmod’s R flag will change a directory’s permissions, and all files in that directory, and all subdi-
recties, all the way down the line. (The ‘R’ stands for recursive.) The f flag forces chmod to attempt
to change permissions, even if the user isn’t the owner of the file. (If chmod is given the f flag, it
won’t print an error message when it fails to change a file’s permissions.) The v flag makes chmod
verbose—it will report on what it’s done.
7.3 System Statistics
Commands in this section will display statistics about the operating system, or a part of the operating
system.
du [-abs] [path1 path2 . . . pathN]
du stands for disk usage. It will count the amount of disk space a given directory and all its
subdirectories take up on the disk. du by itself will return a list of how much space every subdirectory
of the current directory consumes, and, at the very bottom, how much space the current directory
(plus all the previously counted subdirectories) use. If you give it a parameter or two, it will count
the amount of space used by those files or directories instead of the current one.
The a flag will display a count for files, as well as directories. An option of b will display, instead
of kilobytes (1024 characters), the total in bytes. One byte is the equivalent of one letter in a text
64 Chapter 7. Powerful Little Programs
document. And the s flag will just display the directories mentioned on the command-line and not
their subdirectories.
df
df is short for “disk filling”: it summarizes the amount of disk space in use. For each filesystem
(remember, different filesystems are either on different drives or partitions) it shows the total amount
of disk space, the amount used, the amount available, and the total capacity of the filesystem that’s
used.
One odd thing you might encounter is that it’s possible for the capacity to go over 100%, or the
used plus the available not to equal the total. This is because Unix reserves some space on each
filesystem for root. That way if a user accidentally fills the disk, the system will still have a little
room to keep on operating.
For most people, df doesn’t have any useful options.
uptime
The uptime program does exactly what one would suspect. It prints the amount of time the
system has been “up”—the amount of time from the last Unix boot.
uptime also gives the current time and the load average. The load average is the average number
of jobs waiting to run in a certain time period. uptime displays the load average for the last minute,
five minutes, and ten minutes. A load average near zero indicates the system has been relatively
idle. A load average near one indicates that the system has been almost fully utilized but nowhere
near overtaxed. High load averages are the result of several programs being run simultaneously.
Amazingly, uptime is one of the few Unix programs that have no options!
who
who displays the current users of the system and when they logged in. If given the parameters
am i (as in: who am i), it displays the current user.
w [-f] [username]
The w program displays the current users of the system and what they’re doing. (It basically
combines the functionality of uptime and who. The header of w is exactly the same as uptime, and
each line shows a user, when the logged on (and how long they’ve been idle). JCPU is the total
amount of CPU time used by that user, while PCPU the the total amount of CPU time used by their
present task.
7.4. What’s in the File? 65
If w is given the option f, it shows the remote system they logged in from, if any. The optional
parameter restricts w to showing only the named user.
7.4 What’s in the File?
There are two major commands used in Unix for listing files, cat and more. I’ve talked about both
of them in Chapter 6.
cat [-nA] [file1 file2 . . . fileN]
cat is not a user friendly command—it doesn’t wait for you to read the file, and is mostly used in
conjuction with pipes. However, cat does have some useful command-line options. For instance, n
will number all the lines in the file, and A will show control characters as normal characters instead of
(possibly) doing strange things to your screen. (Remember, to see some of the stranger and perhaps
“less useful” options, use the man command: man cat.) cat will accept input from stdin if no files
are specified on the command-line.
more [-l] [+linenumber] [file1 file2 . . . fileN]
more is much more useful, and is the command that you’ll want to use when browsing ASCII
text files. The only interesting option is l, which will tell more that you aren’t interested in treating
the character Ctrl-L as a “new page” character. more will start on a specified linenumber.
Since more is an interactive command, I’ve summarized the major interactive commands below:
Spacebar Moves to the next screen of text.
d This will scroll the screen by 11 lines, or about half a normal, 25-line, screen.
/ Searches for a regular expression. While a regular expression can be quite complicated, you can
just type in a text string to search for. For example, /toad return would search for the next
occurence of “toad” in your current file. A slash followed by a return will search for the next
occurence of what you last searched for.
n This will also search for the next occurence of your regular expression.
: n If you specified more than one file on the command line, this will move to the next file.
: p This will move the the previous file.
q Exits from more.
66 Chapter 7. Powerful Little Programs
head [-lines] [file1 file2 . . . fileN]
head will display the first ten lines in the listed files, or the first ten lines of stdin if no files are
specified on the command line. Any numeric option will be taken as the number of lines to print,
so head -15 frog will print the first fifteen lines of the file frog.
tail [-lines] [file1 file2 . . . fileN]
Like head, tail will display only a fraction of the file. Naturally, tail will display the end of the
file, or the last ten lines that come through stdin. tail also accepts a option specifying the number
of lines.
file [file1 file2 . . . fileN]
The file command attempts to identify what format a particular file is written in. Since not all
files have extentions or other easy to identify marks, the file command performs some rudimentary
checks to try and figure out exactly what it contains.
Be careful, though, because it is quite possible for file to make a wrong identification.
7.5 Information Commands
This section discusses the commands that will alter a file, perform a certain operation on the file,
or display statistics on the file.
grep [-nvwx] [-number] expression [file1 file2 . . . fileN]
One of the most useful commands in Unix is grep, the generalized regular expression parser.
This is a fancy name for a utility which can only search a text file. The easiest way to use grep is
like this:
/home/larry# cat animals
Animals are very interesting creatures. One of my favorite animals is
the tiger, a fearsome beast with large teeth.
I also like the lion---it’s really neat!
/home/larry# grep iger animals
the tiger, a fearsome beast with large teeth.
/home/larry#
One disadvantage of this is, although it shows you all the lines containing your word, it doesn’t
7.5. Information Commands 67
tell you where to look in the file—no line number. Depending on what you’re doing, this might be
fine. For instance, if you’re looking for errors from a programs output, you might try a.out | grep
error, where a.out is your program’s name.
If you’re interested in where the match(es) are, use the n switch to grep to tell it to print line
numbers. Use the v switch if you want to see all the lines that don’t match the specified expression.
Another feature of grep is that it matches only parts of a word, like my example above where
iger matched tiger. To tell grep to only match whole words, use the w, and the x switch will tell
grep to only match whole lines.
If you don’t specify any files, grep will examine stdin.
wc [-clw] [file1 file2 . . . fileN]
wc stands for word count. It simply counts the number of words, lines, and characters in the
file(s). If there aren’t any files specified on the command line, it operates on stdin.
The three parameters, clw, stand for character, line, and word respectively, and tell wc which
of the three to count. Thus, wc -cw will count the number of characters and words, but not the
number of lines. wc defaults to counting everything—words, lines, and characters.
One nice use of wc is to find how many files are in the present directory: ls | wc -w. If you
wanted to see how many files that ended with .c there are, try ls *.c | wc -w.
spell [file1 file2 . . . fileN]
spell is a very simple Unix spelling program, usually for American English.3
spell is a filter,
like most of the other programs we’ve talked about, which sucks in an ASCII text file and outputs
all the words it considers misspellings. spell operates on the files listed in the command line, or, if
there weren’t any there, stdin.
A more sophisticated spelling program, ispell is probably also available on your machine.
ispell will offer possible correct spellings and a fancy menu interface if a filename is specified on
the command line or will run as a filter-like program if no files are specified.
While operation of ispell should be fairly obvious, consult the man page if you need more help.
cmp file1 [file2]
cmp compares two files. The first must be listed on the command line, while the second is either
listed as the second parameter or is read in from standard input. cmp is very simple, and merely
tells you where the two files first differ.
3While there are versions of this for several other European languages, the copy on your Linux machine is most
likely for American English.
68 Chapter 7. Powerful Little Programs
diff file1 file2
One of the most complicated standard Unix commands is called diff. The GNU version of diff
has over twenty command line options! It is a much more powerful version of cmp and shows you
what the differences are instead of merely telling you where the first one is.
Since talking about even a good portion of diff is beyond the scope of this book, I’ll just talk
about the basic operation of diff. In short, diff takes two parameters and displays the differences
between them on a line-by-line basis. For instance:
/home/larry# cat frog
Animals are very interesting creatures. One of my favorite animals is
the tiger, a fearsome beast with large teeth.
I also like the lion---it’s really neat!
/home/larry# cp frog toad
/home/larry# diff frog toad
/home/larry# cat dog
Animals are very nteresting creatures. One of my favorite animals is
the tiger, a fearsome beast with large teeth.
I also like the lion---it’s really neat!
/home/larry# diff frog dog
1c1,2
< Animals are very interesting creatures. One of my favorite animals is
---
> Animals are very nteresting creatures. One of my favorite animals is
>
3c4
< I also like the lion---it’s really neat!
---
> I also like the lion---it’s really neat!
/home/larry#
As you can see, diff outputs nothing when the two files are identical. Then, when I compared
two different files, it had a section header, 1c1,2 saying it was comparing line 1 of the left file, frog,
to lines 1–2 of dog and what differences it noticed. Then it compared line 3 of frog to line 4 of dog.
While it may seem strange at first to compare different line numbers, it is much more efficent then
listing out every single line if there is an extra return early in one file.
gzip [-v#] [file1 file2 . . . fileN]
gunzip [-v] [file1 file2 . . . fileN]
zcat [file1 file2 . . . fileN]
These three programs are used to compress and decompress data. gzip, or GNU Zip, is the
7.5. Information Commands 69
program that reads in the original file(s) and outputs files that are smaller. gzip deletes the files
specified on the command line and replaces them with files that have an identical name except that
they have “.gz” appended to them.
tr string1 string2
The “translate characters” command operates on standard input—it doesn’t accept a filename as
a parameter. Instead, it’s two parameters are arbitrary strings. It replaces all occurences of string1
in the input with string2. In addition to relatively simple commands such as tr frog toad, tr
can accept more complicated commands. For instance, here’s a quick way of converting lowercase
characters into uppercase ones:
/home/larry# tr [:lower:] [:upper:]
this is a WEIRD sentence.
THIS IS A WEIRD SENTENCE.
tr is fairly complex and usually used in small shell programs.
70 Chapter 7. Powerful Little Programs
Chapter 8
Editing files with Emacs
FUNNY SOMETHING OR OTHER
8.1 What’s Emacs?
In order to get anything done on a computer, you need a way to put text into files, and a way to
change text that’s already in files. An editor is a program for doing this. Emacs is one of the most
popular editors around—partly because it’s very easy for a complete beginner to get actual work
done with it. (The classic Unix editor, vi, is covered in Appendix A.)
To learn emacs, you need to find a file of plain text (letters, numbers, and the like), copy it to
your home directory1
(we don’t want to modify the actual file, if it contains important information),
and invoke Emacs on the file:
/home/larry# emacs README
(Of course, if you decided to copy /etc/rc, /etc/inittab, or any other file, substitute that file
name for README. For instance, if you cp /etc/rc ~/rc, then emacs rc.)
“Invoking” Emacs can have different effects depending on where where you do it. From a plain
console displaying only text characters, Emacs will just take over the whole console. If you invoke
it from X, Emacs will actually bring up its own window. I will assume that you are doing it from a
text console, but everything carries over logically into the X Windows version—just substitute the
word “window” in the places I’ve written “screen”. Also, remeber that you have to move the mouse
pointer into Emacs’s window to type in it!
Your screen (or window, if you’re using X) should now resemble Figure 8.1. Most of the screen
contains your text document, but the last two lines are especially interesting if you’re trying to learn
Emacs. The second-to-last line (the one with the long string of dashes) is called the mode line.
1For instance, cp /usr/src/linux/README ./README
71
72 Chapter 8. Editing files with Emacs
Figure 8.1 Emacs was just started with emacs README
In my mode line, you see “Top”. It might be “All” instead, and there may be other minor differ-
ences. (Many people have the current time displayed in the mode line.) The line immediately below
the mode line is called the minibuffer, or sometimes the echo area. Emacs uses the minibuffer to
flash messages at you, and occasionally uses it to read input from you, when necessary. In fact, right
now Emacs is telling you “For information about the GNU Project and its goals, type C-h
C-p.” Ignore it for now; we won’t be making much use of the minibuffer for a while.
Before you actually change any of the text in the file, you need to learn how to move around.
The cursor should be at the beginning of the file, in the upper-left corner of the screen. To move
forward, type C-f (that is, hold down the Control key while you press “f”, for “forward”). It will
move you forward a character at a time, and if you hold both keys down, your system’s automatic
key-repeat should take effect in a half-second or so. Notice how when you get to the end of the line,
the cursor automatically moves to the next line. C-b (for “backward”) has the opposite behavior.
And, while we’re at it, C-n and C-p take you to the next and previous lines, respectively.2
Using the control keys is usually the quickest way of moving around when you’re editing. The
goal of Emacs is to keep your hands over the alpha-numeric keys of the keyboard, where most of
your work gets done. However, if you want to, the arrow keys should also work.
In fact, when you’re using X, you should be able to position the mouse pointer and click with
the left button to move the cursor where you want. However, this is very slow—you have to move
your hand all the way to your mouse! Most people who use Emacs primarily use the keyboard for
getting around.
Use C-p and C-b to get all the way back to the upper-left corner. Now keep C-b held a little
longer. You should hear an annoying bell sound, and see the message “Beginning of buffer”
2In case you hadn’t noticed yet, many of Emacs’s movement commands consist of combining Control with a
single mnemonic letter.
8.2. Getting Started Quickly in X 73
appear in the minibuffer. At this point you might wonder, “But what is a buffer?”
When Emacs works on a file, it doesn’t actually work on the file itself. Instead, it copies the
contents of the file into a special Emacs work area called a buffer, where you can modify it to your
heart’s content. When you are done working, you tell Emacs to save the buffer—in other words, to
write the buffer’s contents into the corresponding file. Until you do this, the file remains unchanged,
and the buffer’s contents exist only inside of Emacs.
With that in mind, prepare to insert your first character into the buffer. Until now, everything
we have done has been “non-destructive”, so this is a big moment. You can choose any character
you like, but if you want to do this in style, I suggest using a nice, solid, capital “X”. As you type
it, take a look at the beginning of the mode line at the bottom of the screen. When you change the
buffer so that its contents are no longer the same as those of the file on disk, Emacs displays two
asterisks at the beginning of the mode line, to let you know that the buffer has been modified:
--**-Emacs: some_file.txt (Fundamental)--Top------------------------
These two asterisks are displayed as soon as you modify the buffer, and remain visible until you
save the buffer. You can save the buffer multiple times during an editing session—the command
to do so is just C-x C-s (hold down Control and hit “x” and “s” while it’s down. . . okay, so you
probably already figured that out!). It’s deliberately easy to type, because saving your buffers is
something best done early and often.
I’m going to list a few more commands now, along with the ones you’ve learned already, and
you can practice them however you like. I’d suggest becoming familiar with them before going any
further:
C-f Move forward one character.
C-b Move backward one character.
C-n Go to next line.
C-p Go to previous line.
C-a Go to beginning of line.
C-e Go to end of line.
C-v Go to next page/screenful of text.
C-l Redraw the screen, with current line in center.
C-d Delete this character (practice this one).
C-k Delete text from here to end of line.
C-x C-s Save the buffer in its corresponding file.
Backspace Delete preceding character (the one you just typed).
8.2 Getting Started Quickly in X
If all you’re interesting in is editing a few files quickly, an X user doesn’t have to go much further
beyond the menus at the top of the screen:
74 Chapter 8. Editing files with Emacs
These menus are not available in text mode.
When you first start Emacs, there will be four menus at the top of the screen: Buffers, File, Edit,
and Help. To use a menu, simply move the mouse pointer over the name (like File, click and hold
down on the left button. Then, move the pointer to the action you want and release the mouse
button. If you change your mind, move the mouse pointer away from the menu and release the
button.
The Buffers menu lists the different files you’ve been editing in this incarnation of Emacs.The
File menu shows a bunch of commands for loading and saving files—many of them will be described
later. The Edit menu displays some commands for editing one buffer, and the Help menu should
hopefully give on-line documentation.
You’ll notice keyboard equivalents are listed next to the choices in the menu. Since, in the long
run, they’ll be quicker, you might want to learn them. Also, for better or for worse, most of Emacs’s
functionality is only available through the keyboard—you might want to read the rest of this chapter.
8.3 Editing Many Files at Once
Emacs can work on more than one file at a time. In fact, the only limit on how many buffers your
Emacs can contain is the actual amount of memory available on the machine. The command to
bring a new file into an Emacs buffer is C-x C-f. When you type it, you will be prompted for a
filename in the minibuffer:
Find file: ~/
The syntax here is the same one used to specify files from the shell prompt; slashes represent
subdirectories, ~means your home directory. You also get filename completion, meaning that if
you’ve typed enough of a filename at the prompt to identify the file uniquely, you can just hit Tab
to complete it (or to show possible completions, if there are more than one). Space also has a role
in filename completion in the minibuffer, similar to Tab , but I’ll let you experiment to find out
how the two differ. Once you have the full filename in the minibuffer, hit Return , and Emacs will
bring up a buffer displaying that file. In Emacs, this process is known as finding a file. Go ahead
and find some other unimportant text file now, and bring it into Emacs (do this from our original
buffer some file.txt). Now you have a new buffer; I’ll pretend it’s called another file.txt, since
I can’t see your mode line.
Your original buffer seems to have disappeared—you’re probably wondering where it went. It’s
still inside Emacs, and you can switch back to it with C-x b. When you type this, you will see that
the minibuffer prompts you for a buffer to switch to, and it names a default. The default is the
buffer you’d get if you just hit Return at the prompt, without typing a buffer name. The default
buffer to switch to is always the one most recently left, so that when you are doing a lot of work
between two buffers, C-x b always defaults to the “other” buffer (which saves you from having to
type the buffer name). Even if the default buffer is the one you want, however, you should try typing
in its name anyway.
8.4. Ending an Editing Session 75
Notice that you get the same sort of completion you got when finding a file: hitting Tab
completes as much of a buffer name as it can, and so on. Whenever you are being prompted for
something in the minibuffer, it’s a good idea to see if Emacs is doing completion. Taking advantage
of completion whenever it’s offered will save you a lot of typing. Emacs usually does completion
when you are choosing one item out of some predefined list.
Everything you learned about moving around and editing text in the first buffer applies to the
new one. Go ahead and change some text in the new buffer, but don’t save it (i.e. don’t type
C-x C-s). Let’s assume that you want to discard your changes without saving them in the file. The
command for that is C-x k, which “kills” the buffer. Type it now. First you will be asked which
buffer to kill, but the default is the current buffer, and that’s almost always the one you want to
kill, so just hit Return . Then you will be asked if you really want to kill the buffer—Emacs always
checks before killing a buffer that has unsaved changes in it. Just type “yes” and hit Return , if
you want to kill it.
Go ahead and practice loading in files, modifying them, saving them, and killing their buffers.
Make sure you don’t modify any important system files in a way that will cause trouble3
, of course,
but do try to have at least five buffers open at once, so you can get the hang of switching between
them.
8.4 Ending an Editing Session
When you are done with your work in Emacs, make sure that all buffers are saved that should be
saved, and exit Emacs with C-x C-c. Sometimes C-x C-c will ask you a question or two in the
minibuffer before it lets you leave—don’t be alarmed, just answer them in the obvious ways. If you
think that you might be returning to Emacs later, don’t use C-x C-c at all; use C-z, which will
suspend Emacs. You can return to it with the shell command “fg” later. This is more efficient than
stopping and starting Emacs multiple times, especially if you have edit the same files again later.
Under X, hitting C-z will merely iconize the window. See the section on iconization in Chapter 5.
This gives you two ways of iconizing Emacs—the normal way your window manager offers, and C-z.
Remember, when you iconize, a simply fg won’t bring the window back—you’ll have to use your
window manager.
8.5 The Meta Key
You’ve already learned about one “modifier key” in Emacs, the Control key. There is a second
one, called the Meta key, which is used almost as frequently. However, not all keyboards have their
Meta key in the same place, and some don’t have one at all. The first thing you need to do is find
where your Meta key is located. Chances are, your keyboard’s Alt keys are also Meta keys, if you
are using an IBM PC or other another keyboard that has an Alt key.
3If you are not the “root” user on the machine, you shouldn’t be able to hurt the system anyway, but be careful
just the same.
76 Chapter 8. Editing files with Emacs
The way to test this is to hold down a key that you think might be a Meta key and type “x”. If
you see a little prompt appear in the minibuffer (like this: M-x) then you’ve found it. To get rid of
the prompt and go back to your Emacs buffer, type C-g.
If you didn’t get a prompt, then there is still one solution. You can use the Escape key as a
Meta key. But instead of holding it down while you type the next letter, you have to tap it and
release it quickly, and then type the letter. This method will work whether or not you have a real
Meta key, so it’s the safest way to go. Try tapping Escape and then typing “x” now. You should
get that tiny prompt again. Just use C-g to make it go away. C-g is the general way in Emacs to
quit out of something you don’t mean to be in. It usually beeps annoyingly at you to let you know
that you have interrupted something, but that’s fine, since that’s what you intended to do if you
typed C-g!4
The notation M-x is analogous to C-x (substitute any character for “x”). If you have found a
real Meta key, use that, otherwise just use the Escape key. I will simply write M-x and you’ll have
to use your own Meta key.
8.6 Cutting, Pasting, Killing and Yanking
Emacs, like any good editor, allows you to cut and paste blocks of text. In order to do this, you need
a way to define the start and end of the block. In Emacs, you do this by setting two locations in the
buffer, known as mark and point. To set the mark, go to the place you want your block to begin
and type C-SPC (“SPC” means Space , of course). You should see the message “Mark set” appear
in the minibuffer.5
The mark has now been set at that place. There will be no special highlighting
indicating that fact, but you know where you put it, and that’s all that matters.
What about point? Well, it turns out that you’ve been setting point every time you move the
cursor, because “point” just refers to your current location in the buffer. In formal terms, point
is the spot where text would be inserted if you were to type something. By setting the mark, and
then moving to the end of the block of text, you have actually defined a block of text. This block is
known as the region. The region always means the area between mark and point.
Merely defining the region does not make it available for pasting. You have to tell Emacs to
copy it in order to be able to paste it. To copy the region, make sure that mark and point are set
correctly, and type M-w. It has now been recorded by Emacs. In order to paste it somewhere else,
just go there and type C-y. This is known as yanking the text into the buffer.
If you want to actually move the text of the region to somewhere else, type C-w instead of M-w.
This will kill the region—all the text inside it will disappear. In fact, it has been saved in the same
way as if you had used M-w. You can yank it back out with C-y, as always. The place Emacs saves
all this text is known as the kill-ring. Some editors call it the “clipboard” or the “paste buffer”.
There’s another way to do cutting and pasting: whenever you use C-k to kill to the end of a line,
the killed text is saved in the kill-ring. If you kill more than one line in a row, they are all saved
4Occasionally, even one C-g isn’t enough to persuade Emacs that you really wanted to interrupt what you’re doing.
Just keep at it, and Emacs will usually return to a saner mode.
5On some terminals, C-SPC doesn’t work. For these machines, you must use C-@.
8.7. Searching and Replacing 77
in the kill-ring together, so that the next yank will paste in all the lines at once. Because of this
feature, it is often faster to use repeated C-k’s to kill some text than it is to explicitly set mark and
point and use C-w. However, either way will work. It’s really a matter of personal preference how
you do it.
8.7 Searching and Replacing
There are several ways to search for text in Emacs. Many of them are rather complex, and not
worth going into here. The easiest and most entertaining way is to use isearch. “Isearch” stands
for “incremental search”. Suppose you want to search for the string “gadfly” in the following buffer:
I was growing afraid that we would run out of gasoline, when my passenger exclaimed
‘‘Gadzooks! There’s a gadfly in here!’’.
You would move to the beginning of the buffer, or at least to some point that you know is before
the first occurence of the goal word, “gadfly”, and type C-s. That puts you in isearch mode. Now
start typing the word you are searching for, “gadfly”. But as soon as you type the “g”, you see that
Emacs has jumped you to the first occurence of “g” in the buffer. If the above quote is the entire
contents of the buffer, then that would be the first “g” of the word “growing”. Now type the “a”
of “gadfly”, and Emacs leaps over to “gasoline”, which contains the first occurence of a “ga”. The
“d” gets you to gadzooks, and finally, “f” gets you to “gadfly”, without your having had to type the
entire word.
What you are doing in an isearch is defining a string to search for. Each time you add a character
to the end of the string, the number of matches is reduced, until eventually you have entered enough
to define the string uniquely. Once you have found the match you are looking for, you can exit
the search with Return or any of the normal movement commands. If you think the string you’re
looking for is behind you in the buffer, then you should use C-r, which does an isearch backwards.
If you encounter a match, but it’s not the one you were looking for, then hit C-s again while
still in the search. This will move you forward to the next complete match, each time you hit it. If
there is no next match, it will say that the search failed, but if you press C-s again at that point,
the search will wrap around from the beginning of the buffer. The reverse holds true for C-r — it
wraps around the end of the buffer.
Try bringing up a buffer of plain English text and doing and isearch for the string “the”. First
you’d type in as much as you wanted, then use repeated C-s’s to go to all instances of it. Notice
that it will match words like “them” as well, since that also contains the substring “the”. To search
only for “the”, you’d have to do add a space to the end of your search string. You can add new
characters to the string at any point in the search, even after you’ve hit C-s repeatedly to find the
next matches. You can also use Backspace or Delete to remove characters from the search string
at any point in the search, and hitting Return exits the search, leaving you at the last match.
Emacs also allows you to replace all instances of a string with some new string—this is known
as query-replace. To invoke it, type query-replace and hit Return . Completion is done on the
78 Chapter 8. Editing files with Emacs
command name, so once you have typed “query-re”, you can just hit Tab to finish it. Say you
wish to replace all instances of “gadfly” with “housefly”. At the “Query replace: ” prompt,
type “gadfly”, and hit Return . Then you will be prompted again, and you should enter “housefly”.
Emacs will then step through the buffer, stopping at every instance of the word “gadfly”, and asking
if you want to replace it. Just hit “y” or “n” at each instance, for “Yes” or “No”, until it finishes.
If this doesn’t make sense as you read it, then try it out.
8.8 What’s Really Going On Here?
Actually, all these keybindings you have been learning are shortcuts to Emacs functions. For exam-
ple, C-p is a short way of telling Emacs to execute the internal function previous-line. However,
all these internal functions can be called by name, using M-x. If you forgot that previous-line
is bound to C-p, you could just type M-x previous-line Return , and it would move you up one
line. Try this now, to understand how M-x previous-line and C-p are really the same thing.
The designer of Emacs started from the ground up, first defining a whole lot of internal functions,
and then giving keybindings to the most commonly-used ones. Sometimes it’s easier just to call a
function explicitly with M-x than to remember what key it’s bound to. The function query-replace,
for example, is bound to M-% in some versions of Emacs. But who can remember such an odd
keybinding? Unless you use query-replace extremely often, it’s easier just to call it with M-x.
Most of the keys you type are letters, meant to be inserted into the text of the buffer. So each
of those keys is bound to the function self-insert-command, which does nothing but insert that
letter into the buffer. Combinations that use the Control key with a letter are generally bound to
functions that do other things, like moving you around. For example, C-v is bound to a function
called scroll-up, which scrolls the buffer up by one screenful (meaning that your position in the
buffer moves down, of course).
If you ever actually wanted to insert a Control character into the buffer, then, how would you do
it? After all, the Control characters are ASCII characters, although rarely used, and you might want
them in a file. There is a way to prevent Control characters from being interpreted as commands
by Emacs. The key C-q6
is bound to a special function named quoted-insert. All quoted-insert
does is read the next key and insert it literally into the buffer, without trying to interpret it as a
command. This is how you can put Control characters into your files using Emacs. Naturally, the
way to insert a C-q is to press C-q twice!
Emacs also has many functions that are not bound to any key. For example, if you’re typing
a long message, you don’t want to have to hit return at the end of every line. You can have
Emacs do it for you (you can have Emacs do anything for you)—the command to do so is called
auto-fill-mode, but it’s not bound to any keys by default. In order to invoke this command, you
would type “M-x auto-fill-mode”. “M-x” is the key used to call functions by name. You could
even use it to call functions like next-line and previous-line, but that would be very inefficient,
since they are already bound to C-n and C-p!
6We call C-q a “key”, even though it is produced by holding down Control and pressing “q”, because it is a single
ASCII character.
8.9. Asking Emacs for Help 79
By the way, if you look at your mode line after invoking auto-fill-mode, you will notice that
the word “Fill” has been added to the right side. As long as it’s there, Emacs will fill (wrap) text
automatically. You can turn it off by typing “M-x auto-fill-mode” again—it’s a toggle command.
The inconvenience of typing long function names in the minibuffer is lessened because Emacs
does completion on function names the same way it does on file names. Therefore, you should rarely
find yourself typing in the whole function name, letter by letter. If you’re not sure whether or not
you can use completion, just hit Tab . It can’t hurt: the worst thing that will happen is that you’ll
just get a tab character, and if you’re lucky, it’ll turn out that you can use completion.
8.9 Asking Emacs for Help
Emacs has extensive help facilities—so extensive, in fact, that we can only touch on them here.
The most basic help features are accessed by typing C-h and then a single letter. For example,
C-h k gets help on a key (it prompts you to type a key, then tells you what that key does). C-h t
brings up a short Emacs tutorial. Most importantly, C-h C-h C-h gets you help on help, to tell you
what’s available once you have typed C-h the first time. If you know the name of an Emacs function
(save-buffer, for example), but can’t remember what key sequence invokes it, then use C-h w, for
“where-is”, and type in the name of the function. Or, if you want to know what a function does
in detail, use C-h f, which prompts for a function name.
Remember, since Emacs does completion on function names, you don’t really have to be sure
what a function is called to ask for help on it. If you think you can guess the word it might start
with, type that and hit Tab to see if it completes to anything. If not, back up and try something
else. The same goes for file names: even if you can’t remember quite what you named some file that
you haven’t accessed for three months, you can guess and use completion to find out if you’re right.
Get used to using completion as means of asking questions, not just as a way of saving keystrokes.
There are other characters you can type after C-h, and each one gets you help in a different way.
The ones you will use most often are C-h k, C-h w, and C-h f. Once you are more familiar with
Emacs, another one to try is C-h a, which prompts you for a string and then tells you about all the
functions who have that string as part of their name (the “a” means for “apropos”, or “about”).
Another source of information is the Info documentation reader. Info is too complex a subject
to go into here, but if you are interested in exploring it on your own, type C-h i and read the
paragraph at the top of the screen. It will tell you how get more help.
8.10 Specializing Buffers: Modes
Emacs buffers have modes associated with them7
. The reason for this is that your needs when
writing a mail message are very different from your needs when, say, writing a program. Rather
than try to come up with an editor that would meet every single need all the time (which would be
7To make matters worse, there are “Major Modes” and “Minor Modes”, but you don’t need to know about that
right now.
80 Chapter 8. Editing files with Emacs
impossible), the designer of Emacs8
chose to have Emacs behave differently depending on what you
are doing in each individual buffer. Thus, buffers have modes, each one designed for some specific
activity. The main features that distinguish one mode from another are the keybindings, but there
can be other differences as well.
The most basic mode is fundamental mode, which doesn’t really have any special commands at
all. In fact, here’s what Emacs has to say about Fundamental Mode:
Fundamental Mode:
Major mode not specialized for anything in particular.
Other major modes are defined by comparison with this one.
I got that information like this: I typed C-x b, which is switch-to-buffer, and entered “foo”
when it prompted me for a buffer name to switch to. Since there was previously no buffer named
“foo”, Emacs created one and switched me to it. It was in fundamental-mode by default, but it it
hadn’t been, I could have typed “M-x fundamental-mode” to make it so. All mode names have a
command called <modename>-mode which puts the current buffer into that mode. Then, to find out
more information about that major mode, I typed C-h m, which gets you help on the current major
mode of the buffer you’re in.
There’s a slightly more useful mode called text-mode, which has the special commands M-S, for
center-paragraph, and M-s, which invokes center-line. M-S, by the way, means exactly what
you think it does: hold down both the Meta and the Shift key, and press “S”.
Don’t just take my word for this—go make a new buffer, put it into text-mode, and type C-h m.
You may not understand everything Emacs tells you when you do that, but you should be able to
get some useful information out of it.
Here is an introduction to some of the more commonly used modes. If you use them, make sure
that you type C-h m sometime in each one, to find out more about each mode.
8.11 Programming Modes
8.11.1 C Mode
If you use Emacs for programming in the C language, you can get it to do all the indentation
for you automatically. Files whose names end in “.c ” or “.h” are automatically brought up in
c-mode. This means that certain special editing commands, useful for writing C-programs, are
available. In C-mode, Tab is bound to c-indent-command. This means that hitting the Tab
key does not actually insert a tab character. Instead, if you hit Tab anywhere on a line, Emacs
automatically indents that line correctly for its location in the program. This implies that Emacs
knows something about C syntax, which it does (although nothing about semantics—it cannot insure
that your program has no errors!)
8Richard Stallman, also sometimes referred to as “rms”, because that’s his login name.
8.11. Programming Modes 81
In order to do this, it assumes that the previous lines are indented correctly. That means that if
the preceding line is missing a parenthesis, semicolon, curly brace, or whatever, Emacs will indent
the current line in a funny way. When you see it do that, you will know to look for a punctuation
mistake on the line above.
You can use this feature to check that you have punctuated your programs correctly—instead
of reading through the entire program looking for problems, just start indenting lines from the top
down with Tab , and when something indents oddly, check the lines just before it. In other words,
let Emacs do the work for you!
8.11.2 Scheme Mode
This is a major mode that won’t do you any good unless you have a compiler or an interpreter for
the Scheme programming language on your system. Having one is not as normal as having, say, a
C compiler, but it’s becoming more and more common, so I’ll cover it too. Much of what is true for
Scheme mode is true for Lisp mode as well, if you prefer to write in Lisp.
Well, to make matters painful, Emacs comes with two different Scheme modes, because people
couldn’t decide how they wanted it to work. The one I’m describing is called cmuscheme, and later
on, in the section on customizing Emacs, I’ll talk about how there can be two different Scheme
modes and what to do about it. For now, don’t worry about it if things in your Emacs don’t quite
match up to what I say here. A customizable editor means an unpredictable editor, and there’s no
way around that!
You can run an interactive Scheme process in Emacs, with the command M-x run-scheme. This
creates a buffer named “*scheme*”, which has the usual Scheme prompt in it. You can type in
Scheme expressions at the prompt, hit Return , and Scheme will evaluate them and display the
answer. Thus, in order to interact with the Scheme process, you could just type all your function
definitions and applications in at the prompt. Chances are you have previously-written Scheme
source code in a file somewhere, and it would be easier to do your work in that file and send the
definitions over to the Scheme process buffer as necessary.
If that source file ends in “.ss” or “.scm”, it will automatically be brought up in Scheme mode
when you find it with C-x C-f. If for some reason, it doesn’t come up in Scheme mode, you can do
it by hand with M-x scheme-mode. This scheme-mode is not the same thing as the buffer running
the Scheme process; rather, the source code buffer’s being in scheme-mode means that it has special
commands for communicating with the process buffer.
If you put yourself inside a function definition in the Scheme source code buffer and type C-c C-e,
then that definition will be “sent” to the process buffer — exactly as if you had typed it in yourself.
C-c M-e sends the definition and then brings you to the process buffer to do some interactive work.
C-c C-l loads a file of Scheme code (this one works from either the process buffer or the source
code buffer). And like other programming language modes, hitting Tab anywhere on a line of code
correctly indents that line.
If you’re at the prompt in the process buffer, you can use M-p and M-n to move through your
previous commands (also known as the input history). So if you are debugging the function
82 Chapter 8. Editing files with Emacs
‘rotate’, and have already applied it to arguments in the process buffer, like so:
> (rotate ’(a b c d e))
then you can get that command back by typing M-p at the prompt later on. There should be no
need to retype long expressions at the Scheme prompt — get in the habit of using the input history
and you’ll save a lot of time.
Emacs knows about quite a few programming languages: C, C++, Lisp, and Scheme are just
some. Generally, it knows how to indent them in intuitive ways.
8.11.3 Mail Mode
You can also edit and send mail in Emacs. To enter a mail buffer, type C-x m. You need to fill in
the To: and Subject: fields, and then use C-n to get down below the separator line into the body
of the message (which is empty when you first start out). Don’t change or delete the separator line,
or else Emacs will not be able to send your mail—it uses that line to distinguish the mail’s headers,
which tell it where to send the mail, from the actual contents of the message.
You can type whatever you want below the separator line. When you are ready to send the
message, just type C-c C-c, and Emacs will send it and then make the mail buffer go away.
8.12 Being Even More Efficient
Experienced Emacs users are fanatical about efficiency. In fact, they will often end up wasting a lot
of time searching for ways to be more efficient! While I don’t want that to happen to you, there are
some easy things you can do to become a better Emacs user. Sometimes experienced users make
novices feel silly for not knowing all these tricks—for some reason, people become religious about
using Emacs “correctly”. I’d condemn that sort of elitism more if I weren’t about to be guilty of it
myself. Here we go:
When you’re moving around, use the fastest means available. You know that C-f is forward-char—
can you guess that M-f is forward-word? C-b is backward-char. Guess what M-b does? That’s
not all, though: you can move forward a sentence at a time with M-e, as long as you write your
sentences so that there are always two spaces following the final period (otherwise Emacs can’t tell
where one sentence ends and the next one begins). M-a is backward-sentence.
If you find yourself using repeated C-f’s to get to the end of the line, be ashamed, and make
sure that you use C-e instead, and C-a to go to the beginning of the line. If you use many C-n’s to
move down screenfuls of text, be very ashamed, and use C-v forever after. If you are using repeated
C-p’s to move up screenfuls, be embarrassed to show your face, and use M-v instead.
If you are nearing the end of a line and you realize that there’s a mispelling or a word left out
somewhere earlier in the line, don’t use Backspace or Delete to get back to that spot. That would
require retyping whole portions of perfectly good text. Instead, use combinations of M-b, C-b, and
C-f to move to the precise location of the error, fix it, and then use C-e to move to the end of the
line again.
8.13. Customizing Emacs 83
When you have to type in a filename, don’t ever type in the whole name. Just type in enough
of it to identify it uniquely, and let Emacs’s completion finish the job by hitting Tab or Space .
Why waste keystrokes when you can waste CPU cycles instead?
If you are typing some kind of plain text, and somehow your auto-filling (or auto-wrapping) has
gotten screwed up, use M-q, which is fill-paragraph in common text modes. This will “adjust”
the paragraph you’re in as if it had been wrapped line by line, but without your having to go mess
around with it by hand. M-q will work from inside the paragraph, or from its very beginning or end.
Sometimes it’s helpful to use C-x u, (undo), which will try to “undo” the last change(s) you
made. Emacs will guess at how much to undo; usually it guesses very intelligently. Calling it
repeatedly will undo more and more, until Emacs can no longer remember what changes were made.
8.13 Customizing Emacs
Emacs is so big, and so complex, that it actually has its own programming language! I’m not
kidding: to really customize Emacs to suit your needs, you have to write programs in this language.
It’s called Emacs Lisp, and it’s a dialect of Lisp, so if you have previous experience in Lisp, it will
seem quite friendly. If not, don’t worry: I’m not going to go into a great deal of depth, because it’s
definitely best learned by doing. To really learn about programming Emacs, you should consult the
Info pages on Emacs Lisp, and read a lot of Emacs Lisp source code.
Most of Emacs’s functionality is defined in files of Emacs Lisp9
code. Most of these files
are distributed with Emacs and collectively are known as the “Emacs Lisp library”. This li-
brary’s location depends on how Emacs was installed on your system — common locations are
/usr/lib/emacs/lisp, /usr/lib/emacs/19.19/lisp/, etc. The “19.19” is the version number of
Emacs, and might be different on your system.
You don’t need to poke around your filesystem looking for the lisp library, because Emacs has the
information stored internally, in a variable called load-path. To find out the value of this variable,
it is necessary to evaluate it; that is, to have Emacs’s lisp interpreter get its value. There is a special
mode for evaluating Lisp expressions in Emacs, called lisp-interaction-mode. Usually, there is a
buffer called “*scratch*” that is already in this mode. If you can’t find one, create a new buffer of
any name, and type M-x lisp-interaction-mode inside it.
Now you have a workspace for interacting with the Emacs Lisp interpreter. Type this:
load-path
and then press C-j at the end of it. In lisp-interaction-mode, C-j is bound to eval-print-last-sexp.
An “sexp” is an “s-expression”, which means a balanced group of parentheses, including none.
Well, that’s simplifying it a little, but you’ll get a feel for what they are as you work with Emacs
Lisp. Anyway, evaluating load-path should get you something like this:
load-path C-j
("/usr/lib/emacs/site-lisp/vm-5.35" "/home/kfogel/elithp"
9Sometimes unofficially called “Elisp”.
84 Chapter 8. Editing files with Emacs
"/usr/lib/emacs/site-lisp" "/usr/lib/emacs/19.19/lisp")
It won’t look the same on every system, of course, since it is dependant on how Emacs was
installed. The above example comes from my 386 PC running Linux. As the above indicates,
load-path is a list of strings. Each string names a directory that might contain Emacs Lisp files.
When Emacs needs to load a file of Lisp code, it goes looking for it in each of these directories, in
order. If a directory is named but does not actually exist on the filesystem, Emacs just ignores it.
When Emacs starts up, it automatically tries to load the file .emacs in your home directory.
Therefore, if you want to make personal customizations to Emacs, you should put them in .emacs.
The most common customizations are keybindings, so here’s how to do them:
(global-set-key "C-cl" ’goto-line)
global-set-key is a function of two arguments: the key to be bound, and the function to bind
it to. The word “global” means that this keybinding will be in effect in all major modes (there is
another function, local-set-key, that binds a key in a single buffer). Above, I have bound C-c l
to the function goto-line. The key is described using a string. The special syntax “C-<char>”
means the Control key held down while the key <char> is pressed. Likewise, “M-<char>” indicates
the Meta key.
All very well, but how did I know that the function’s name was “goto-line”? I may know that
I want to bind C-c l to some function that prompts for a line number and then moves the cursor
to that line, but how did I find out that function’s name?
This is where Emacs’s online help facilities come in. Once you have decided what kind of
function you are looking for, you can use Emacs to track down its exact name. Here’s one quick
and dirty way to do it: since Emacs gives completion on function names, just type C-h f (which
is describe-function, remember), and then hit Tab without typing anything. This asks Emacs
to do completion on the empty string — in other words, the completion will match every single
function! It may take a moment to build the completion list, since Emacs has so many internal
functions, but it will display as much of it as fits on the screen when it’s ready.
At that point, hit C-g to quit out of describe-function. There will be a buffer called “*Completions*”,
which contains the completion list you just generated. Switch to that buffer. Now you can use C-s,
isearch, to search for likely functions. For example, it’s a safe assumption that a function which
prompts for a line number and then goes to that line will contain the string “line” in its name.
Therefore, just start searching for the string “line”, and you’ll find what you’re looking for eventu-
ally.
If you want another method, you can use C-h a, command-apropos, to show all functions whose
names match the given string. The output of command-apropos is a little harder to sort through
than just searching a completion list, in my opinion, but you may find that you feel differently. Try
both methods and see what you think.
There is always the possibility that Emacs does not have any predefined function to do what
you’re looking for. In this situation, you have to write the function yourself. I’m not going to
talk about how to do that — you should look at the Emacs Lisp library for examples of function
definitions, and read the Info pages on Emacs Lisp. If you happen to know a local Emacs guru, ask
8.13. Customizing Emacs 85
her how to do it. Defining your own Emacs functions is not a big deal — to give you an idea, I have
written 131 of them in the last year or so. It takes a little practice, but the learning curve is not
steep at all.
Another thing people often do in their .emacs is set certain variables to preferred values. For
example, put this in your .emacs and then start up a new Emacs:
(setq inhibit-startup-message t)
Emacs checks the value of the variable inhibit-startup-message to decide whether or not to
display certain information about version and lack of warranty when it starts up. The Lisp expression
above uses the command setq to set that variable to the value ‘t’, which is a special Lisp value that
means true. The opposite of ‘t’ is ‘nil’, which is the designated false value in Emacs Lisp. Here
are two things that are in my .emacs that you might find useful:
(setq case-fold-search nil) ; gives case-insensitivity in searching
;; make C programs indent the way I like them to:
(setq c-indent-level 2)
The first expression causes searches (including isearch) to be case-insensitive; that is, the search
will match upper- or lower-case versions of a character even though the search string contains only
the lower-case version. The second expression sets the default indentation for C language statements
to be a little smaller than it is normally — this is just a personal preference; I find that it makes C
code more readable.
The comment character in Lisp is “;”. Emacs ignores anything following one, unless it appears
inside a literal string, like so:
;; these two lines are ignored by the Lisp interpreter, but the
;; s-expression following them will be evaluated in full:
(setq some-literal-string "An awkward pause; for no purpose.")
It’s a good idea to comment your changes to Lisp files, because six months later you will have
no memory of what you were thinking when you modified them. If the comment appears on a line
by itself, precede it with two semicolons. This aids Emacs in indenting Lisp files correctly.
You can find out about internal Emacs variables the same ways you find out about functions. Use
C-h v, describe-variable to make a completion list, or use C-h C-a, apropos. Apropos differs
from C-h a, command-apropos, in that it shows functions and variables instead of just functions.
The default extension for Emacs Lisp files is “.el”, as in “c-mode.el”. However, to make Lisp
code run faster, Emacs allows it to be byte-compiled, and these files of compiled Lisp code end
in “.elc” instead of “.el”. The exception to this is your .emacs file, which does not need the .el
extension because Emacs knows to search for it on startup.
To load a file of Lisp code interactively, use the command M-x load-file. It will prompt you
for the name of the file. To load Lisp files from inside other Lisp files, do this:
(load "c-mode") ; force Emacs to load the stuff in c-mode.el or .elc
86 Chapter 8. Editing files with Emacs
Emacs will first add the .elc extension to the filename and try to find it somewhere in the
load-path. If it fails, it tries it with the .el extension; failing that, it uses the literal string as
passed to load. You can byte-compile a file with the command M-x byte-compile-file, but if
you modify the file often, it’s probably not worth it. You should never byte-compile your .emacs,
though, nor even give it a .el extension.
After your .emacs has been loaded, Emacs searches for a file named default.el to load. Usually
it’s located in a directory in load-path called site-lisp or local-elisp or something (see the
example load-path I gave a while ago). People who maintain Emacs on multi-user systems use
default.el to make changes that will affect everyone’s Emacs, since everybody’s Emacs loads it after
their personal .emacs. Default.el should not be byte-compiled either, since it tends to be modified
fairly often.
If a person’s .emacs contains any errors, Emacs will not attempt to load default.el, but
instead will just stop, flashing a message saying “Error in init file.” or something. If you see
this message, there’s probably something wrong with your .emacs.
There is one more kind of expression that often goes in a .emacs. The Emacs Lisp library
sometimes offers multiple packages for doing the same thing in different ways. This means that you
have to specify which one you want to use (or you’ll get the default package, which is not always the
best one for all purposes). One area in which this happens is Emacs’s Scheme interaction features.
There are two different Scheme interfaces distributed with Emacs (in version 19 at least): xscheme
and cmuscheme.
prompt> ls /usr/lib/emacs/19.19/lisp/*scheme*
/usr/lib/emacs/19.19/lisp/cmuscheme.el
/usr/lib/emacs/19.19/lisp/cmuscheme.elc
/usr/lib/emacs/19.19/lisp/scheme.el
/usr/lib/emacs/19.19/lisp/scheme.elc
/usr/lib/emacs/19.19/lisp/xscheme.el
/usr/lib/emacs/19.19/lisp/xscheme.elc
I happen to like the interface offered by cmuscheme much better than that offered by xscheme,
but the one Emacs will use by default is xscheme. How can I cause Emacs to act in accordance with
my preference? I put this in my .emacs:
;; notice how the expression can be broken across two lines. Lisp
;; ignores whitespace, generally:
(autoload ’run-scheme "cmuscheme"
"Run an inferior Scheme, the way I like it." t)
The function autoload takes the name of a function (quoted with “’”, for reasons having to do
with how Lisp works) and tells Emacs that this function is defined in a certain file. The file is the
second argument, a string (without the “.el” or “.elc” extension) indicating the name of the file
to search for in the load-path.
The remaining arguments are optional, but necessary in this case: the third argument is a
documentation string for the function, so that if you call describe-function on it, you get some
8.14. Finding Out More 87
useful information. The fourth argument tells Emacs that this autoloadable function can be called
interactively (that is, by using M-x). This is very important in this case, because one should be able
to type M-x run-scheme to start a scheme process running under Emacs.
Now that run-scheme has been defined as an autoloadable function, what happens when I type
M-x run-scheme? Emacs looks at the function run-scheme, sees that it’s set to be autoloaded,
and loads the file named by the autoload (in this case, “cmuscheme”). The byte-compiled file
cmuscheme.elc exists, so Emacs will load that. That file must define the function run-scheme, or
there will be an autoload error. Luckily, it does define run-scheme, so everything goes smoothly,
and I get my preferred Scheme interface10
.
An autoload is a like a promise to Emacs that, when the time comes, it can find the specified
function in the file you tell it to look in. In return, you get some control over what gets loaded.
Also, autoloads help cut down on Emacs’s size in memory, by not loading certain features until they
are asked for. Many commands are not really defined as functions when Emacs starts up. Rather,
they are simply set to autoload from a certain file. If you never invoke the command, it never gets
loaded. This space saving is actually vital to the functioning of Emacs: if it loaded every available
file in the Lisp library, Emacs would take twenty minutes just to start up, and once it was done, it
might occupy most of the available memory on your machine. Don’t worry, you don’t have to set
all these autoloads in your .emacs; they were taken care of when Emacs was built.
8.14 Finding Out More
I have not told you everything there is to know about Emacs. In fact, I don’t think I have even told
you 1% of what there is to know about Emacs. While you know enough to get by, there are still lots
of time-saving tricks and conveniences that you ought to find out about. The best way to do this is
to wait until you find yourself needing something, and then look for a function that does it.
The importance of being comfortable with Emacs’s online help facilities cannot be emphasized
enough. For example, suppose you want to be able to insert the contents of some file into a buffer
that is already working on a different file, so that the buffer contains both of them. Well, if you
were to guess that there is a command called insert-file, you’d be right. To check your educated
guess, type C-h f. At the prompt in the minibuffer, enter the name of a function that you want
help on. Since you know that there is completion on function names, and you can guess that the
command you are looking for begins with “insert”, you type insert and hit Tab . This shows you
all the function names that begin with “insert”, and “insert-file” is one of them.
So you complete the function name and read about how it works, and then use M-x insert-file.
If you’re wondering whether it’s also bound to a key, you type C-h w insert-file Return , and
find out. The more you know about Emacs’s help facilities, the more easily you can ask Emacs
questions about itself. The ability to do so, combined with a spirit of exploration and a willingness
to learn new ways of doing things, can end up saving you a lot of keystrokes.
To order a copy of the Emacs user’s manual and/or the Emacs Lisp Programming manual, write
10By the way, cmuscheme was the interface I was talking about earlier, in the section on working with Scheme, so if
you want to use any of the stuff from that tutorial, you need to make sure that you run cmuscheme.
88 Chapter 8. Editing files with Emacs
to:
Free Software Foundation
675 Mass Ave
Cambridge, MA 02139
USA
Both of these manuals are distributed electronically with Emacs, in a form readable by using
the Info documentation reader (C-h i), but you may find it easier to deal with treeware than with
the online versions. Also, their prices are quite reasonable, and the money goes to a good cause —
quality free software! At some point, you should type C-h C-c to read the copyright conditions for
Emacs. It’s more interesting than you might think, and will help clarify the concept of free software.
If you think the term “free software” just means that the program doesn’t cost anything, please do
read that copyright as soon as you have time!
Chapter 9
I Gotta Be Me!
If God had known we’d need foresight, she would have given it to us.
9.1 bash Customization
One of the distinguishing things about the Unix philosophy is that the system’s designers did not
attempt to predict every need that users might have; instead, they tried to make it easy for each
individual user to tailor the environment to their own particular needs. This is mainly done through
configuration files. These are also known as “init files”, “rc files” (for “run control”), or even
“dot files”, because the filenames often begin with “.”. If you’ll recall, filenames that start with “.”
aren’t normally displayed by ls.
The most important configuration files are the ones used by the shell. Linux’s default shell is
bash, and that’s the shell this chapter covers. Before we go into how to customize bash, we should
know what files bash looks at.
9.1.1 Shell Startup
There are several different ways bash can run. It can run as a login shell, which is how it runs
when you first login. The login shell should be the first shell you see.
Another way bash can run is as an interactive shell. This is any shell which presents a prompt
to a human and waits for input. A login shell is also an interactive shell. A way you can get a
non-login interactive shell is, say, a shell inside xterm. Any shell that was created by some other
way besides logging in is a non-login shell.
Finally, there are non-interactive shells. These shells are used for executing a file of commands,
much like MS-DOS’s batch files—the files that end in .BAT. These shell scripts function like mini-
programs. While they are usually much slower than a regular compiled program, it is often true
that they’re easier to write.
89
90 Chapter 9. I Gotta Be Me!
Depending on the type of shell, different files will be used at shell startup:
Type of Shell Action
Interactive login The file .bash profile is read and executed
Interactive The file .bashrc is read and executed
Non-interactive The shell script is read and executed
9.1.2 Startup Files
Since most users want to have largely the same environment no matter what type of interactive
shell they wind up with, whether or not it’s a login shell, we’ll start our configuration by putting
a very simple command into our .bash profile: “source ~/.bashrc”. The source command
tells the shell to interprete the argument as a shell script. What it means for us is that everytime
.bash profile is run, .bashrc is also run.
Now, we’ll just add commands to our .bashrc. If you ever want a command to only be run
when you login, add it to your .bash profile.
9.1.3 Aliasing
What are some of the things you might want to customize? Here’s something that I think about
90% of Bash users have put in their .bashrc:
alias ll="ls -l"
That command defined a shell alias called ll that “expands” to the normal shell command
“ls -l” when invoked by the user. So, assuming that Bash has read that command in from your
.bashrc, you can just type ll to get the effect of “ls -l” in only half the keystrokes. What
happens is that when you type ll and hit Return , Bash intercepts it, because it’s watching for
aliases, replaces it with “ls -l”, and runs that instead. There is no actual program called ll on the
system, but the shell automatically translated the alias into a valid program.
Some sample aliases are in Figure 9.1.3. You could put them in your own .bashrc. One especially
interesting alias is the first one. With that alias, whenever someone types ls, they automatically
have a -F flag tacked on. (The alias doesn’t try to expand itself again.) This is a common way of
adding options that you use every time you call a program.
Notice the comments with the # character in Figure 9.1.3. Whenever a # appears, the shell
ignores the rest of the line.
You might have noticed a few odd things about them. First of all, I leave off the quotes in a few
of the aliases—like pu. Strictly speaking, quotes aren’t necessary when you only have one word on
the right of the equal sign.
It never hurts to have quotes either, so don’t let me get you into any bad habits. You should
certainly use them if you’re going to be aliasing a command with options and/or arguments:
alias rf="refrobnicate -verbose -prolix -wordy -o foo.out"