This chapter discusses different types of software licenses:
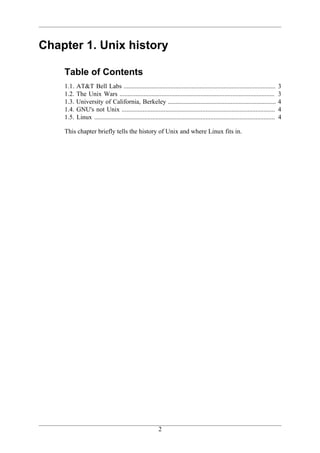
- Proprietary licenses require payment of fees and do not allow access to source code. Examples include AIX, HP-UX, and Solaris 9.
- BSD licenses are open source and allow copying and modification with few restrictions other than retaining copyright notices.
- The GNU GPL is a prominent open source license that allows free use and modification of source code but requires any derived works to also be shared under the GPL.
- Other licenses discussed include free software, open source, freeware, and various other licenses with different terms.


![man pages
5.6. whereis
The location of a manpage can be revealed with whereis.
paul@laika:~$ whereis -m whois
whois: /usr/share/man/man1/whois.1.gz
This file is directly readable by man.
paul@laika:~$ man /usr/share/man/man1/whois.1.gz
5.7. man sections
By now you will have noticed the numbers between the round brackets. man man
will explain to you that these are section numbers. Executable programs and shell
commands reside in section one.
1 Executable programs or shell commands
2 System calls (functions provided by the kernel)
3 Library calls (functions within program libraries)
4 Special files (usually found in /dev)
5 File formats and conventions eg /etc/passwd
6 Games
7 Miscellaneous (including macro packages and conventions), e.g. man(7)
8 System administration commands (usually only for root)
9 Kernel routines [Non standard]
5.8. man $section $file
Therefor, when referring to the man page of the passwd command, you will see it
written as passwd(1); when referringto the passwd file, you will see it written as
passwd(5). The screenshot explains how to open the man page in the correct section.
[paul@RHEL52 ~]$ man passwd # opens the lowest section (1)
[paul@RHEL52 ~]$ man 5 passwd # opens a page from section 5
5.9. man man
If you want to know more about man, then Read The Fantastic Manual (RTFM).
Unfortunately, manual pages do not have the answer to everything...
paul@laika:~$ man woman
No manual entry for woman
21](/p?url=https%3A%2F%2Fimage.slidesharecdn.com%2Flinuxtraining-120930200745-phpapp01%2F85%2FLinux-training-27-320.jpg&__src=https%3A%2F%2Fwww.slideshare.net%2Fslideshow%2Flinux-training%2F14531783&__type=image)


![working with files
7.7. mv
Use mv to rename a file or to move the file to another directory.
paul@laika:~/test$ touch file100
paul@laika:~/test$ ls
file100
paul@laika:~/test$ mv file100 ABC.txt
paul@laika:~/test$ ls
ABC.txt
paul@laika:~/test$
When you need to rename only one file then mv is the preferred command to use.
7.8. rename
The rename command can also be used but it has a more complex syntax to enable
renaming of many files at once. Below are two examples, the first switches all
occurrences of txt to png for all filenames ending in .txt. The second example switches
all occurrences of uppercase ABC in lowercase abc for all filenames ending in .png .
The following syntax will work on debian and ubuntu (prior to Ubuntu 7.10).
paul@laika:~/test$ ls
123.txt ABC.txt
paul@laika:~/test$ rename 's/txt/png/' *.txt
paul@laika:~/test$ ls
123.png ABC.png
paul@laika:~/test$ rename 's/ABC/abc/' *.png
paul@laika:~/test$ ls
123.png abc.png
paul@laika:~/test$
On Red Hat Enterprise Linux (and many other Linux distributions like Ubuntu 8.04),
the syntax of rename is a bit different. The first example below renames all *.conf
files replacing any occurrence of conf with bak. The second example renames all (*)
files replacing one with ONE.
[paul@RHEL4a test]$ ls
one.conf two.conf
[paul@RHEL4a test]$ rename conf bak *.conf
[paul@RHEL4a test]$ ls
one.bak two.bak
[paul@RHEL4a test]$ rename one ONE *
[paul@RHEL4a test]$ ls
ONE.bak two.bak
[paul@RHEL4a test]$
38](/p?url=https%3A%2F%2Fimage.slidesharecdn.com%2Flinuxtraining-120930200745-phpapp01%2F85%2FLinux-training-44-320.jpg&__src=https%3A%2F%2Fwww.slideshare.net%2Fslideshow%2Flinux-training%2F14531783&__type=image)


![the Linux file tree
9.1. filesystem hierarchy standard
Many Linux distributions partially follow the Filesystem Hierarchy Standard. The
FHS may help make more Unix/Linux file system trees conform better in the future.
The FHS is available online at http://www.pathname.com/fhs/ where we read: "The
filesystem hierarchy standard has been designed to be used by Unix distribution
developers, package developers, and system implementors. However, it is primarily
intended to be a reference and is not a tutorial on how to manage a Unix filesystem
or directory hierarchy."
9.2. man hier
There are some differences in the filesystems between Linux distributions. For
help about your machine, enter man hier to find information about the file system
hierarchy. This manual will explain the directory structure on your computer.
9.3. the root directory /
All Linux systems have a directory structure that starts at the root directory. The
root directory is represented by a forward slash, like this: /. Everything that exists
on your Linux system can be found below this root directory. Let's take a brief look
at the contents of the root directory.
[paul@RHELv4u3 ~]$ ls /
bin dev home media mnt proc sbin srv tftpboot usr
boot etc lib misc opt root selinux sys tmp var
50](/p?url=https%3A%2F%2Fimage.slidesharecdn.com%2Flinuxtraining-120930200745-phpapp01%2F85%2FLinux-training-56-320.jpg&__src=https%3A%2F%2Fwww.slideshare.net%2Fslideshow%2Flinux-training%2F14531783&__type=image)


![the Linux file tree
0: 13876877 IO-APIC-edge timer
1: 15 IO-APIC-edge i8042
8: 1 IO-APIC-edge rtc
9: 0 IO-APIC-level acpi
12: 67 IO-APIC-edge i8042
14: 128 IO-APIC-edge ide0
15: 124320 IO-APIC-edge ide1
169: 111993 IO-APIC-level ioc0
177: 2428 IO-APIC-level eth0
NMI: 0
LOC: 13878037
ERR: 0
MIS: 0
On a machine with two CPU's, the file looks like this.
paul@laika:~$ cat /proc/interrupts
CPU0 CPU1
0: 860013 0 IO-APIC-edge timer
1: 4533 0 IO-APIC-edge i8042
7: 0 0 IO-APIC-edge parport0
8: 6588227 0 IO-APIC-edge rtc
10: 2314 0 IO-APIC-fasteoi acpi
12: 133 0 IO-APIC-edge i8042
14: 0 0 IO-APIC-edge libata
15: 72269 0 IO-APIC-edge libata
18: 1 0 IO-APIC-fasteoi yenta
19: 115036 0 IO-APIC-fasteoi eth0
20: 126871 0 IO-APIC-fasteoi libata, ohci1394
21: 30204 0 IO-APIC-fasteoi ehci_hcd:usb1, uhci_hcd:usb2
22: 1334 0 IO-APIC-fasteoi saa7133[0], saa7133[0]
24: 234739 0 IO-APIC-fasteoi nvidia
NMI: 72 42
LOC: 860000 859994
ERR: 0
/proc/kcore
The physical memory is represented in /proc/kcore. Do not try to cat this file, instead
use a debugger. The size of /proc/kcore is the same as your physical memory, plus
four bytes.
paul@laika:~$ ls -lh /proc/kcore
-r-------- 1 root root 2.0G 2007-01-30 08:57 /proc/kcore
paul@laika:~$
/sys Linux 2.6 hot plugging
The /sys directory was created for the Linux 2.6 kernel. Since 2.6, Linux uses sysfs
to support usb and IEEE 1394 (FireWire) hot plug devices. See the manual pages
of udev(8) (the successor of devfs) and hotplug(8) for more info (or visit http://linux-
hotplug.sourceforge.net/ ).
Basically the /sys directory contains kernel information about hardware.
60](/p?url=https%3A%2F%2Fimage.slidesharecdn.com%2Flinuxtraining-120930200745-phpapp01%2F85%2FLinux-training-66-320.jpg&__src=https%3A%2F%2Fwww.slideshare.net%2Fslideshow%2Flinux-training%2F14531783&__type=image)


![the Linux file tree
9.9. /var variable data
Files that are unpredictable in size, such as log, cache and spool files, should be
located in /var.
/var/log
The /var/log directory serves as a central point to contain all log files.
[paul@RHEL4b ~]$ ls /var/log
acpid cron.2 maillog.2 quagga secure.4
amanda cron.3 maillog.3 radius spooler
anaconda.log cron.4 maillog.4 rpmpkgs spooler.1
anaconda.syslog cups mailman rpmpkgs.1 spooler.2
anaconda.xlog dmesg messages rpmpkgs.2 spooler.3
audit exim messages.1 rpmpkgs.3 spooler.4
boot.log gdm messages.2 rpmpkgs.4 squid
boot.log.1 httpd messages.3 sa uucp
boot.log.2 iiim messages.4 samba vbox
boot.log.3 iptraf mysqld.log scrollkeeper.log vmware-tools-guestd
boot.log.4 lastlog news secure wtmp
canna mail pgsql secure.1 wtmp.1
cron maillog ppp secure.2 Xorg.0.log
cron.1 maillog.1 prelink.log secure.3 Xorg.0.log.old
/var/log/messages
A typical first file to check when troubleshooting is the /var/log/messages file. By
default this file will contain information on what just happened to the system.
[root@RHEL4b ~]# tail /var/log/messages
Jul 30 05:13:56 anacron: anacron startup succeeded
Jul 30 05:13:56 atd: atd startup succeeded
Jul 30 05:13:57 messagebus: messagebus startup succeeded
Jul 30 05:13:57 cups-config-daemon: cups-config-daemon startup succeeded
Jul 30 05:13:58 haldaemon: haldaemon startup succeeded
Jul 30 05:14:00 fstab-sync[3560]: removed all generated mount points
Jul 30 05:14:01 fstab-sync[3628]: added mount point /media/cdrom for...
Jul 30 05:14:01 fstab-sync[3646]: added mount point /media/floppy for...
Jul 30 05:16:46 sshd(pam_unix)[3662]: session opened for user paul by...
Jul 30 06:06:37 su(pam_unix)[3904]: session opened for user root by paul
/var/cache
The /var/cache directory can contain cache data for several applications.
paul@ubu1010:~$ ls /var/cache/
apt dictionaries-common gdm man software-center
binfmts flashplugin-installer hald pm-utils
cups fontconfig jockey pppconfig
debconf fonts ldconfig samba
63](/p?url=https%3A%2F%2Fimage.slidesharecdn.com%2Flinuxtraining-120930200745-phpapp01%2F85%2FLinux-training-69-320.jpg&__src=https%3A%2F%2Fwww.slideshare.net%2Fslideshow%2Flinux-training%2F14531783&__type=image)


![commands and arguments
10.1. echo
This chapter frequently uses the echo command to demonstrate shell features. The
echo command is very simple: it echoes the input that it receives.
paul@laika:~$ echo Burtonville
Burtonville
paul@laika:~$ echo Smurfs are blue
Smurfs are blue
10.2. arguments
One of the primary features of a shell is to perform a command line scan. When
you enter a command at the shell's command prompt and press the enter key, then
the shell will start scanning that line, cutting it up in arguments. While scanning the
line, the shell may make many changes to the arguments you typed. This process
is called shell expansion. When the shell has finished scanning and modifying that
line, then it will be executed.
white space removal
Parts that are separated by one or more consecutive white spaces (or tabs) are
considered separate arguments, any white space is removed. The first argument is
the command to be executed, the other arguments are given to the command. The
shell effectively cuts your command into one or more arguments.
This explains why the following four different command lines are the same after shell
expansion.
[paul@RHELv4u3 ~]$ echo Hello World
Hello World
[paul@RHELv4u3 ~]$ echo Hello World
Hello World
[paul@RHELv4u3 ~]$ echo Hello World
Hello World
[paul@RHELv4u3 ~]$ echo Hello World
Hello World
The echo command will display each argument it receives from the shell. The echo
command will also add a new whitespace between the arguments it received.
single quotes
You can prevent the removal of white spaces by quoting the spaces. The contents of
the quoted string are considered as one argument. In the screenshot below the echo
receives only one argument.
[paul@RHEL4b ~]$ echo 'A line with single quotes'
A line with single quotes
71](/p?url=https%3A%2F%2Fimage.slidesharecdn.com%2Flinuxtraining-120930200745-phpapp01%2F85%2FLinux-training-77-320.jpg&__src=https%3A%2F%2Fwww.slideshare.net%2Fslideshow%2Flinux-training%2F14531783&__type=image)
![commands and arguments
[paul@RHEL4b ~]$
double quotes
You can also prevent the removal of white spaces by double quoting the spaces. Same
as above, echo only receives one argument.
[paul@RHEL4b ~]$ echo "A line with double quotes"
A line with double quotes
[paul@RHEL4b ~]$
echo and quotes
Quoted lines can include special escaped characters recognized by the echo command
(when using echo -e). The screenshot below shows how to use n for a newline and
t for a tab (usually eight white spaces).
[paul@RHEL4b ~]$ echo -e "A line with na newline"
A line with
a newline
[paul@RHEL4b ~]$ echo -e 'A line with na newline'
A line with
a newline
[paul@RHEL4b ~]$ echo -e "A line with ta tab"
A line with a tab
[paul@RHEL4b ~]$ echo -e 'A line with ta tab'
A line with a tab
[paul@RHEL4b ~]$
The echo command can generate more than white spaces, tabs and newlines. Look
in the man page for a list of options.
10.3. commands
external or builtin commands ?
Not all commands are external to the shell, some are builtin. External commands
are programs that have their own binary and reside somewhere in the file system.
Many external commands are located in /bin or /sbin. Builtin commands are an
integral part of the shell program itself.
type
To find out whether a command given to the shell will be executed as an external
command or as a builtin command, use the type command.
paul@laika:~$ type cd
72](/p?url=https%3A%2F%2Fimage.slidesharecdn.com%2Flinuxtraining-120930200745-phpapp01%2F85%2FLinux-training-78-320.jpg&__src=https%3A%2F%2Fwww.slideshare.net%2Fslideshow%2Flinux-training%2F14531783&__type=image)
![commands and arguments
cd is a shell builtin
paul@laika:~$ type cat
cat is /bin/cat
As you can see, the cd command is builtin and the cat command is external.
You can also use this command to show you whether the command is aliased or not.
paul@laika:~$ type ls
ls is aliased to `ls --color=auto'
running external commands
Some commands have both builtin and external versions. When one of these
commands is executed, the builtin version takes priority. To run the external version,
you must enter the full path to the command.
paul@laika:~$ type -a echo
echo is a shell builtin
echo is /bin/echo
paul@laika:~$ /bin/echo Running the external echo command...
Running the external echo command...
which
The which command will search for binaries in the $PATH environment variable
(variables will be explained later). In the screenshot below, it is determined that cd
is builtin, and ls, cp, rm, mv, mkdir, pwd, and which are external commands.
[root@RHEL4b ~]# which cp ls mv rm cd mkdir pwd which
/bin/cp
/bin/ls
/bin/mv
/bin/rm
/usr/bin/which: no cd in (/usr/kerberos/sbin:/usr/kerberos/bin:...
/bin/mkdir
/bin/pwd
/usr/bin/which
10.4. aliases
create an alias
The shell allows you to create aliases. Aliases are often used to create an easier to
remember name for an existing command or to easily supply parameters.
[paul@RHELv4u3 ~]$ cat count.txt
one
two
three
[paul@RHELv4u3 ~]$ alias dog=tac
[paul@RHELv4u3 ~]$ dog count.txt
73](/p?url=https%3A%2F%2Fimage.slidesharecdn.com%2Flinuxtraining-120930200745-phpapp01%2F85%2FLinux-training-79-320.jpg&__src=https%3A%2F%2Fwww.slideshare.net%2Fslideshow%2Flinux-training%2F14531783&__type=image)
![commands and arguments
three
two
one
abbreviate commands
An alias can also be useful to abbreviate an existing command.
paul@laika:~$ alias ll='ls -lh --color=auto'
paul@laika:~$ alias c='clear'
paul@laika:~$
default options
Aliases can be used to supply commands with default options. The example below
shows how to set the -i option default when typing rm.
[paul@RHELv4u3 ~]$ rm -i winter.txt
rm: remove regular file `winter.txt'? no
[paul@RHELv4u3 ~]$ rm winter.txt
[paul@RHELv4u3 ~]$ ls winter.txt
ls: winter.txt: No such file or directory
[paul@RHELv4u3 ~]$ touch winter.txt
[paul@RHELv4u3 ~]$ alias rm='rm -i'
[paul@RHELv4u3 ~]$ rm winter.txt
rm: remove regular empty file `winter.txt'? no
[paul@RHELv4u3 ~]$
Some distributions enable default aliases to protect users from accidentally erasing
files ('rm -i', 'mv -i', 'cp -i')
viewing aliases
You can provide one or more aliases as arguments to the alias command to get their
definitions. Providing no arguments gives a complete list of current aliases.
paul@laika:~$ alias c ll
alias c='clear'
alias ll='ls -lh --color=auto'
unalias
You can undo an alias with the unalias command.
[paul@RHEL4b ~]$ which rm
/bin/rm
[paul@RHEL4b ~]$ alias rm='rm -i'
[paul@RHEL4b ~]$ which rm
alias rm='rm -i'
/bin/rm
[paul@RHEL4b ~]$ unalias rm
[paul@RHEL4b ~]$ which rm
/bin/rm
74](/p?url=https%3A%2F%2Fimage.slidesharecdn.com%2Flinuxtraining-120930200745-phpapp01%2F85%2FLinux-training-80-320.jpg&__src=https%3A%2F%2Fwww.slideshare.net%2Fslideshow%2Flinux-training%2F14531783&__type=image)
![commands and arguments
[paul@RHEL4b ~]$
10.5. displaying shell expansion
You can display shell expansion with set -x, and stop displaying it with set +x. You
might want to use this further on in this course, or when in doubt about exactly what
the shell is doing with your command.
[paul@RHELv4u3 ~]$ set -x
++ echo -ne '033]0;paul@RHELv4u3:~007'
[paul@RHELv4u3 ~]$ echo $USER
+ echo paul
paul
++ echo -ne '033]0;paul@RHELv4u3:~007'
[paul@RHELv4u3 ~]$ echo $USER
+ echo '$USER'
$USER
++ echo -ne '033]0;paul@RHELv4u3:~007'
[paul@RHELv4u3 ~]$ set +x
+ set +x
[paul@RHELv4u3 ~]$ echo $USER
paul
75](/p?url=https%3A%2F%2Fimage.slidesharecdn.com%2Flinuxtraining-120930200745-phpapp01%2F85%2FLinux-training-81-320.jpg&__src=https%3A%2F%2Fwww.slideshare.net%2Fslideshow%2Flinux-training%2F14531783&__type=image)


![control operators
11.1. ; semicolon
You can put two or more commands on the same line separated by a semicolon ; .
The shell will scan the line until it reaches the semicolon. All the arguments before
this semicolon will be considered a separate command from all the arguments after
the semicolon. Both series will be executed sequentially with the shell waiting for
each command to finish before starting the next one.
[paul@RHELv4u3 ~]$ echo Hello
Hello
[paul@RHELv4u3 ~]$ echo World
World
[paul@RHELv4u3 ~]$ echo Hello ; echo World
Hello
World
[paul@RHELv4u3 ~]$
11.2. & ampersand
When a line ends with an ampersand &, the shell will not wait for the command
to finish. You will get your shell prompt back, and the command is executed in
background. You will get a message when this command has finished executing in
background.
[paul@RHELv4u3 ~]$ sleep 20 &
[1] 7925
[paul@RHELv4u3 ~]$
...wait 20 seconds...
[paul@RHELv4u3 ~]$
[1]+ Done sleep 20
The technical explanation of what happens in this case is explained in the chapter
about processes.
11.3. $? dollar question mark
The exit code of the previous command is stored in the shell variable $?. Actually $?
is a shell parameter and not a variable, since you cannot assign a value to $?.
paul@debian5:~/test$ touch file1
paul@debian5:~/test$ echo $?
0
paul@debian5:~/test$ rm file1
paul@debian5:~/test$ echo $?
0
paul@debian5:~/test$ rm file1
rm: cannot remove `file1': No such file or directory
paul@debian5:~/test$ echo $?
1
paul@debian5:~/test$
81](/p?url=https%3A%2F%2Fimage.slidesharecdn.com%2Flinuxtraining-120930200745-phpapp01%2F85%2FLinux-training-87-320.jpg&__src=https%3A%2F%2Fwww.slideshare.net%2Fslideshow%2Flinux-training%2F14531783&__type=image)
![control operators
11.4. && double ampersand
The shell will interprete && as a logical AND. When using && the second command
is executed only if the first one succeeds (returns a zero exit status).
paul@barry:~$ echo first && echo second
first
second
paul@barry:~$ zecho first && echo second
-bash: zecho: command not found
Another example of the same logical AND principle. This example starts with a
working cd followed by ls, then a non-working cd which is not followed by ls.
[paul@RHELv4u3 ~]$ cd gen && ls
file1 file3 File55 fileab FileAB fileabc
file2 File4 FileA Fileab fileab2
[paul@RHELv4u3 gen]$ cd gen && ls
-bash: cd: gen: No such file or directory
[paul@RHELv4u3 gen]$
11.5. || double vertical bar
The || represents a logical OR. The second command is executed only when the first
command fails (returns a non-zero exit status).
paul@barry:~$ echo first || echo second ; echo third
first
third
paul@barry:~$ zecho first || echo second ; echo third
-bash: zecho: command not found
second
third
paul@barry:~$
Another example of the same logical OR principle.
[paul@RHELv4u3 ~]$ cd gen || ls
[paul@RHELv4u3 gen]$ cd gen || ls
-bash: cd: gen: No such file or directory
file1 file3 File55 fileab FileAB fileabc
file2 File4 FileA Fileab fileab2
[paul@RHELv4u3 gen]$
11.6. combining && and ||
You can use this logical AND and logical OR to write an if-then-else structure on
the command line. This example uses echo to display whether the rm command was
successful.
paul@laika:~/test$ rm file1 && echo It worked! || echo It failed!
It worked!
paul@laika:~/test$ rm file1 && echo It worked! || echo It failed!
rm: cannot remove `file1': No such file or directory
82](/p?url=https%3A%2F%2Fimage.slidesharecdn.com%2Flinuxtraining-120930200745-phpapp01%2F85%2FLinux-training-88-320.jpg&__src=https%3A%2F%2Fwww.slideshare.net%2Fslideshow%2Flinux-training%2F14531783&__type=image)
![control operators
It failed!
paul@laika:~/test$
11.7. # pound sign
Everything written after a pound sign (#) is ignored by the shell. This is useful to
write a shell comment, but has no influence on the command execution or shell
expansion.
paul@debian4:~$ mkdir test # we create a directory
paul@debian4:~$ cd test #### we enter the directory
paul@debian4:~/test$ ls # is it empty ?
paul@debian4:~/test$
11.8. escaping special characters
The backslash character enables the use of control characters, but without the shell
interpreting it, this is called escaping characters.
[paul@RHELv4u3 ~]$ echo hello ; world
hello ; world
[paul@RHELv4u3 ~]$ echo hello world
hello world
[paul@RHELv4u3 ~]$ echo escaping # & " '
escaping # & " '
[paul@RHELv4u3 ~]$ echo escaping ?*"'
escaping ?*"'
end of line backslash
Lines ending in a backslash are continued on the next line. The shell does not interpret
the newline character and will wait on shell expansion and execution of the command
line until a newline without backslash is encountered.
[paul@RHEL4b ~]$ echo This command line
> is split in three
> parts
This command line is split in three parts
[paul@RHEL4b ~]$
83](/p?url=https%3A%2F%2Fimage.slidesharecdn.com%2Flinuxtraining-120930200745-phpapp01%2F85%2FLinux-training-89-320.jpg&__src=https%3A%2F%2Fwww.slideshare.net%2Fslideshow%2Flinux-training%2F14531783&__type=image)


![variables
12.1. about variables
$ dollar sign
Another important character interpreted by the shell is the dollar sign $. The shell
will look for an environment variable named like the string following the dollar
sign and replace it with the value of the variable (or with nothing if the variable does
not exist).
These are some examples using $HOSTNAME, $USER, $UID, $SHELL, and
$HOME.
[paul@RHELv4u3 ~]$ echo This is the $SHELL shell
This is the /bin/bash shell
[paul@RHELv4u3 ~]$ echo This is $SHELL on computer $HOSTNAME
This is /bin/bash on computer RHELv4u3.localdomain
[paul@RHELv4u3 ~]$ echo The userid of $USER is $UID
The userid of paul is 500
[paul@RHELv4u3 ~]$ echo My homedir is $HOME
My homedir is /home/paul
case sensitive
This example shows that shell variables are case sensitive!
[paul@RHELv4u3 ~]$ echo Hello $USER
Hello paul
[paul@RHELv4u3 ~]$ echo Hello $user
Hello
$PS1
The $PS1 variable determines your shell prompt. You can use backslash escaped
special characters like u for the username or w for the working directory. The bash
manual has a complete reference.
In this example we change the value of $PS1 a couple of times.
paul@deb503:~$ PS1=prompt
prompt
promptPS1='prompt '
prompt
prompt PS1='> '
>
> PS1='u@h$ '
paul@deb503$
paul@deb503$ PS1='u@h:W$'
paul@deb503:~$
87](/p?url=https%3A%2F%2Fimage.slidesharecdn.com%2Flinuxtraining-120930200745-phpapp01%2F85%2FLinux-training-93-320.jpg&__src=https%3A%2F%2Fwww.slideshare.net%2Fslideshow%2Flinux-training%2F14531783&__type=image)
![variables
$PATH
The $PATH variable is determines where the shell is looking for commands to
execute (unless the command is builtin or aliased). This variable contains a list of
directories, separated by colons.
[[paul@RHEL4b ~]$ echo $PATH
/usr/kerberos/bin:/usr/local/bin:/bin:/usr/bin:
The shell will not look in the current directory for commands to execute! (Looking
for executables in the current directory provided an easy way to hack PC-DOS
computers). If you want the shell to look in the current directory, then add a . at the
end of your $PATH.
[paul@RHEL4b ~]$ PATH=$PATH:.
[paul@RHEL4b ~]$ echo $PATH
/usr/kerberos/bin:/usr/local/bin:/bin:/usr/bin:.
[paul@RHEL4b ~]$
Your path might be different when using su instead of su - because the latter will take
on the environment of the target user. The root user typically has /sbin directories
added to the $PATH variable.
[paul@RHEL3 ~]$ su
Password:
[root@RHEL3 paul]# echo $PATH
/usr/local/bin:/bin:/usr/bin:/usr/X11R6/bin
[root@RHEL3 paul]# exit
[paul@RHEL3 ~]$ su -
Password:
[root@RHEL3 ~]# echo $PATH
/usr/local/sbin:/usr/local/bin:/sbin:/bin:/usr/sbin:/usr/bin:
[root@RHEL3 ~]#
creating variables
This example creates the variable $MyVar and sets its value. It then uses echo to
verify the value.
[paul@RHELv4u3 gen]$ MyVar=555
[paul@RHELv4u3 gen]$ echo $MyVar
555
[paul@RHELv4u3 gen]$
12.2. quotes
Notice that double quotes still allow the parsing of variables, whereas single quotes
prevent this.
[paul@RHELv4u3 ~]$ MyVar=555
[paul@RHELv4u3 ~]$ echo $MyVar
555
[paul@RHELv4u3 ~]$ echo "$MyVar"
555
88](/p?url=https%3A%2F%2Fimage.slidesharecdn.com%2Flinuxtraining-120930200745-phpapp01%2F85%2FLinux-training-94-320.jpg&__src=https%3A%2F%2Fwww.slideshare.net%2Fslideshow%2Flinux-training%2F14531783&__type=image)
![variables
[paul@RHELv4u3 ~]$ echo '$MyVar'
$MyVar
The bash shell will replace variables with their value in double quoted lines, but not
in single quoted lines.
paul@laika:~$ city=Burtonville
paul@laika:~$ echo "We are in $city today."
We are in Burtonville today.
paul@laika:~$ echo 'We are in $city today.'
We are in $city today.
12.3. set
You can use the set command to display a list of environment variables. On Ubuntu
and Debian systems, the set command will also list shell functions after the shell
variables. Use set | more to see the variables then.
12.4. unset
Use the unset command to remove a variable from your shell environment.
[paul@RHEL4b ~]$ MyVar=8472
[paul@RHEL4b ~]$ echo $MyVar
8472
[paul@RHEL4b ~]$ unset MyVar
[paul@RHEL4b ~]$ echo $MyVar
[paul@RHEL4b ~]$
12.5. env
The env command without options will display a list of exported variables. The
difference with set with options is that set lists all variables, inlcuding those not
exported to child shells.
But env can also be used to start a clean shell (a shell without any inherited
environment). The env -i command clears the environment for the subshell.
Notice in this screenshot that bash will set the $SHELL variable on startup.
[paul@RHEL4b ~]$ bash -c 'echo $SHELL $HOME $USER'
/bin/bash /home/paul paul
[paul@RHEL4b ~]$ env -i bash -c 'echo $SHELL $HOME $USER'
/bin/bash
[paul@RHEL4b ~]$
You can use the env command to set the $LANG, or any other, variable for just
one instance of bash with one command. The example below uses this to show the
influence of the $LANG variable on file globbing (see the chapter on file globbing).
[paul@RHEL4b test]$ env LANG=C bash -c 'ls File[a-z]'
89](/p?url=https%3A%2F%2Fimage.slidesharecdn.com%2Flinuxtraining-120930200745-phpapp01%2F85%2FLinux-training-95-320.jpg&__src=https%3A%2F%2Fwww.slideshare.net%2Fslideshow%2Flinux-training%2F14531783&__type=image)
![variables
Filea Fileb
[paul@RHEL4b test]$ env LANG=en_US.UTF-8 bash -c 'ls File[a-z]'
Filea FileA Fileb FileB
[paul@RHEL4b test]$
12.6. export
You can export shell variables to other shells with the export command. This will
export the variable to child shells.
[paul@RHEL4b ~]$ var3=three
[paul@RHEL4b ~]$ var4=four
[paul@RHEL4b ~]$ export var4
[paul@RHEL4b ~]$ echo $var3 $var4
three four
[paul@RHEL4b ~]$ bash
[paul@RHEL4b ~]$ echo $var3 $var4
four
But it will not export to the parent shell (previous screenshot continued).
[paul@RHEL4b ~]$ export var5=five
[paul@RHEL4b ~]$ echo $var3 $var4 $var5
four five
[paul@RHEL4b ~]$ exit
exit
[paul@RHEL4b ~]$ echo $var3 $var4 $var5
three four
[paul@RHEL4b ~]$
12.7. delineate variables
Until now, we have seen that bash interpretes a variable starting from a dollar sign,
continuing until the first occurrence of a non-alphanumeric character that is not an
underscore. In some situations, this can be a problem. This issue can be resolved with
curly braces like in this example.
[paul@RHEL4b ~]$ prefix=Super
[paul@RHEL4b ~]$ echo Hello $prefixman and $prefixgirl
Hello and
[paul@RHEL4b ~]$ echo Hello ${prefix}man and ${prefix}girl
Hello Superman and Supergirl
[paul@RHEL4b ~]$
12.8. unbound variables
The example below tries to display the value of the $MyVar variable, but it fails
because the variable does not exist. By default the shell will display nothing when a
variable is unbound (does not exist).
[paul@RHELv4u3 gen]$ echo $MyVar
[paul@RHELv4u3 gen]$
90](/p?url=https%3A%2F%2Fimage.slidesharecdn.com%2Flinuxtraining-120930200745-phpapp01%2F85%2FLinux-training-96-320.jpg&__src=https%3A%2F%2Fwww.slideshare.net%2Fslideshow%2Flinux-training%2F14531783&__type=image)
![variables
There is, however, the nounset shell option that you can use to generate an error
when a variable does not exist.
paul@laika:~$ set -u
paul@laika:~$ echo $Myvar
bash: Myvar: unbound variable
paul@laika:~$ set +u
paul@laika:~$ echo $Myvar
paul@laika:~$
In the bash shell set -u is identical to set -o nounset and likewise set +u is identical
to set +o nounset.
12.9. shell options
Both set and unset are builtin shell commands. They can be used to set options of
the bash shell itself. The next example will clarify this. By default, the shell will treat
unset variables as a variable having no value. By setting the -u option, the shell will
treat any reference to unset variables as an error. See the man page of bash for more
information.
[paul@RHEL4b ~]$ echo $var123
[paul@RHEL4b ~]$ set -u
[paul@RHEL4b ~]$ echo $var123
-bash: var123: unbound variable
[paul@RHEL4b ~]$ set +u
[paul@RHEL4b ~]$ echo $var123
[paul@RHEL4b ~]$
To list all the set options for your shell, use echo $-. The noclobber (or -C) option
will be explained later in this book (in the I/O redirection chapter).
[paul@RHEL4b ~]$ echo $-
himBH
[paul@RHEL4b ~]$ set -C ; set -u
[paul@RHEL4b ~]$ echo $-
himuBCH
[paul@RHEL4b ~]$ set +C ; set +u
[paul@RHEL4b ~]$ echo $-
himBH
[paul@RHEL4b ~]$
When typing set without options, you get a list of all variables without function when
the shell is on posix mode. You can set bash in posix mode typing set -o posix.
12.10. shell embedding
Shells can be embedded on the command line, or in other words, the command line
scan can spawn new processes containing a fork of the current shell. You can use
variables to prove that new shells are created. In the screenshot below, the variable
$var1 only exists in the (temporary) sub shell.
91](/p?url=https%3A%2F%2Fimage.slidesharecdn.com%2Flinuxtraining-120930200745-phpapp01%2F85%2FLinux-training-97-320.jpg&__src=https%3A%2F%2Fwww.slideshare.net%2Fslideshow%2Flinux-training%2F14531783&__type=image)
![variables
[paul@RHELv4u3 gen]$ echo $var1
[paul@RHELv4u3 gen]$ echo $(var1=5;echo $var1)
5
[paul@RHELv4u3 gen]$ echo $var1
[paul@RHELv4u3 gen]$
You can embed a shell in an embedded shell, this is called nested embedding of
shells.
This screenshot shows an embedded shell inside an embedded shell.
paul@deb503:~$ A=shell
paul@deb503:~$ echo $C$B$A $(B=sub;echo $C$B$A; echo $(A=sub;echo $C$B$A))
shell subshell subsub
back ticks
Single embedding can be useful to avoid changing your current directory. The
screenshot below uses back ticks instead of dollar-bracket to embed.
[paul@RHELv4u3 ~]$ echo `cd /etc; ls -d * | grep pass`
passwd passwd- passwd.OLD
[paul@RHELv4u3 ~]$
You can only use the $() notation to nest embedded shells, backticks cannot do this.
back ticks or single quotes
Placing the embedding between backticks uses one character less than the dollar
and parenthesis combo. Be careful however, backticks are often confused with single
quotes. The technical difference between ' and ` is significant!
[paul@RHELv4u3 gen]$ echo `var1=5;echo $var1`
5
[paul@RHELv4u3 gen]$ echo 'var1=5;echo $var1'
var1=5;echo $var1
[paul@RHELv4u3 gen]$
92](/p?url=https%3A%2F%2Fimage.slidesharecdn.com%2Flinuxtraining-120930200745-phpapp01%2F85%2FLinux-training-98-320.jpg&__src=https%3A%2F%2Fwww.slideshare.net%2Fslideshow%2Flinux-training%2F14531783&__type=image)
![variables
12.11. practice: shell variables
1. Use echo to display Hello followed by your username. (use a bash variable!)
2. Create a variable answer with a value of 42.
3. Copy the value of $LANG to $MyLANG.
4. List all current shell variables.
5. List all exported shell variables.
6. Do the env and set commands display your variable ?
6. Destroy your answer variable.
7. Find the list of shell options in the man page of bash. What is the difference
between set -u and set -o nounset?
8. Create two variables, and export one of them.
9. Display the exported variable in an interactive child shell.
10. Create a variable, give it the value 'Dumb', create another variable with value 'do'.
Use echo and the two variables to echo Dumbledore.
11. Activate nounset in your shell. Test that it shows an error message when using
non-existing variables.
12. Deactivate nounset.
13. Find the list of backslash escaped characters in the manual of bash. Add the time
to your PS1 prompt.
14. Execute cd /var and ls in an embedded shell.
15. Create the variable embvar in an embedded shell and echo it. Does the variable
exist in your current shell now ?
16. Explain what "set -x" does. Can this be useful ?
(optional)17. Given the following screenshot, add exactly four characters to that
command line so that the total output is FirstMiddleLast.
[paul@RHEL4b ~]$ echo First; echo Middle; echo Last
18. Display a long listing (ls -l) of the passwd command using the which command
inside back ticks.
93](/p?url=https%3A%2F%2Fimage.slidesharecdn.com%2Flinuxtraining-120930200745-phpapp01%2F85%2FLinux-training-99-320.jpg&__src=https%3A%2F%2Fwww.slideshare.net%2Fslideshow%2Flinux-training%2F14531783&__type=image)