Rhodesian Ridgeback Crochet Pattern

0% found this document useful (0 votes)
364 views6 pages
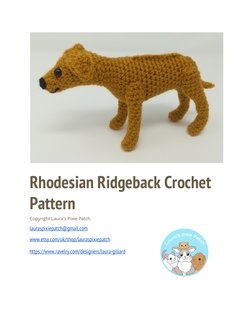
This document provides a crochet pattern for making a Rhodesian Ridgeback dog toy. The pattern includes instructions for making the head, body, legs, ears, tail and ridge along the back in s…
  • Rhodesian Ridgeback Crochet Pattern - Cover
  • Abbreviations
  • Head and Body
  • Overview
  • Ears
  • Front Legs
  • Back Legs
  • Face
  • Tail
  • Ridgeback
  • Copyright Notice

Rhodesian Ridgeback Crochet

Pattern
Copyright Laura’s Pixie Patch

lauraspixiepatch@[Link]
[Link]/uk/shop/lauraspixiepatch

[Link]
© Laura’s Pixie Patch 1

Overview
This is a pattern for a Rhodesian ridgeback, written using US crochet terminology. It is of
intermediate skill level as though there are no complicated stitches a beginner would find
parts of this pattern fiddly, especially the legs. It is assumed you have made some
amigurumi before. Apart from the ears, the pattern is worked as a continuous spiral. You
can use any yarn type you like though the sample was made using about 20g of Stylecraft
SPecial DK yarn and a 3.25mm hook. I also used 7.5mm safety eyes. The example measures
about 15cm long excluding the tail and 10cm tall and the shoulder.

Abbreviations
● Sc (single crochet)
● Dec (decrease. For best results use the invisible decrease. For this, put the front
loops only of the next two stitches on the hook, yarn over, pull through these two
loops, yarn over and pull through all remaining loops.)
● Hdc (half double crochet)
● Inc (increase by making two sc in the next stitch)
● Sl st (slip stitch)
● M.r. (magic ring)

Head and Body


Stuff as you go
Round 1: ​make 6sc in m.r. (6 stitches)
Round 2: ​(inc, sc) three times (9 stitches)
Rounds 3-5: s​ c around (9 stitches per round)
Round 6: ​sc, inc in each of the next three stitches, 5sc (12 stitches)
Round 7: ​sc, (inc,sc) three times, 5sc (15 stitches)
Round 8: ​sc, (2sc, inc) three times, 5sc (18 stitches)
Round 9: ​16sc, inc, sc (19 stitches)
Round 10: ​17sc, inc, sc (20 stitches)
Round 11: ​sc, dec, 9sc, dec, 3sc, inc, 2sc (19 stitches)
Insert safety eyes now if using. Mine are between rounds 6 and 7, level with the first and third
increases of round 7.
Round 12: ​16sc, inc, 2sc (20 stitches)
Round 13: ​3sc, dec, 3sc, dec, 6sc, inc, 3sc (19 stitches)
Round 14: ​3sc, dec, sc, dec, 7sc, inc, 3sc (18 stitches)
© Laura’s Pixie Patch 2
Round 15: ​2sc, dec, sc, dec, 5sc, inc, sc, inc, 3sc (18 stitches)
Round 16: ​sc, dec, sc, dec, 4sc, inc, sc, inc, sc, inc, 3sc (19 stitches)
Round 17: ​2sc, dec, 6sc, inc, sc, inc, sc, inc, 4sc (21 stitches)
Round 18: ​2sc, dec, 7sc, inc, sc, inc, sc, inc, 5sc (23 stitches)
Rounds 19: 1
​ 2sc, inc, sc, inc, sc, inc, 6sc (26 stitches)
Round 20: ​14sc, inc, 3sc, inc, 7sc (28 stitches)
Rounds 21-25: ​sc around (28 stitches)
Round 26: ​16sc, dec, 3sc, dec, 5sc (26 stitches)
Round 27: ​15sc, dec, 3sc, dec, 4sc (24 stitches)
Round 28: ​sc around (24 stitches)
Round 29: ​15sc, dec, 3sc, dec, 2sc (22 stitches)
Round 30: ​sc around (22 stitches)
Round 31: ​15sc, dec, 3sc, dec (20 stitches)
Rounds 32-37: ​sc around (20 stitches per
round)
Round 38: ​(dec, 3sc) four times (16
stitches)
Round 39: ​(sc, dec, sc) four times (12
stitches)
Round 40: ​dec six times (6 stitches)
Fasten off leaving long yarn tail. Draw tail
through last six stitches, pull tight and
fasten off. Weave in end.

Ears (make 2)
Chain 5, sc in second chain from hook, hdc in each of next three chain, chain 2, sc in back
bump of second chain from hook, hdc in same chain as previous hdc. Along the back of the
starting chain make 2hdc and sc in last chain. Fasten off leaving long yarn end. Sew ears to
head with front edge level with round 9 of the head.

Front Legs (make 2)


Stuff as you go. The legs will need to be stuffed fairly firmly up to row 14 order for your dog to
stand. Rounds 15-18 should be stuffed more lightly.
Round 1: ​make 6sc in m.r. (6 stitches)
© Laura’s Pixie Patch 3
Round 2: ​3sc, inc in each of the next three stitches (9 stitches)
Round 3: ​3sc, dec three times (6 stitches)
Rounds 4-6: s​ c around (6 stitches per round)
Round 7: ​sc, inc, 2sc, dec (6 stitches)
Rounds 8-14: s​ c around (6 stitches per round)
Round 15: ​sc, inc, 2sc, inc, sc (8 stitches)
Rounds 16-17: ​sc around (8 stitches)
Round 18: ​(2sc, dec) twice (6 stitches)
Slip stitch in next stitch, fasten off, leaving long yarn tail for sewing. Sew front legs to body with
the front edge level with round 21 on the body and the open end eight stitches up from the
centre bottom of round 21.

Back Legs (make 2)


Round 1: ​make 6sc in m.r. (6 stitches)
Round 2: ​3sc, inc in each of the next three stitches (9 stitches)
Round 3: ​3sc, dec three times (6 stitches)
Round 4: ​sc, inc, 2sc, dec (6 stitches)
Rounds 5-7: s​ c around (6 stitches per round)
© Laura’s Pixie Patch 4
Round 8: ​dec, sc, inc, 2sc (6 stitches)
Round 9: ​repeat round 8 (6 stitches)
Rounds 10-13: ​sc around (6 stitches
per round)
Round 14: ​5sc, inc (7 stitches)
Round 15: ​6sc, inc (8 stitches)
Round 16: ​7sc, inc (9 stitches)
Round 17: ​7sc, inc, sc (10 stitches)
Rounds 18-19: ​sc around (10 stitches
per round)
Round 20: ​3sc, inc, 4sc, dec (10
stitches)
Rounds 21-22: ​sc around (10 stitches
per round)
Round 23: ​(dec, 3sc) twice (8 stitches)
Slip stitch in next stitch, fasten off leaving
long yarn tail. Use yarn tail to sew the
legs to the body, with the back edge level
with round 38 on the body. Be careful to
ensure the legs are correctly angled
when sewing, with the open edge about
four stitches down from the centre top of the body.

Tail
Row 1: C​ hain 14. Starting in second
chain from hook, slip stitch in each
chain (13 stitches)
Row 2: C ​ hain 1, turn, slip stitch in each
stitch along through front loops only (13
stitches)
Row 3: D​ o not chain, turn, slip stitch
along through both back loop of the slip
stitches and the back of the starting
chain. (13 stitches)
Fasten off leaving a long yarn tail for
sewing. Sew tail to body.
© Laura’s Pixie Patch 5

Face
Embroider nose and mouth using long stitches

Ridgeback
The ridge along the back is crocheted directly on to the body between the shoulders and
the hips. Starting just past the shoulders, join the yarn to the centre of the back and then sc
along to the hips keeping the line straight as shown in the photo. Slip stitch and fasten off.
Weave in end.

Copyright Notice
Congratulations on finishing your rhodesian ridgeback. You are welcome to give away or
sell any rhodesian ridgebacks made from my pattern, though please credit me, Laura
Gillard or Laura’s PIxie Patch as the designer and a link to my Ravelry or Etsy stores would
be appreciated. You may not copy or share my pattern or use my photos as your own.

Common questions

Powered by AI

Continuity in the construction of the Rhodesian Ridgeback body is maintained through the use of a continuous spiral method for most parts, which avoids distinct rows and creates a seamless look. This method ensures a more polished and professional finish, which is important for achieving the desired aesthetic results in the final product .

The face of the Rhodesian Ridgeback is completed by embroidering the nose and mouth using long stitches . This technique is important for achieving the desired aesthetic because it allows for precise and defined features, contributing to the realism and accuracy of the amigurumi design.

The pattern allows for flexibility by suggesting any yarn type can be used, though the sample was made with a specific yarn and hook size. This indicates an openness to user customization, accommodating different preferences in texture, color, and available materials, which enhances accessibility and allows for personalization and creativity in the crafting process .

The ridge characteristic of a Rhodesian Ridgeback is incorporated by crocheting directly onto the body between the shoulders and hips, ensuring it aligns accurately with the physical attributes of the breed. This approach suggests that the pattern prioritizes accurate representation and authenticity in depicting distinct breed features, thereby enhancing realism and appeal to enthusiasts of the breed .

The legs of the Rhodesian Ridgeback need to be stuffed firmly up to row 14 to ensure the dog can stand properly . This is crucial because insufficient stuffing could result in the legs being too weak to support the weight of the body, affecting the overall stability and presentation of the amigurumi.

Working in a spiral is significant because it eliminates the unsightly seam line that can occur with joined rounds, providing a more continuous and organic structure. This technique benefits the creation of the Rhodesian Ridgeback amigurumi by giving it a smoother, more professional appearance, crucial for realism and visual appeal in amigurumi projects .

The construction of the ears involves creating a chain and then working stitches along the chain and back into the bumps, in contrast to the continuous spiral method used for most of the design . This difference in construction requires additional skills such as working in chains and understanding turning stitches, which could add to pattern complexity as it demands different handling compared to the rest of the piece.

The front legs are sewn to the body with the front edge level with round 21, while the back legs are attached at round 38, ensuring the correct anatomical positioning. Additionally, the pattern for each leg type involves different stitch increments and number of rounds, reflecting different shaping needs. These differences affect the overall construction process by requiring careful attention to positioning and shaping to achieve correct proportions and stability in the finished design .

The use of safety eyes in the Rhodesian Ridgeback pattern suggests a design intention focused on both aesthetics and safety. Safety eyes are often preferred in amigurumi projects because they are less likely to detach and pose a choking hazard compared to button eyes. This consideration reflects a focus on durability and child-friendly features, emphasizing user safety and long-term use .

The Rhodesian Ridgeback crochet pattern is classified as intermediate skill level because, although it does not involve complicated stitches, beginners may find parts of the pattern fiddly, particularly the legs. Additionally, it assumes that you have some experience with making amigurumi, which is a factor in determining the skill level required .


Rhodesian Ridgeback Crochet 
Pattern 
Copyright Laura’s Pixie Patch 
lauraspixiepatch@gmail.com (mailto:lauraspixiepatc
© Laura’s Pixie Patch  1 
Overview 
This is a pattern for a Rhodesian ridgeback, written using US crochet terminology. It is
© Laura’s Pixie Patch  2 
Round 15: ​2sc, dec, sc, dec, 5sc, inc, sc, inc, 3sc (18 stitches) 
Round 16: ​sc, dec, sc, dec, 4s
© Laura’s Pixie Patch  3 
Round 2: ​3sc, inc in each of the next three stitches (9 stitches) 
Round 3: ​3sc, dec three times
© Laura’s Pixie Patch  4 
Round 8: ​dec, sc, inc, 2sc (6 stitches) 
Round 9: ​repeat round 8 (6 stitches) 
Rounds 10-13: ​sc
© Laura’s Pixie Patch  5 
Face 
Embroider nose and mouth using long stitches 
Ridgeback 
The ridge along the back is crochete

You might also like